My YouTube Setup and Workflow
Table of Contents
First things first, Kindly subscribe to my channel.
It's been three-plus years since I published the first YouTube video, and here are my experiences recording the first screencast. Things have changed a lot since then, so I thought of putting this post together on my current setup.
In this post, I will walk through my current YouTube setup, the equipment, software, and the recording process.

Equipment Setup
Equipment does play an essential part in the quality of the video. However, that is not the only thing. Don't wait for the best gear to start creating. That is just another way to procrastinate. Add more stuff as you go along.
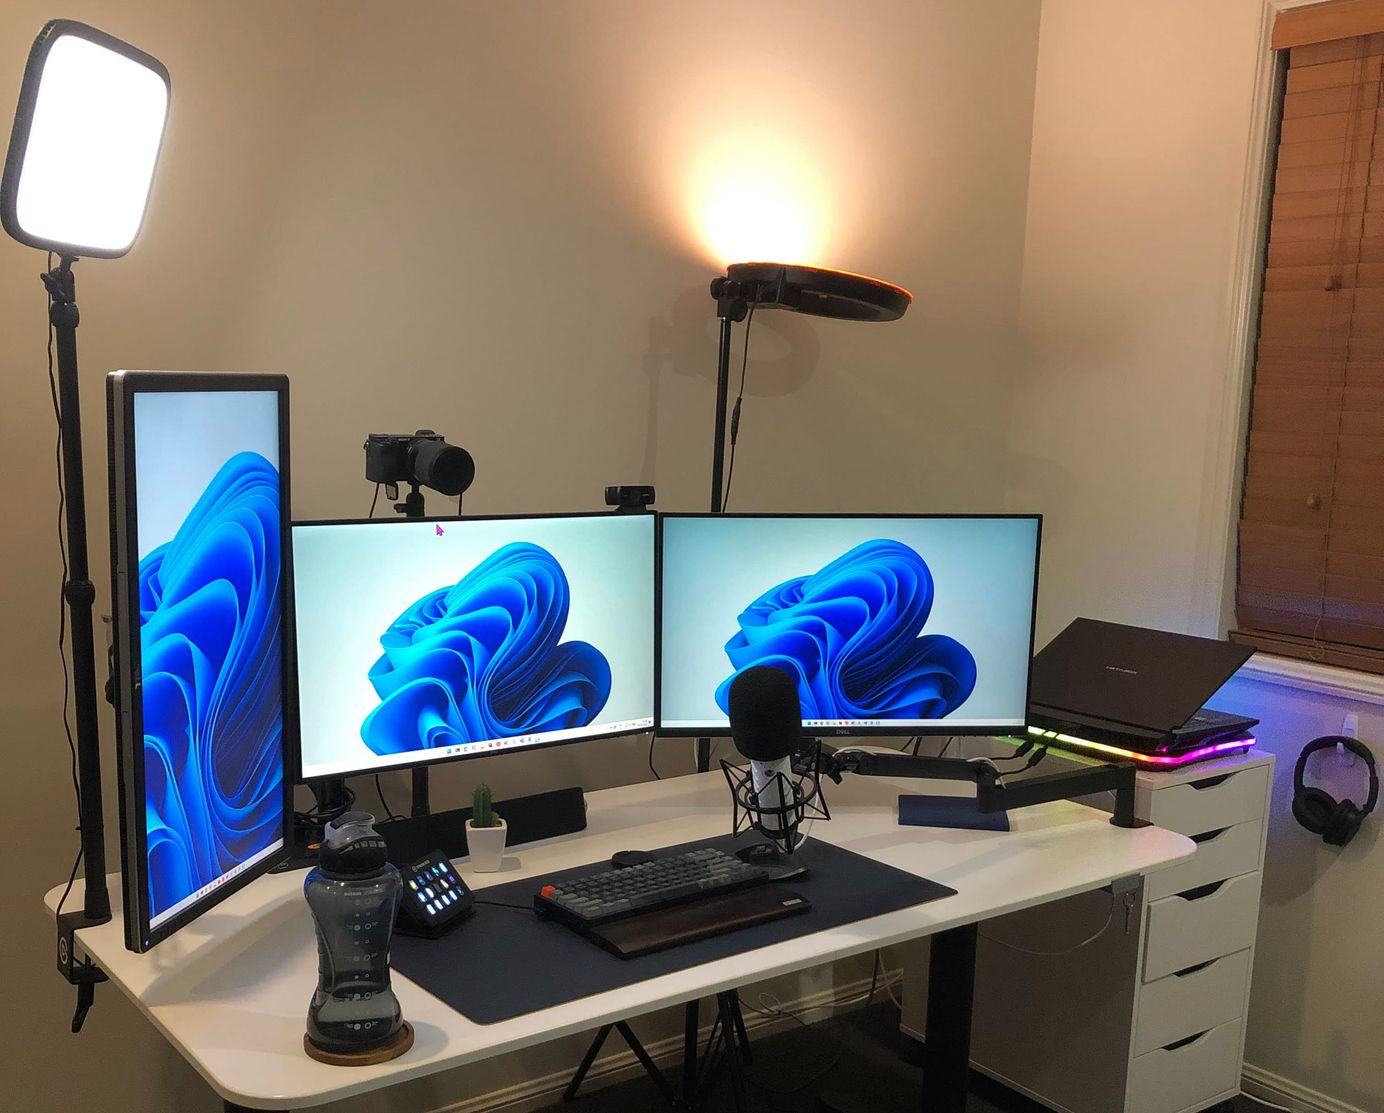
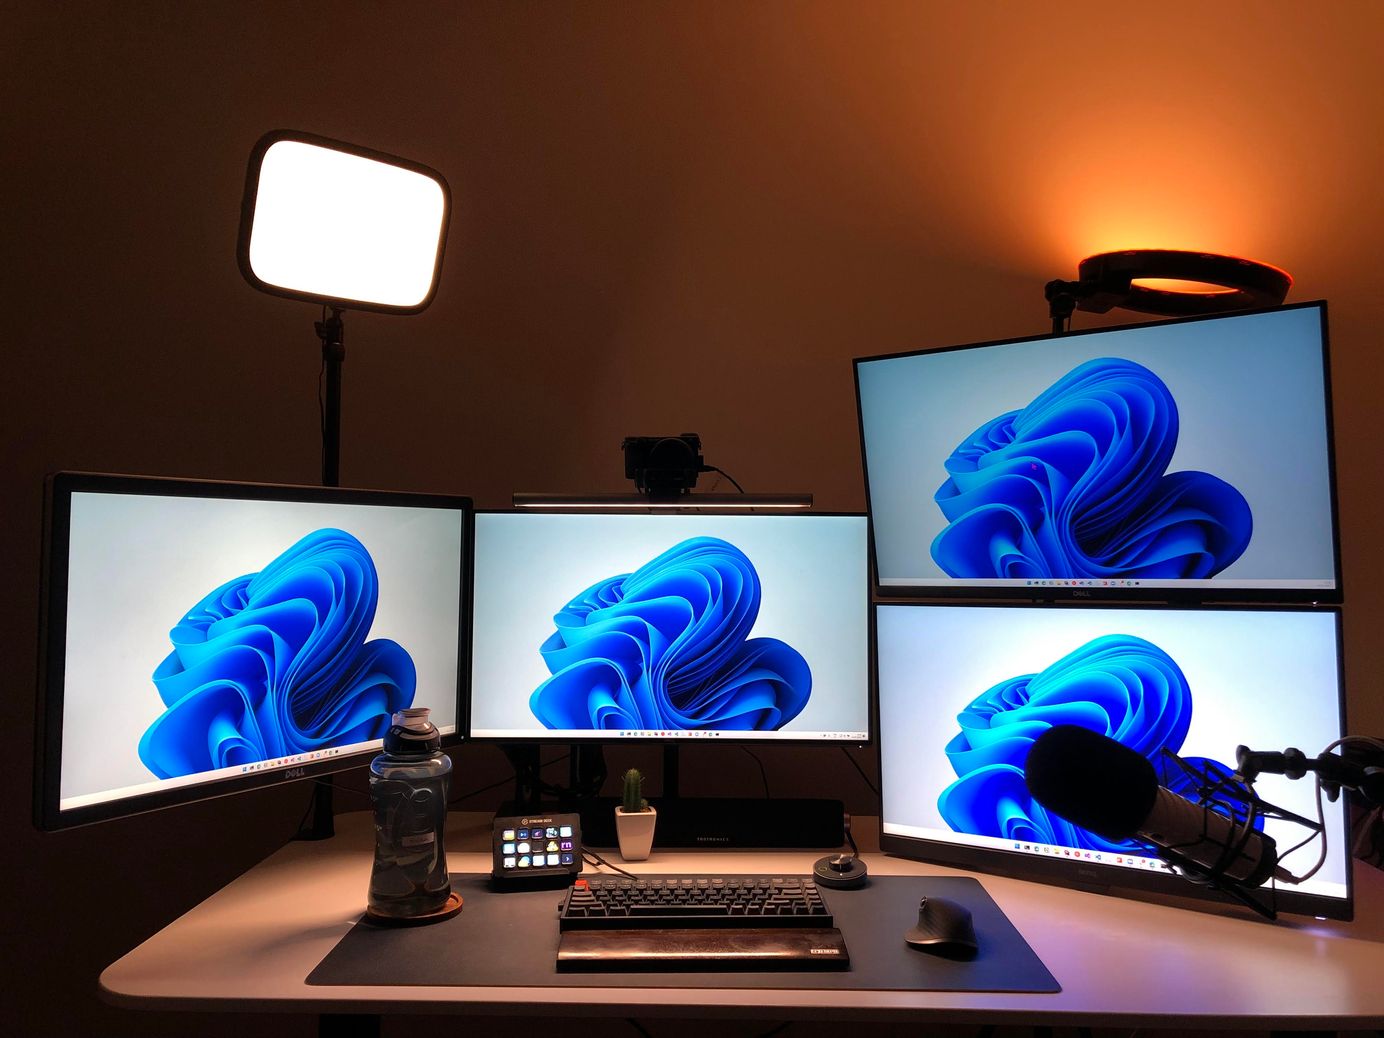
That said, here is what my recording gear looks like now.
Audio
Get a decent mic.
It is the one piece of advice that you see and hear when looking out to start recording videos or screencasts. Even though I was not sure of being it in for the long term, I got one of the best microphones at the time. It was costly, but worth it.
The Rode Podcaster is a dynamic USB mic and is a popular choice amongst many people out there. It's pricey (depends on your budget though) but delivers excellent value. It cuts off most of the room noise and takes in only your voice. You need to get close to the mic, so a boom arm helps.
One other cheaper and popular option that came up when researching for microphones is the Blue Yeti. Check it out if you don't want to spend a lot.
Video
- Sony Alpha α6000 with default 16-50mm Power Zoom Lens
- Camlink 4k
- Dummy Battery
- Micro HDMI to HDMI Cable (for the camera to Elgato)
Most of my videos are screencasts. It means the main content is the computer screen. When I started out, I recorded only my screen and audio. After a couple of videos, I wanted a video of myself as a [pip video] - where I appear in a small box to the bottom.
I started with a Logitech c922 HD camera but soon moved on to a DSLR setup inspired by Hanselman. I use a Sony Alpha a6000, with Elgato CamLink to live stream video from DSLR to the computer. With the dummy battery, the camera never runs out of battery, and it is one less thing to worry about when recording. I mount the camera on the stand that came along with my lights. I am looking at options to move this to a separate mount some time - the Elgato Multi Mount along with the Flex Arm Kit looks excellent.
Lights
Lighting is crucial when shooting yourself. I record in our spare bedroom, which, unfortunately, does not get any sunlight. Even if did, it would not be of much good, as I do all my recording early morning. I got myself a 14" ring light by Neewer. Currently, I have it behind my monitor, and it does an excellent job lighting up my face. But I am looking at ways to improve the framing and the light setup.
Software Tools
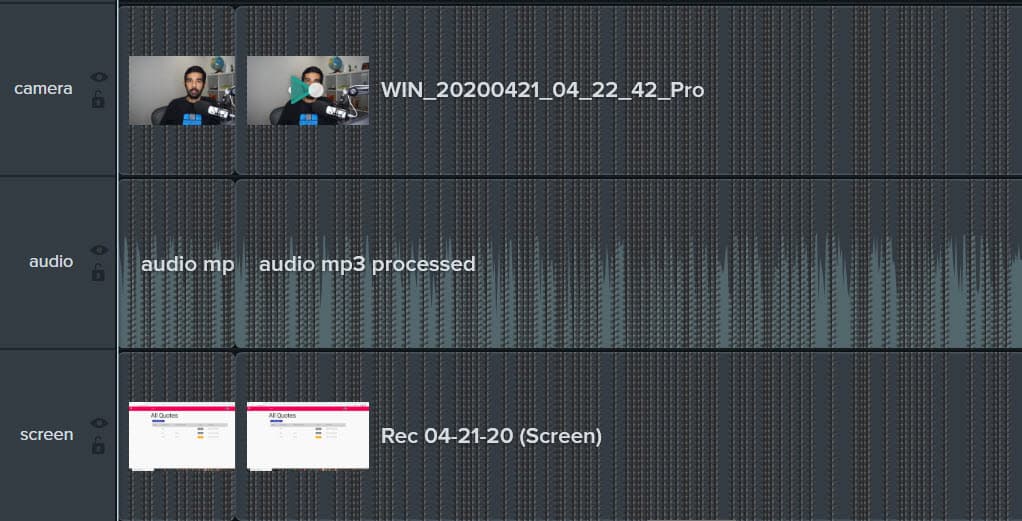
Windows is my primary work machine and is where I record my videos. So most of the software is specific to it. I use Camtasia, for recording the screen, Audacity for the sound and the default Camera App in Windows for the video from the DSLR.
Before recording I switch my primary 4k monitor to 1980px x 1080px(Full HD) resolution. It is important to record, edit, and publish in the same size settings. All three software record the audio. When editing, it makes it easy to align the videos together.
Record, Edit and Publish in the same size
Camlink used to crash/freeze randomly during recording. This problem resolved after connecting Camlink directly to my laptop instead of the dock station. Reddit says it's most likely Camlink overloading the USB link.
PRO TIP: Snap you fingers, like a clapperboard. The sharp spike in the audio waveform helps to align.
I process the audio in Audacity - mostly sticking to Normalize, Amplify, and Noise Reduction. For the past couple of videos, I have been using Auphonic, an automatic audio post production web service. I am currently on the 2 hours per month trial with Auphonic.
Most of the editing happens in Camtasia, where I import the audio, video, and the screen recording into the same project. Layer them up, depending on how you want it in the final video. I have the camera video on top and the screen below it. The audio position does not matter. Once all the different layers are aligned, I separate the audio and video for the camera and screen recordings and delete them.
I upgraded to Camtasia 2019 from Camtasia 8 recently and been liking the new interface and experience. I love the overall UI and the layout better; the default library assets are way better, better keyboard shortcuts support, and the Alt + drag to extend a frame is a real bonus. Editing takes a significant portion of my overall workflow. I am trying to bring it down and optimize it.
YouTube Thumbnails
I use Canva for making thumbnails for YouTube. Canva has an inbuilt template for YouTube thumbnails and makes it easy. For stock photos for the thumbnail, I mostly use Pixabay and UnSplash. I am on the free version of all the above software. I usually put the name and details of the photos in the description for the video.
Planning and Recording Workflow
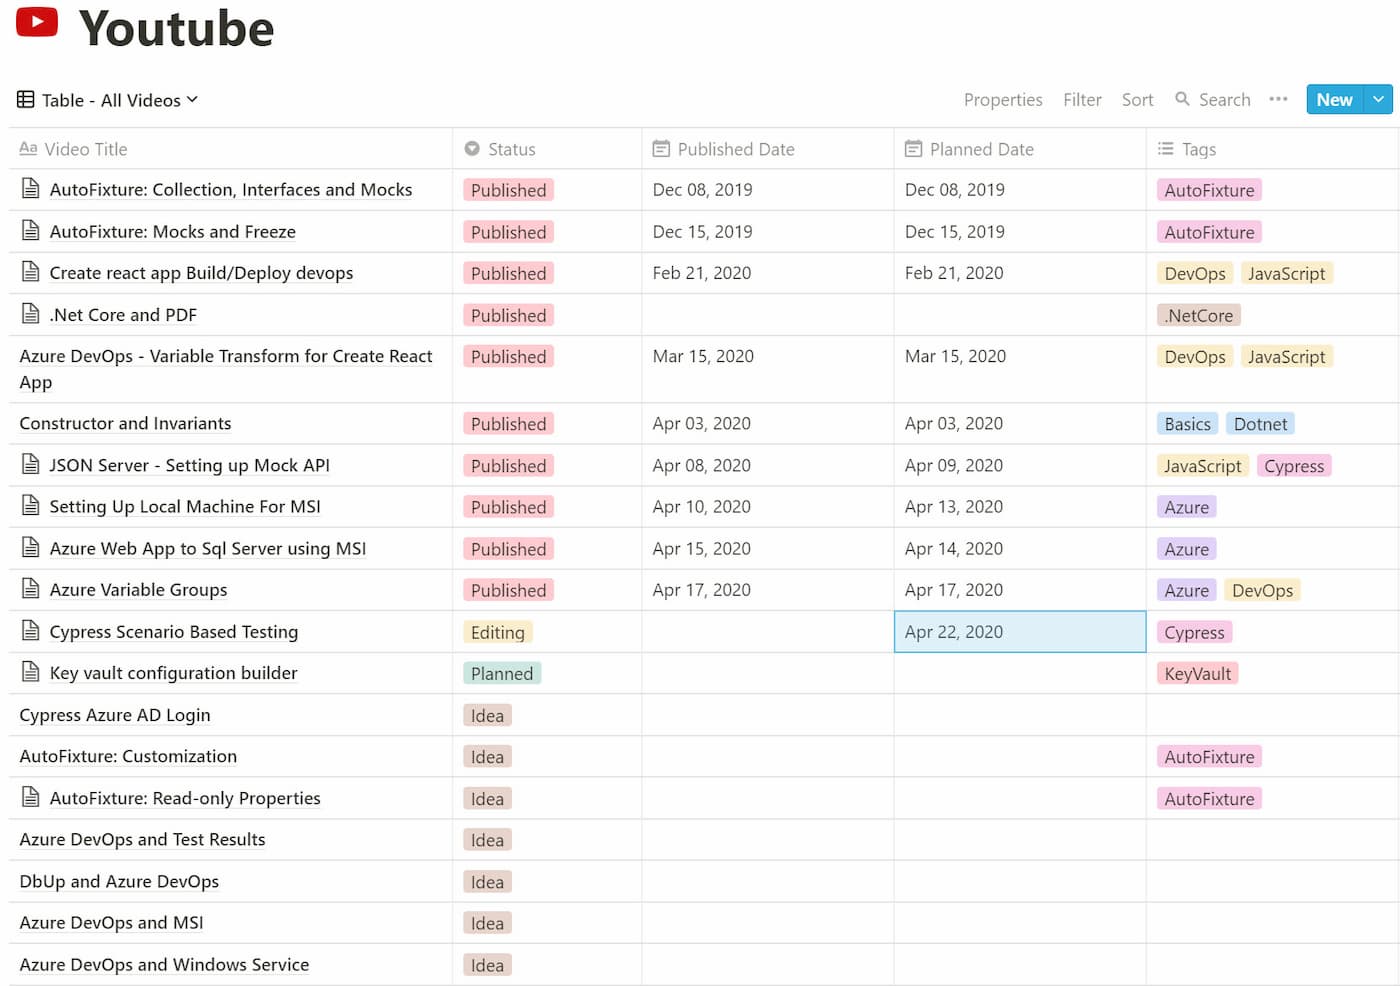
I use Notion for most of my notes and planning. I recently migrated to Notion from OneNote and like it way better. I keep a list of video ideas and a rough plan on when to publish it. The week before recording a video, I script out the main flow of the video along with any associated code. Most of the time, I try to align videos along with my blog posts on the same topic. It allows reusing the code examples for both the video and the blog.
I record my videos early in the morning and try to finish the full recording in one go. The videos average around 10 minutes and take around an hour to record. I try to do the editing in batches as when I get time.
When asked for tips for beginner YouTuber, someone said, "Record the first 100 videos as fast as possible. Don't look at the quality but focus on the quantity.". So if you are still on the fence line, don't wait any longer.
This is a journey. I am just beginning!
Do you have a YouTube channel, and what is your workflow? Sound off in the comments.
* Some links are affliated

Rahul Nath Newsletter
Join the newsletter to receive the latest updates in your inbox.