How To Continuously Deploy Your .NET Core Azure WebJobs
New To Azure WebJobs? Learn how to get started and set up a build deploy pipeline in Azure DevOps.
Table of Contents
WebJobs is a feature of Azure App Service that enables you to run a program or script in the same instance as a web app, API app, or mobile app. Since this runs as part of the same instance as the Web App, there is no additional cost to use WebJobs. WebJobs is not supported on a Linux App Service.
The Azure WebJobs SDK simplifies the task of writing WebJobs. Version 3.x of WebJobs SDK supports both .NET Core and .NET Framework. At the time of writing, there are no code templates to create an Azure WebJob .NET Core application in Visual Studio. However, setting up is not that hard and well explained in the Getting started with Azure WebJobs SDK article.
Set Up Azure WebJob
All you need to do is create a .NET Core Console application (from the Visual Studio templates), add the Microsoft.Azure.WebJobs and Microsoft.Azure.WebJobs.Extensions NuGet packages. Update the Program.cs file in the .NET Console Application to use the HostBuilder as shown. If you want to log to the console, also add the Microsoft.Extensions.Logging.Console NuGet package.
static async Task Main()
{
    var builder = new HostBuilder();
#if DEBUG
    builder.UseEnvironment("development");
#endif
    builder.ConfigureWebJobs(b =>
    {
        b.AddAzureStorageCoreServices();
        b.AddAzureStorage();

    });
    builder.ConfigureLogging((context, b) =>
    {
        b.AddConsole();
    });
    var host = builder.Build();
    using (host)
    {
        await host.RunAsync();
    }
}
To run the host in development mode call the UseEnvironment method on the builder and set it to development. It increases the queue polling interval, sets log level to verbose, etc., and makes development more efficient.
Adding the Job
Azure Functions is also built on the WebJobs SDK, and both have a lot in common. To add a Job, we add a 'Function.'
The HostBuilder that we created is the container for these functions. It listens to various Triggers and calls the functions.
Triggers define how a function is invoked, and a function must have exactly one trigger.
Check this article for the full differences between Azure WebJobs and Azure Functions.
public class ProcessMessageFunction
{
    private QueueClient _queueClient;
    public ProcessMessageFunction(IConfiguration configuration)
    {
        _queueClient = new QueueClient(configuration["AzureWebJobsStorage"], "processed");
    }

    public string ProcessQueueMessage([QueueTrigger("queue")] string message, ILogger logger)
    {
        await _queueClient.SendMessageAsync($"Processed {message} {DateTime.Now}");
        logger.LogInformation(message);
        return message;
    }
}
The above function is triggered every time a message is dropped in the Azure Storage Queue with the name 'queue.' The function reads the message and drops it back to another queue named 'processed.' It adds a Processed text and the date and time it was processed.

Azure DevOps Pipeline
Since we are not much interested in what the function is doing, let's move to set up the Build/Deploy pipeline for this Azure Function. I have a sample pipeline set up here (details at the bottom of the post) in case you want to refer to it at any step. You can also check out the video above for the full setup walkthrough.
When setting up the build/deploy pipeline, I prefer to set it up as two separate pipelines.
- a Build Pipeline that builds and generates a build artifact
- a Release Pipeline that deploys the build artifact to the different environments (Dev, Test or Prod)
Build Pipeline
To create a new build pipeline, go to the Pipelines section under your Azure DevOps project. Click the new pipeline and choose the repository source. Once you have selected the repository source, the wizard will prompt you to select a template to create the pipeline.
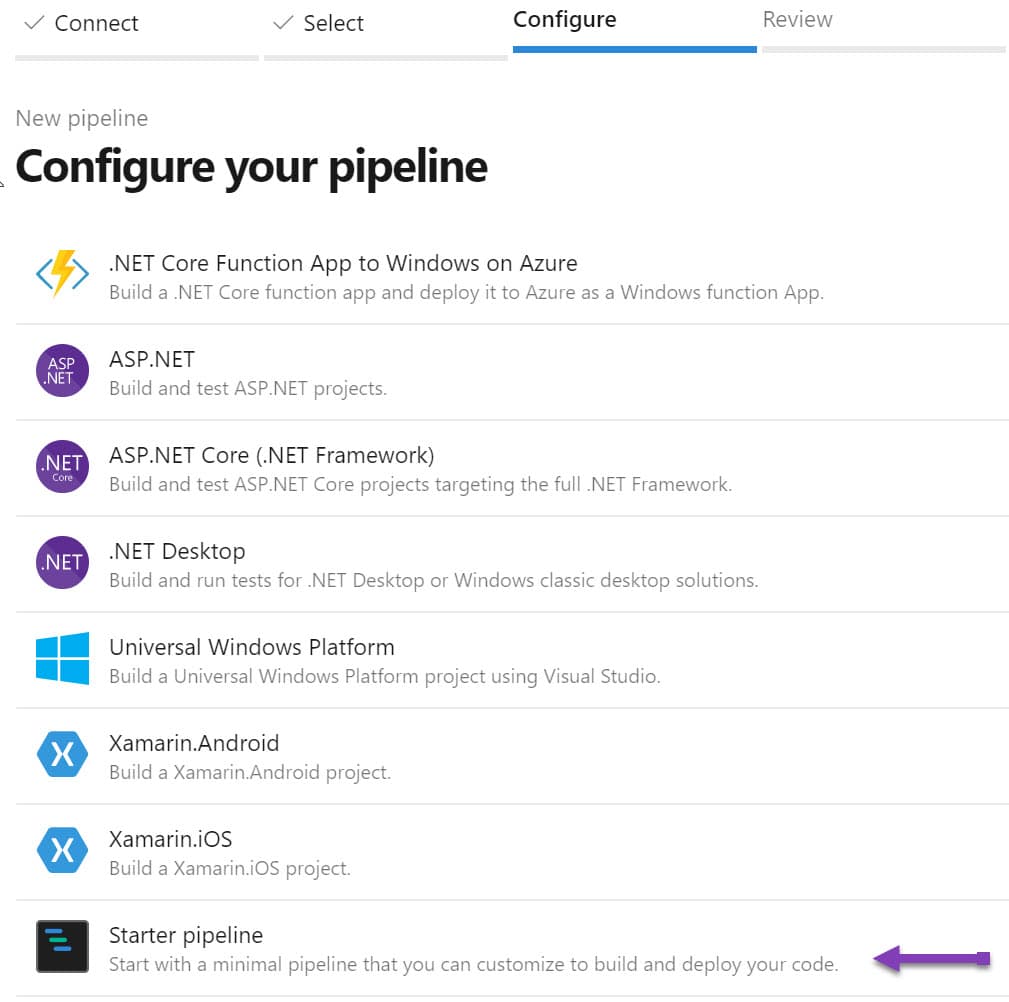
Select 'Starter pipeline' from the template options, which will help set up the template from scratch. Clear off everything under the 'steps' section in the yml file.
In the build pipeline, we need to achieve the below.
- Build the Project
- Publish the project (to create the executable file)
- Archive/Zip the publish folder
- Publish the Archive as Build Artifact
Build and Publish The Project
To build and publish the project, we will use the DotNetCoreCLI task. The CLI tasks need the project path to build and also any additional arguments that you want to pass. Below are the tasks to build and publish the WebJobs project.
- task: DotNetCoreCLI@2
  inputs:
    command: 'build'
    projects: '**/*.csproj'
    arguments: '--configuration Release'

- task: DotNetCoreCLI@2
  inputs:
    command: 'publish'
    publishWebProjects: false
    projects: '**/*.csproj'
    arguments: '--output $(Build.BinariesDirectory)/publish_output/App_Data/jobs/continuous/YoutubeWebJob'
    zipAfterPublish: false
    modifyOutputPath: false
For both the tasks we pass in a wildcard selector for the csproj, since we only have one project in the whole repository. If you have multiple projects, make sure to provide the WebJobs project file's name just to build that. ('WebJobExample.WebJob' in this case).
WebJobs Folder Structure
The 'publish' task, has a specific folder structure (App_Data/jobs/continuous/YoutubeWebJob) as the output folder. It is by convention, and Azure expects WebJobs to be in that folder structure in the webserver (IIS). Depending on whether the WebJob is continuous (AppData/jobs/continuous) or triggered (App_Data/jobs/triggered), the build artifacts need to be placed appropriately. To enable multiple WebJobs under the same server, we can add them under a Folder inside the expected folder paths, like _YoutubeWebJob folder above.
NOTE: The continuous or triggered folder is not related to the 'trigger' in QueueTrigger. Any job that is manually triggered or run based on a cron expression goes under the 'triggered' folder. All other WebJobs should be under the continuous folder.
The trigger word with both the folder and the QueueTrigger (for example) can be slightly confusing. Any job that is manually triggered or run based on a cron expression goes under the 'triggered' folder. All other WebJobs should be under the continuous folder. In this example, since it is a QueueTrigger job, we need to keep running continuously and get triggered whenever a message is dropped in the queue. So it needs to be deployed under the continuous folder.
Archive and Publish
To archive the build output, you can either specify the zipAfterPublish to true in the dotnet core CLI task step above or add a separate step as shown below.
The below step uses the Archive Files Task and Publish Build Artifacts Task.
- task: ArchiveFiles@2
  inputs:
    rootFolderOrFile: '$(Build.BinariesDirectory)/publish_output'
    includeRootFolder: false
    archiveType: 'zip'
    archiveFile: '$(Build.ArtifactStagingDirectory)/$(Build.BuildId).zip'
    replaceExistingArchive: true

- task: PublishBuildArtifacts@1
  inputs:
    PathtoPublish: '$(Build.ArtifactStagingDirectory)'
    ArtifactName: 'drop'
    publishLocation: 'Container'
On saving the pipeline file, it will commit to your repository with the specified filename (azure-pipelines.yml). We now have out build pipeline, which creates a build artifact, a zip file with the console application executable (the Web Job) and the associated DLL's.
Release Pipeline
Azure Web Jobs are deployed to Azure Web app either independently or as part of the Web App that it lives under. In this example, it is getting deployed independently. If you want to package it along with a Web App, you can update the build pipeline to generate the Web App to the '(Build.BinariesDirectory)/publish_output' folder. Check out an example here where I build and deploy a Create React Application
To create a new Release Pipeline, go to the Releases section under Pipelines in Azure DevOps, as shown in the image below (1).
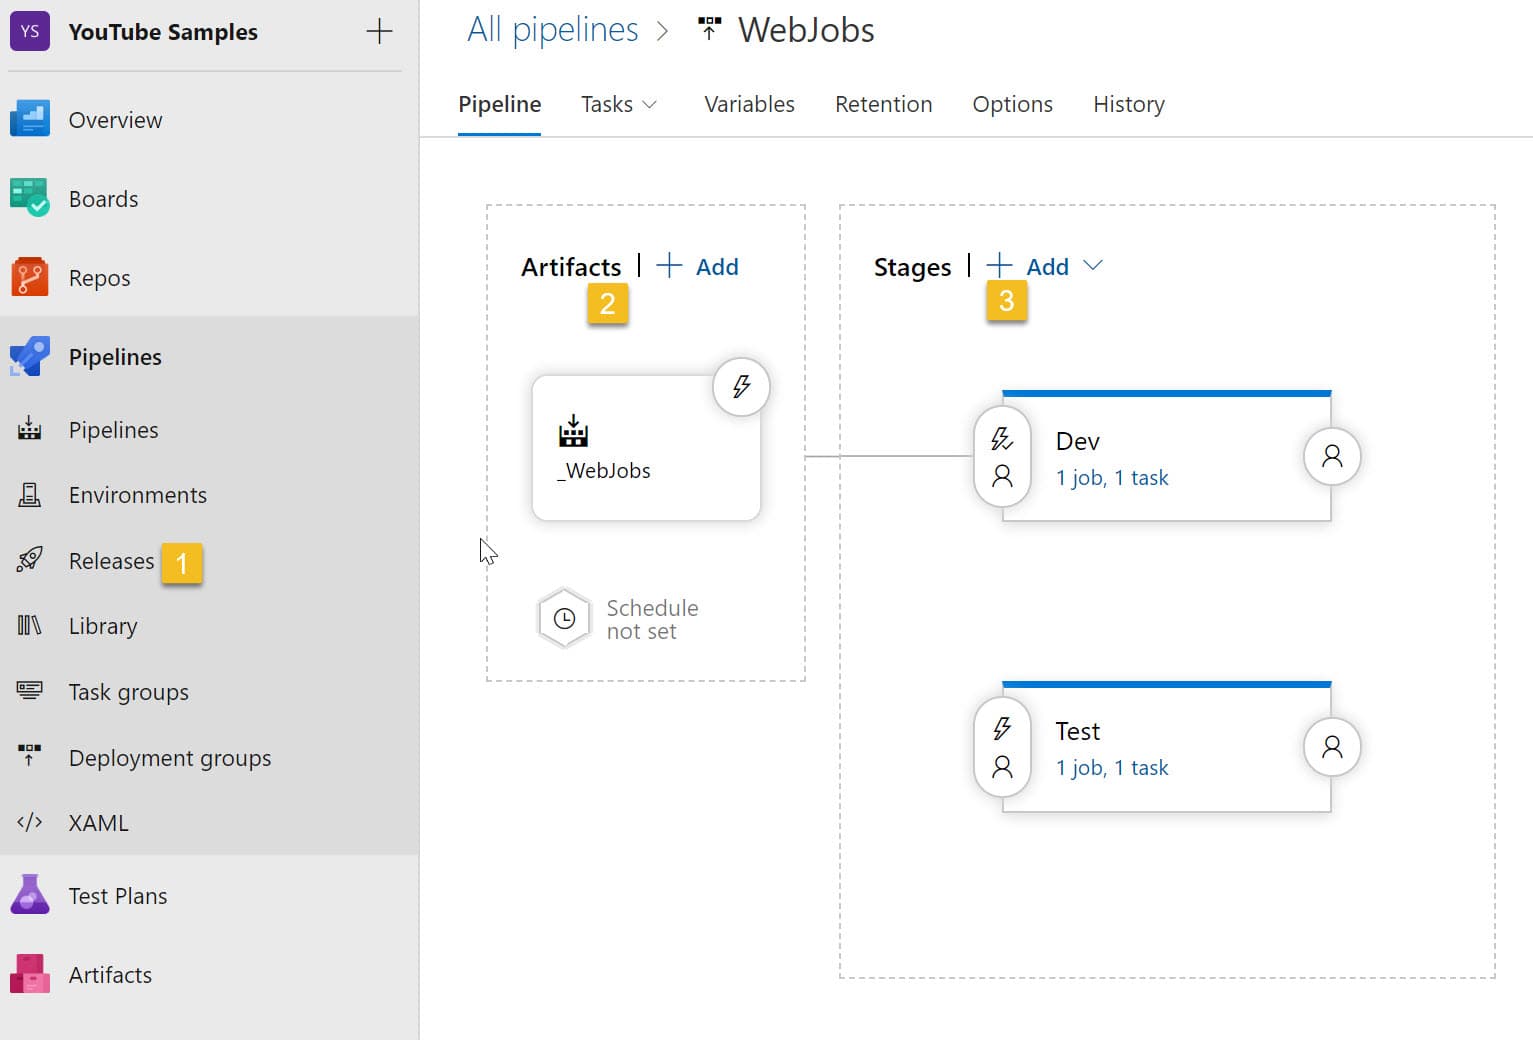
Select the Artifact that you want to deploy (2). In this case, choose the build pipeline that we created in the previous step.
Stages in the Release pipeline represent the different environments that you want to deploy your application. In the example above, I have added two stages - 'Dev' and 'Test.' Any time a release is created, it is automatically deployed to the 'Dev' environment. You can manually deploy it to the next stage ('Test') when you have the code ready for Testing.
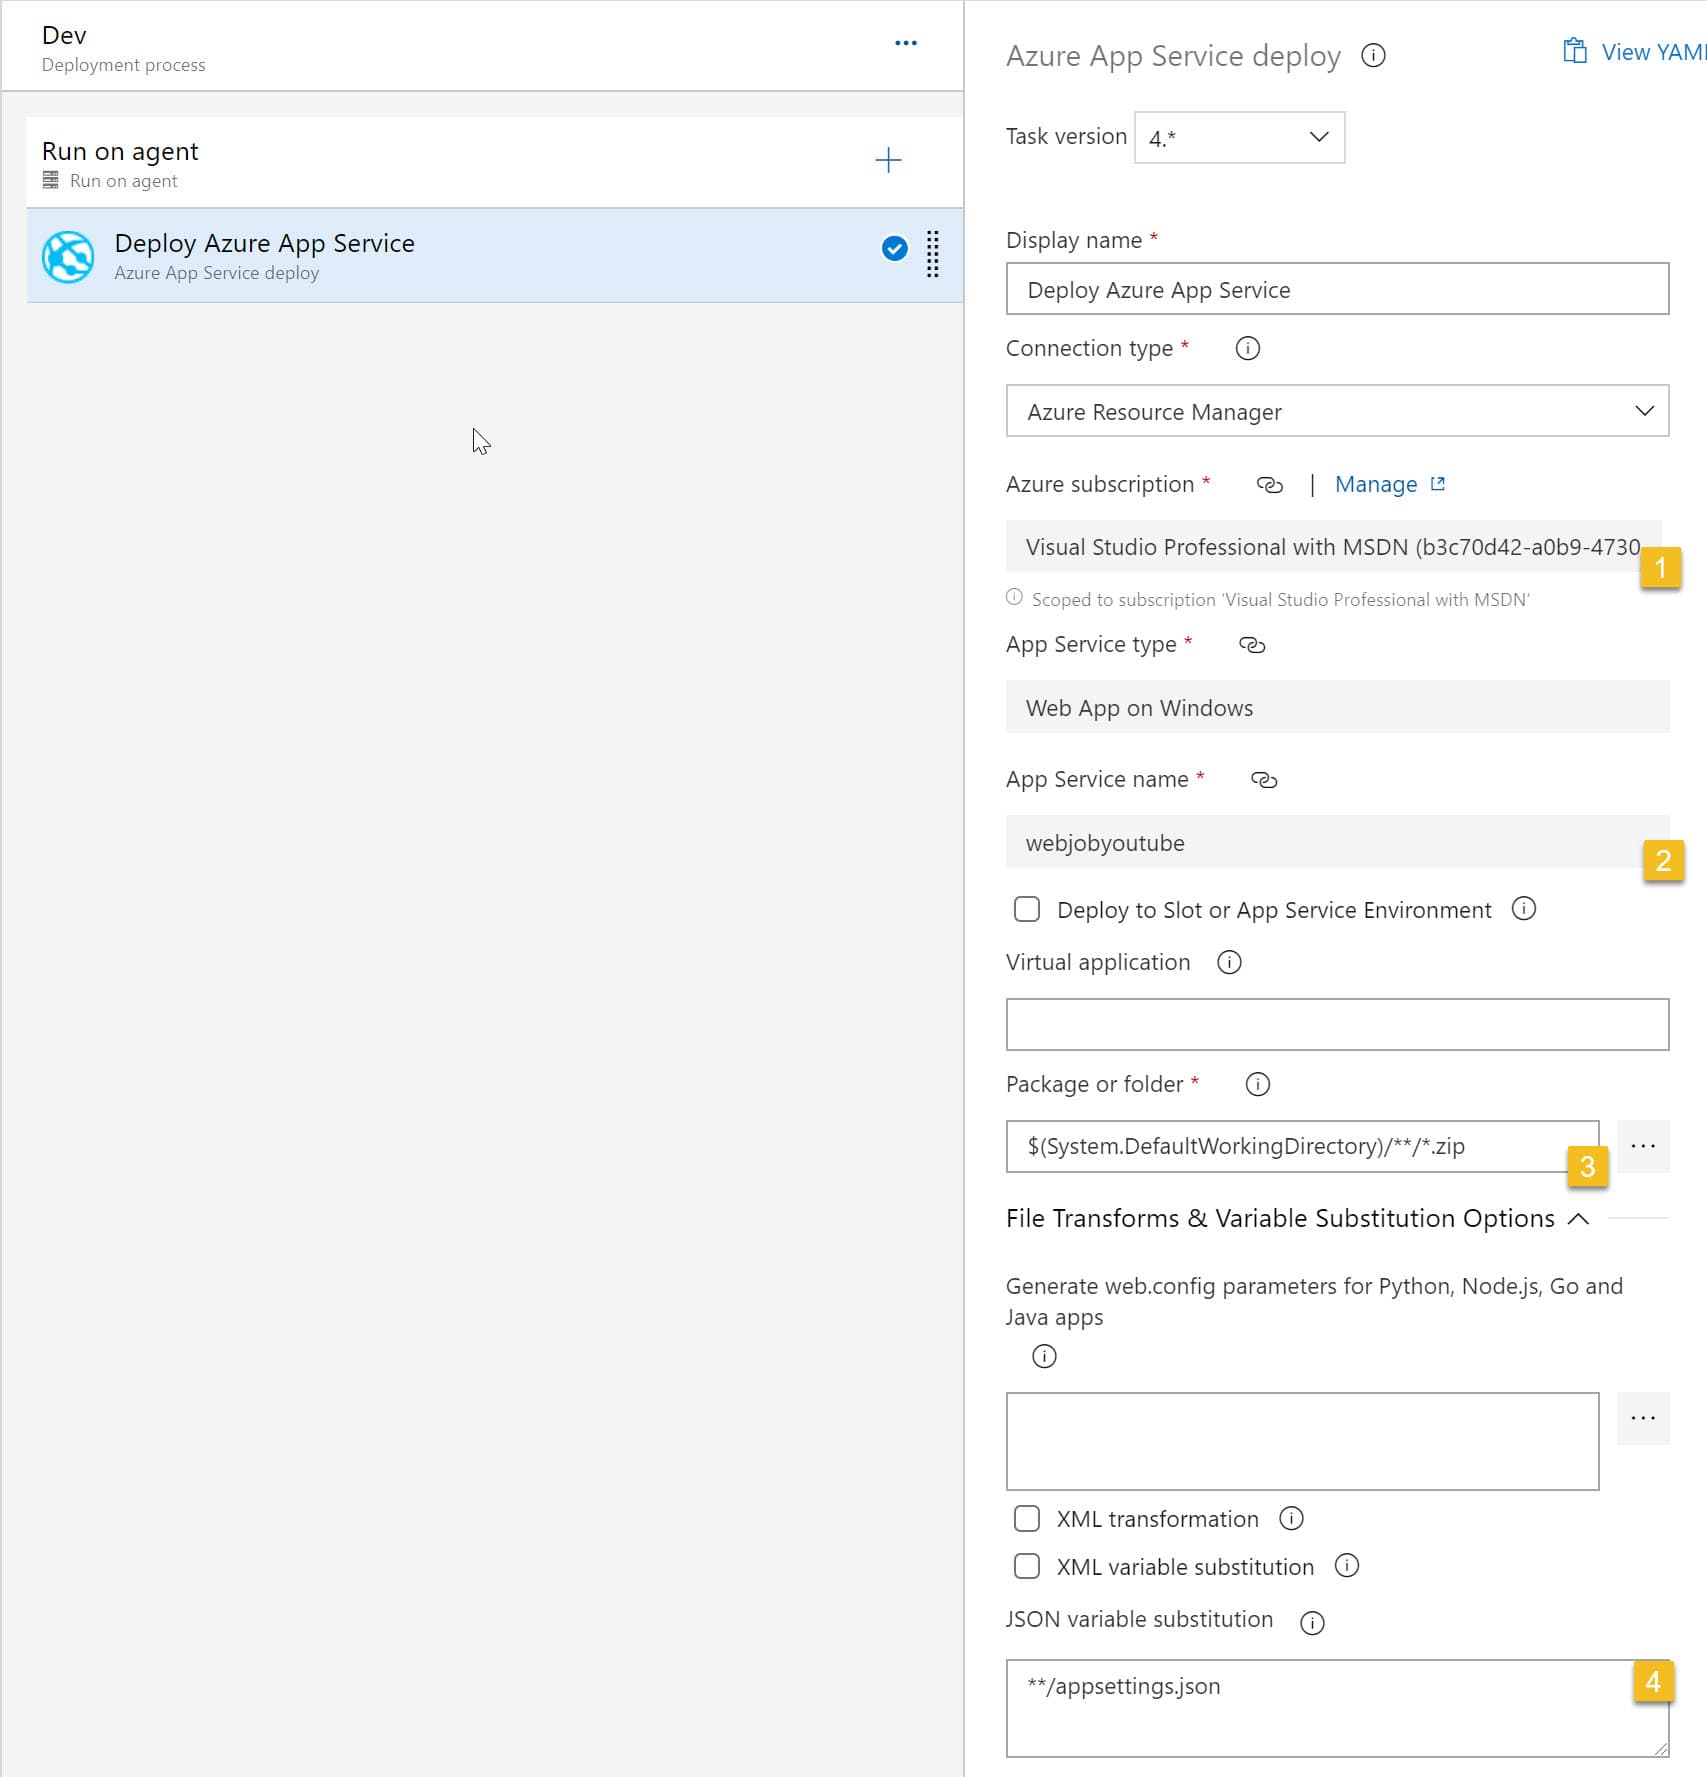
The 'Dev' and 'Test' stage has a single task in it - Deploy Azure App Service Task.You can specify the Azure Subscription (1) to which the WebJob needs to be deployed to, select the App Service name (2). The package or folder path specifies the path to the artifact. When a release is created, the linked artifact is automatically downloaded to the '$(System.DefaultWorkingDirectory)' by DevOps. The zip file that we published as part of the build pipeline will be available in this location.
Depending on the environment you are running, the WebJob will connect to different resources. Add these values as Release Variables to your Release pipeline. To replace this in the configuration file, use the 'File Transforms & Variable Substitution Options' and specify the 'appsettings.json' file name. DevOps will automatically replace variables that match the name in the file with that in the Release Variables.
The Azure WebJobs deployment is successfully set up. Trigger a new build, which should automatically trigger a new release and deploy it to the Web App that you have selected for the environment.
Find the related source code and the build/release pipeline below.
Source Code
Build Pipeline
Release Pipeline
Hope this helps you set up a new Azure WebJob and configure the build/deploy pipeline in Azure DevOps.

Rahul Nath Newsletter
Join the newsletter to receive the latest updates in your inbox.
