Building and Deploying .NET Applications with AWS CDK on GitHub Actions
Let's learn how to set up a build-deploy pipeline on GitHub Actions to automate infrastructure management and deploy resources on AWS for our .NET application.
Table of Contents
The AWS Cloud Development Kit (CDK) simplifies cloud infrastructure management.
GitHub Actions provides a powerful CI/CD solution that integrates seamlessly with AWS, allowing you to automate your infrastructure deployments.
In this post, let's explore how to set up a build-deploy pipeline to automatically create resources and deploy your .NET application to AWS using GitHub Actions.
Thanks to AWS for sponsoring this post in my .NET on AWS Series
Setting Up GitHub Actions File
If you are to GitHub Actions, use the Quickstart guide to get up to speed.
The GitHub Actions workflow files should be located in the .github/workflows directory at the root of your repository.
So, let's add a new file to get started.
Authoring GitHub Actions File in VSCode
You can author the actions file in the web browser or from your IDE/Editor.
I prefer to use the VSCode editor for this.
The GitHub Actions extension lets you manage your workflows, view the workflow run history, and help authoring workflows.
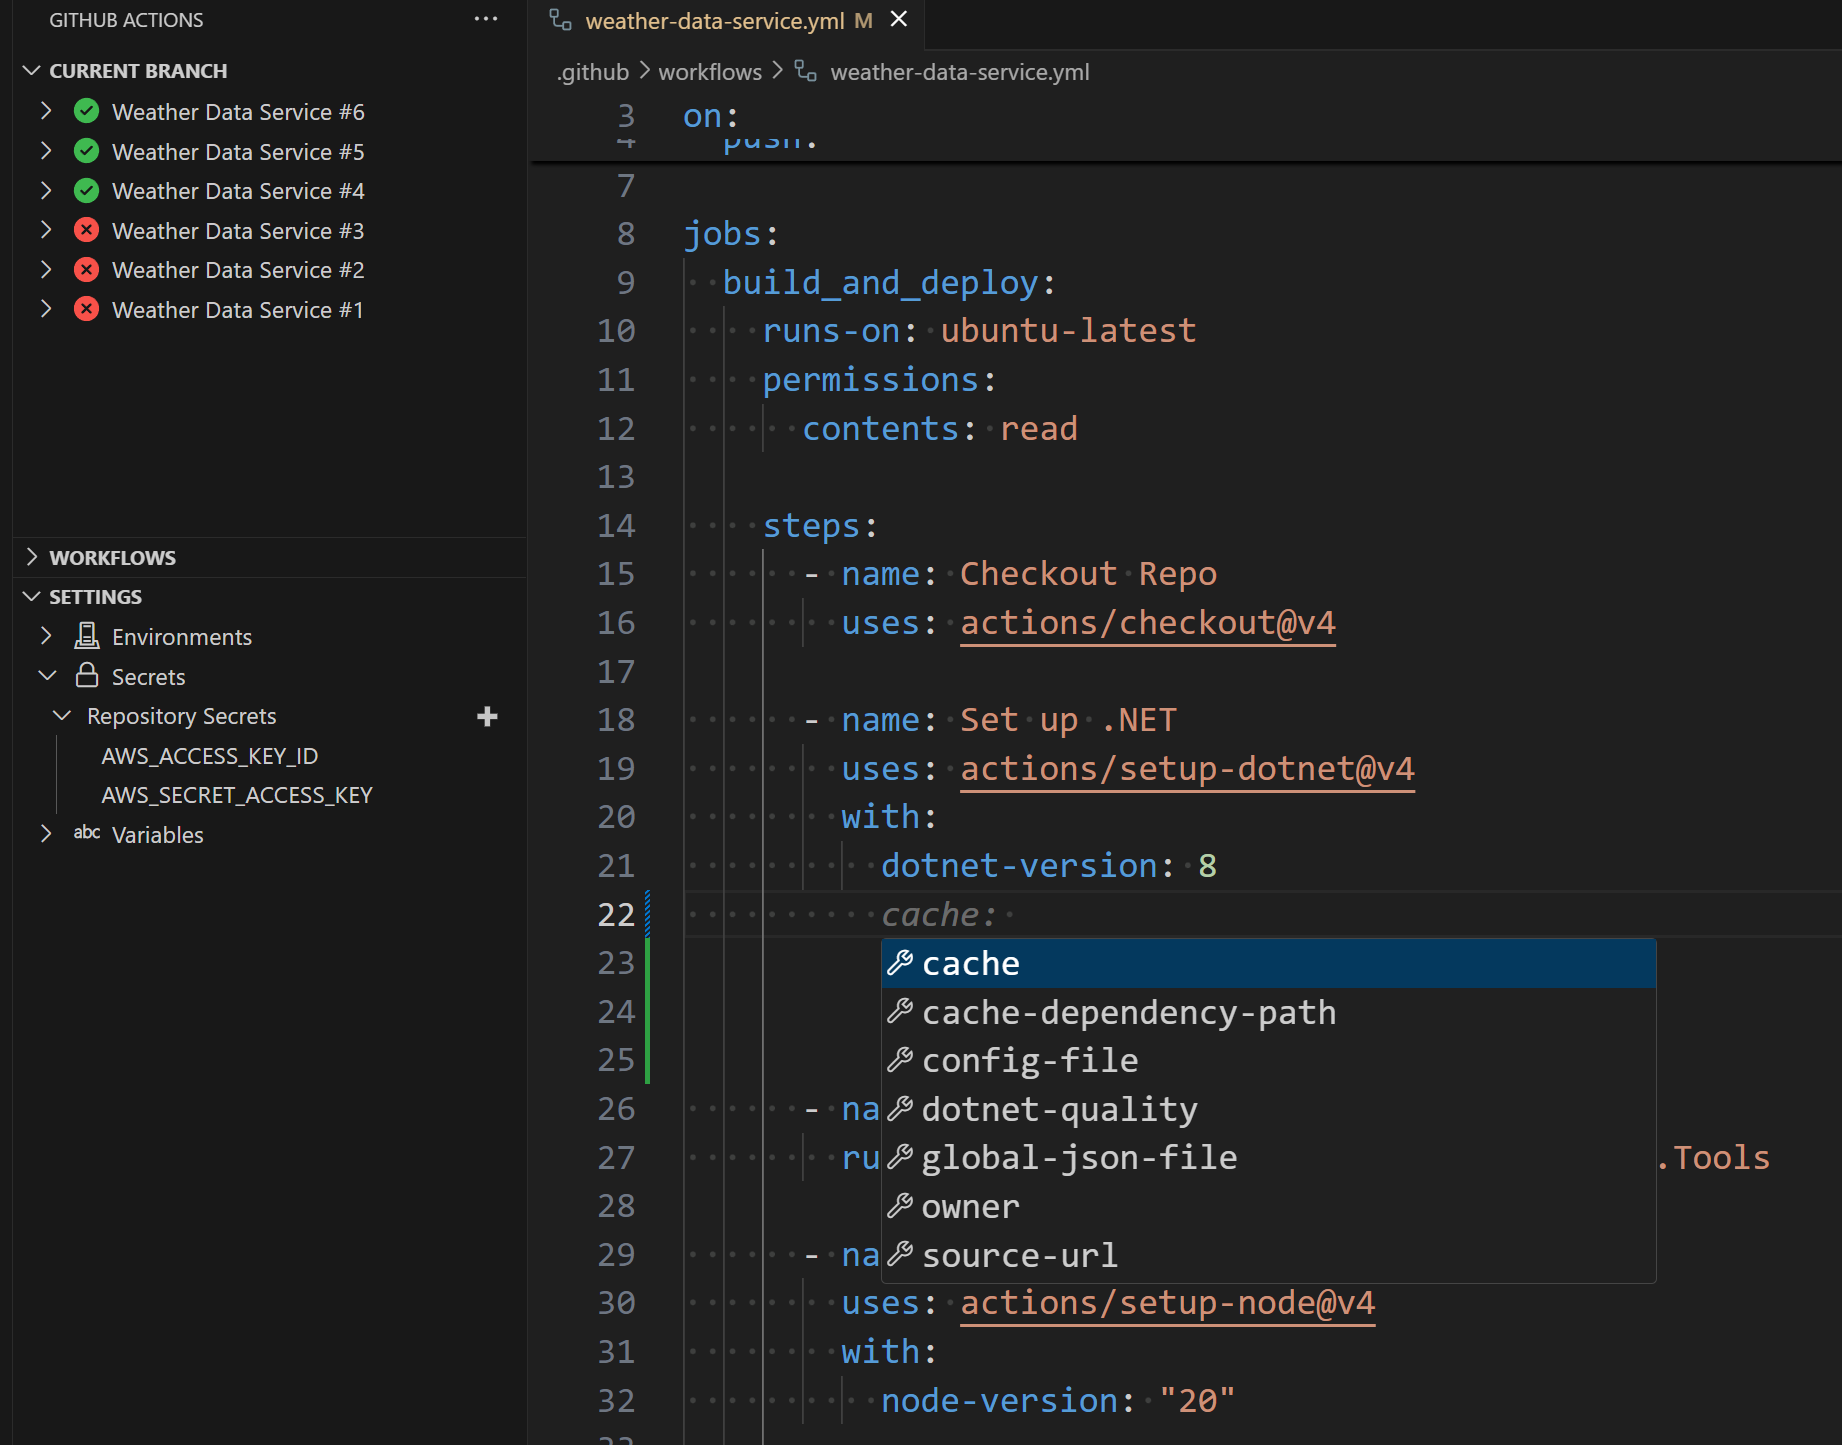
The extension provides intellisense support based on the action you are editing, which makes it extremely easy to author workflows from the editor.
You can also CTRL + click on the uses action to navigate to the GitHub repository and look up the required documentation.
Deploying .NET Application using CDK to AWS
Let's now create the workflow file to deploy our application.
My sample application has an ASP NET Web API and a worker service, which I want to host on AWS Lambda Function.
You can find more details on the CDK code to create the resources in the article below.
This post will focus on the GitHub Actions workflow side to set up the pipeline to run and deploy our .NET application.
This GitHub Actions workflow, named "Weather Data Service", triggers on every push to the main branch.
name: Weather Data Service

on:
  push:
    branches:
      - main

jobs:
  build_and_deploy:
    runs-on: ubuntu-latest
    permissions:
      contents: read
It defines a single job, build_and_deploywhich runs on an Ubuntu environment with read-only permissions for repository contents.
Let's now add the different steps required to build, package and deploy our .NET application to AWS.
Setting Up Required Tools For .NET and AWS CDK
Let's first set up the environment running the build action for deploying .NET applications to AWS. It ensures the necessary tools and configurations are in place for building, deploying, and managing infrastructure.
- Check out the repository
- Sets up .NET SDK 8 and installs Amazon Lambda .NET tools
- Sets up Node.js and installs AWS CDK
- name: Checkout Repo
  uses: actions/checkout@v4

- name: Set up .NET
  uses: actions/setup-dotnet@v4
  with:
    dotnet-version: 8

- name: Install AWS Lambda Tools
  run: dotnet tool install -g Amazon.Lambda.Tools

- name: Setup Node.js
  uses: actions/setup-node@v4
  with:
    node-version: "20"

- name: Install AWS CDK
  run: npm install -g aws-cdk
Packaging .NET Application for Deployment
To deploy our application we first need to package it into deployable artifacts.
Since for this application, I am deploying the WeatherForecast.Api and the WeatherForecast.Service as Lambda functions, I use the dotnet lambda tool to package them as zip files.
- name: Package API
  run: |
    dotnet lambda package --project-location ./src/WeatherForecast.Api \
    --configuration Release \
    --framework net8.0 \
    --output-package artifacts/api.zip

- name: Package API
  run: |
    dotnet lambda package --project-location ./src/WeatherForecast.Service \
    --configuration Release \
    --framework net8.0 \
    --output-package artifacts/service.zip
The above steps generate two artifacts in the artifacts directory in the root of the directory - api.zip and service.zip
Configure AWS Credentials
The aws-actions/configure-aws-credentials action helps configure your AWS credentials and region environment variables for use in other GitHub Actions.
It requires the Access Key, Secret, and the region to connect to.
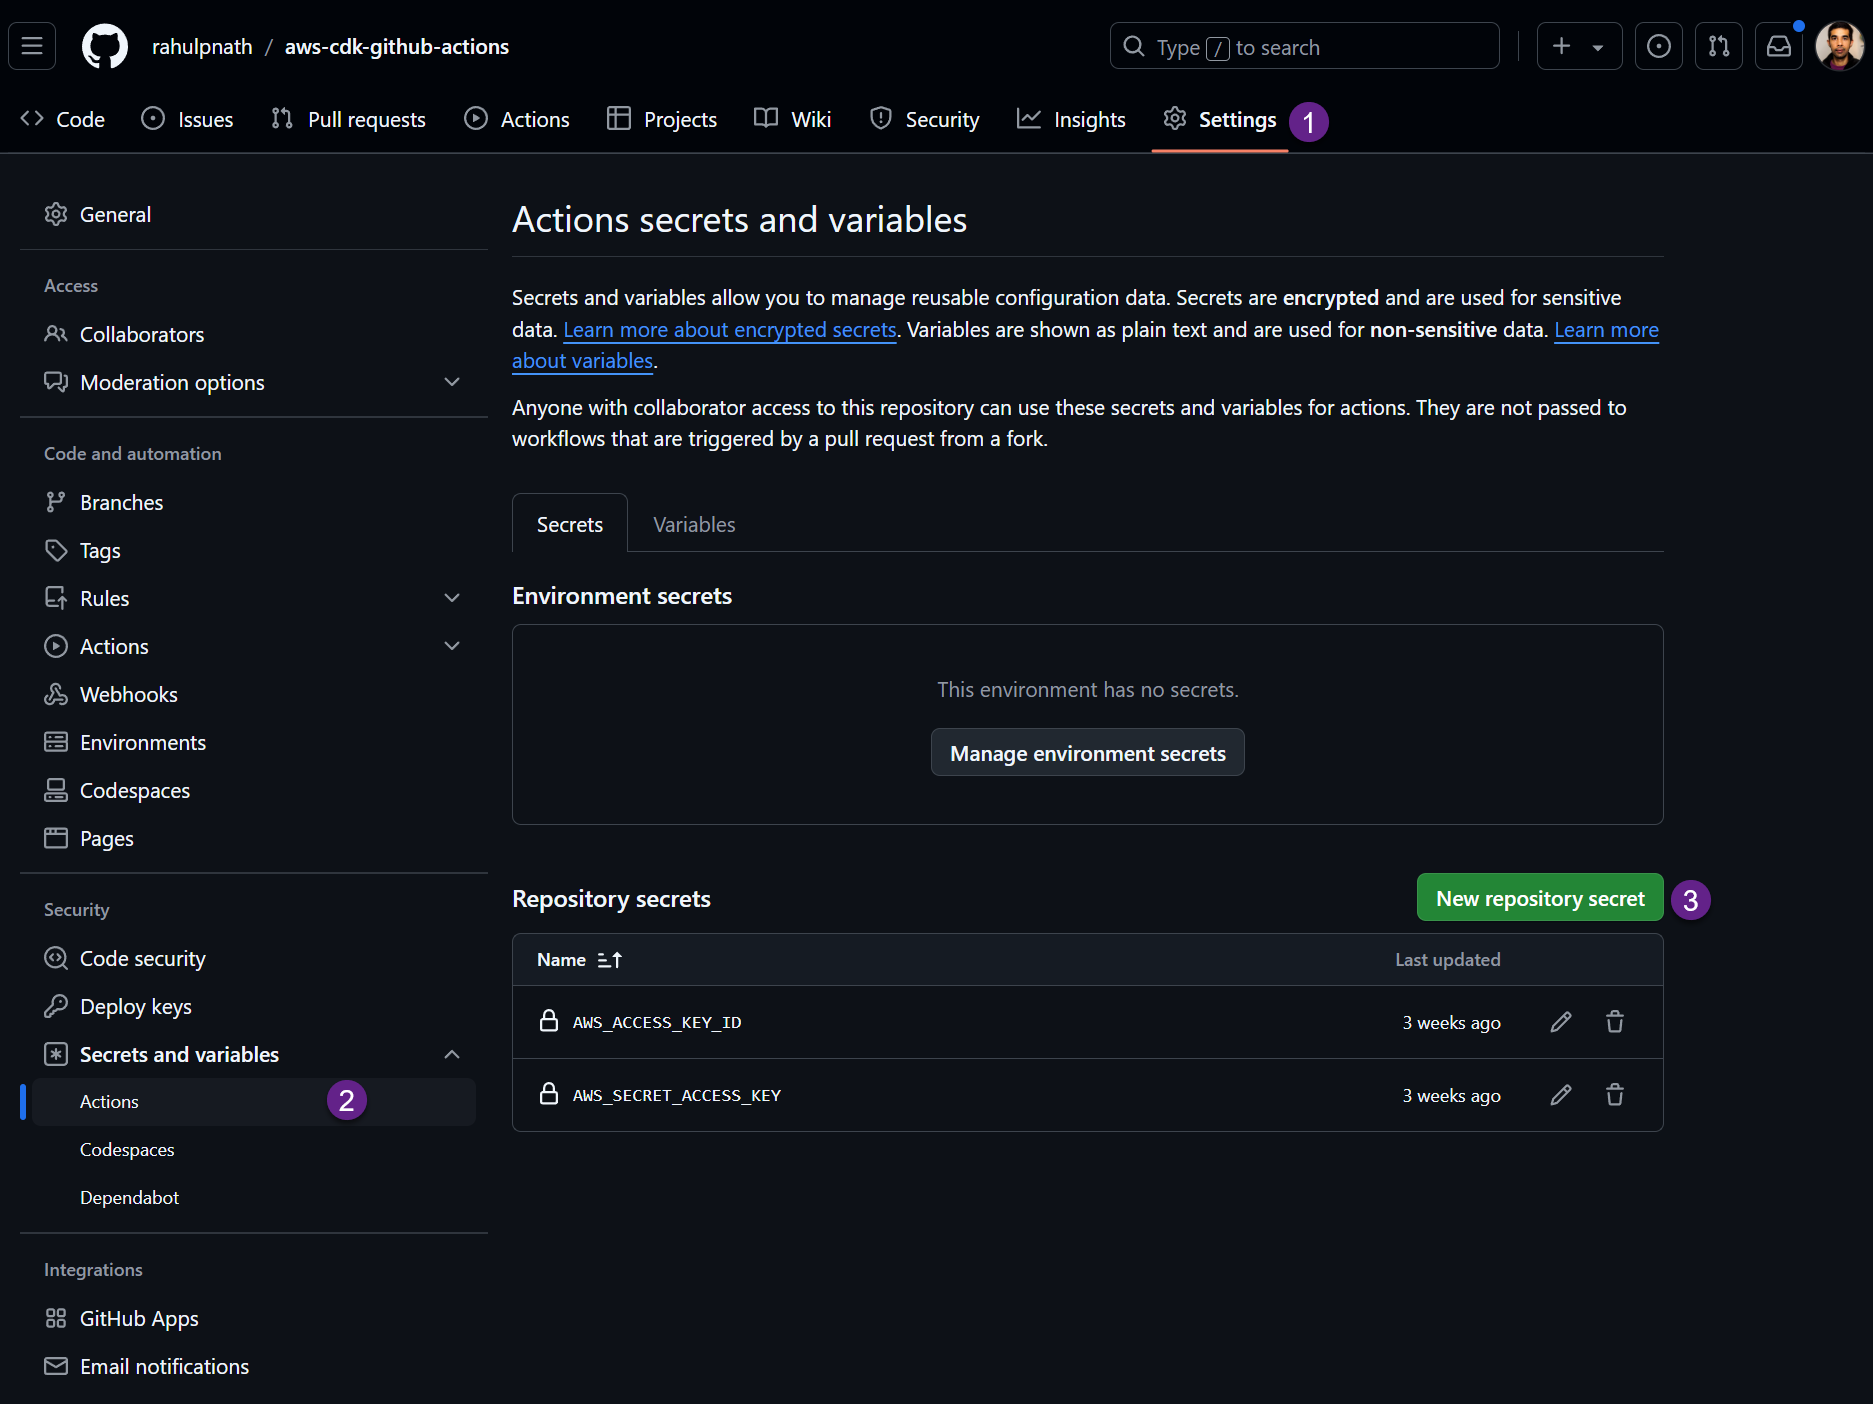
Since the keys are sensitive it's best to use GitHub Secrets, to manage them.
- name: Configure AWS Credentials
  uses: aws-actions/configure-aws-credentials@v4
  with:
    aws-access-key-id: ${{secrets.AWS_ACCESS_KEY_ID}}
    aws-secret-access-key: ${{secrets.AWS_SECRET_ACCESS_KEY}}
    aws-region: "ap-southeast-2"
You can configure the GitHub Secrets for your repository under Settings → Secrets and variables → Actions and add a new repository secret (as shown below)
Run AWS CDK Deploy From GitHub Actions
Our repository is a CDK project and contains the cdk.json file at the root of the repository. So we can run our cdk commands from there.
Ensure your AWS account is bootstrapped and ready to use with AWS CDK.

To deploy the application, all we need to do is run the cdk deploy command
- name: CDK Deploy
  run: cdk deploy --all --require-approval never
Ensure that the requie-approval is turned off so that it does not prompt for approval from the user to deploy the stack.
Our CDK code looks for the deploy package from the artifacts folder, as shown below.
// Lambda Function To Process SQS
var weatherLambdaFunction = new Function(this, "WeatherDataProcessor", new FunctionProps {
  FunctionName = "weather-data-processor",
    Runtime = Runtime.DOTNET_8,
    Handler = "WeatherForecast.Service::WeatherForecast.Service.Function::FunctionHandler",
    Code = Code.FromAsset("./artifacts/service.zip")
    ...
    }
});
Since our previous steps have generated the artifacts files, the CDK code automatically picks these up and deploys to the respective AWS resources.
If the resource does not exist or has been modified, those changes are also performed.

Rahul Nath Newsletter
Join the newsletter to receive the latest updates in your inbox.