
How To Protect Your ASP NET Web API Using JWT Authentication
Learn how to protect an ASP NET Core Web API using JWT Bearer Token. We will be using Azure Active Directory (AD) as the Identity Provider and see how to integrate with it from our application and how everything works together.
Table of Contents
When building applications, we often want to control access to it. The process of securing your application is referred to as Authentication and Authorization.
In this post, let's learn how to protect your ASP NET Core Web API using JWT Bearer Token. We will be using Azure Active Directory (AD) as the Identity Provider and see how to integrate with it from our application and how everything works together.
To get started, let's create an ASP NET Web API application from the default template. If you are using the dotnet CLI, you can use dotnet new webapi command to create a new Web API application.
It will create an API application with a default WeatherForecast Controller that returns some hardcoded data. It also comes with Swagger Endpoint setup
The API endpoint and the application is by default available to all users. If you deploy this application to a website anyone who has the URL to the application can access the API and retrieve the data.
Authentication and Authorization
We need to protect this API endpoint so that only specific users can use this API. These could be anyone within your company or maybe even further restricted to a specific group of people.
To achieve this, we need to make sure only authenticated users can access the API. Any time we talk about Authentication, we most likely speak about Authorization as well. So what is the difference between these two?
Authentication is the process of proving that you are who you say you are.
Authorization is the act of granting an authenticated party permission to do something.
For this post to keep things simple, I will only focus on Authentication.
Real-World Analogy
We come across both Authentication and Authorization a lot in our day-to-day lives. Often in a physical office setting or public places, we use access cards or building passes to access the building or service. In these scenarios, we are authenticating who we say we are to access the building.
In specific scenarios, we might be able to access particular office areas only if we are a manager or an admin. Or certain public services are available simply if you are above 18 years of age. In these cases, in addition to verifying who you are, you also need to prove that you have valid permissions to be where you are. It might be by showing the date of birth on a driver's license, showing a role mentioned in the id card or even embedded into the access card chip, etc.
In all these cases, office spaces or public buildings can either create and manage their passes or use publicly available identity cards (like driving license, passport, etc.). Even when using their passes, companies can outsource this to companies that specialize in building and maintaining the cards rather than producing themselves.
Similarly, when building an application, depending on your application scenario, you can either manage the username and passwords yourself or use existing public services like Google, Facebook, etc. or outsource it to a third-party provider often referred to as Identity Provider.

Setting Up Identity Provider - Azure Active Directory (AD)
In Microsoft Azure world, Azure Active Directory(AD) is a centralized Identity Provider in the Cloud. It supports and enables various scenarios like Multi-Factor Authentication (sometimes also called 2FA), Single-Sign on, Conditional access (making sure the user is in a specific location, etc.)
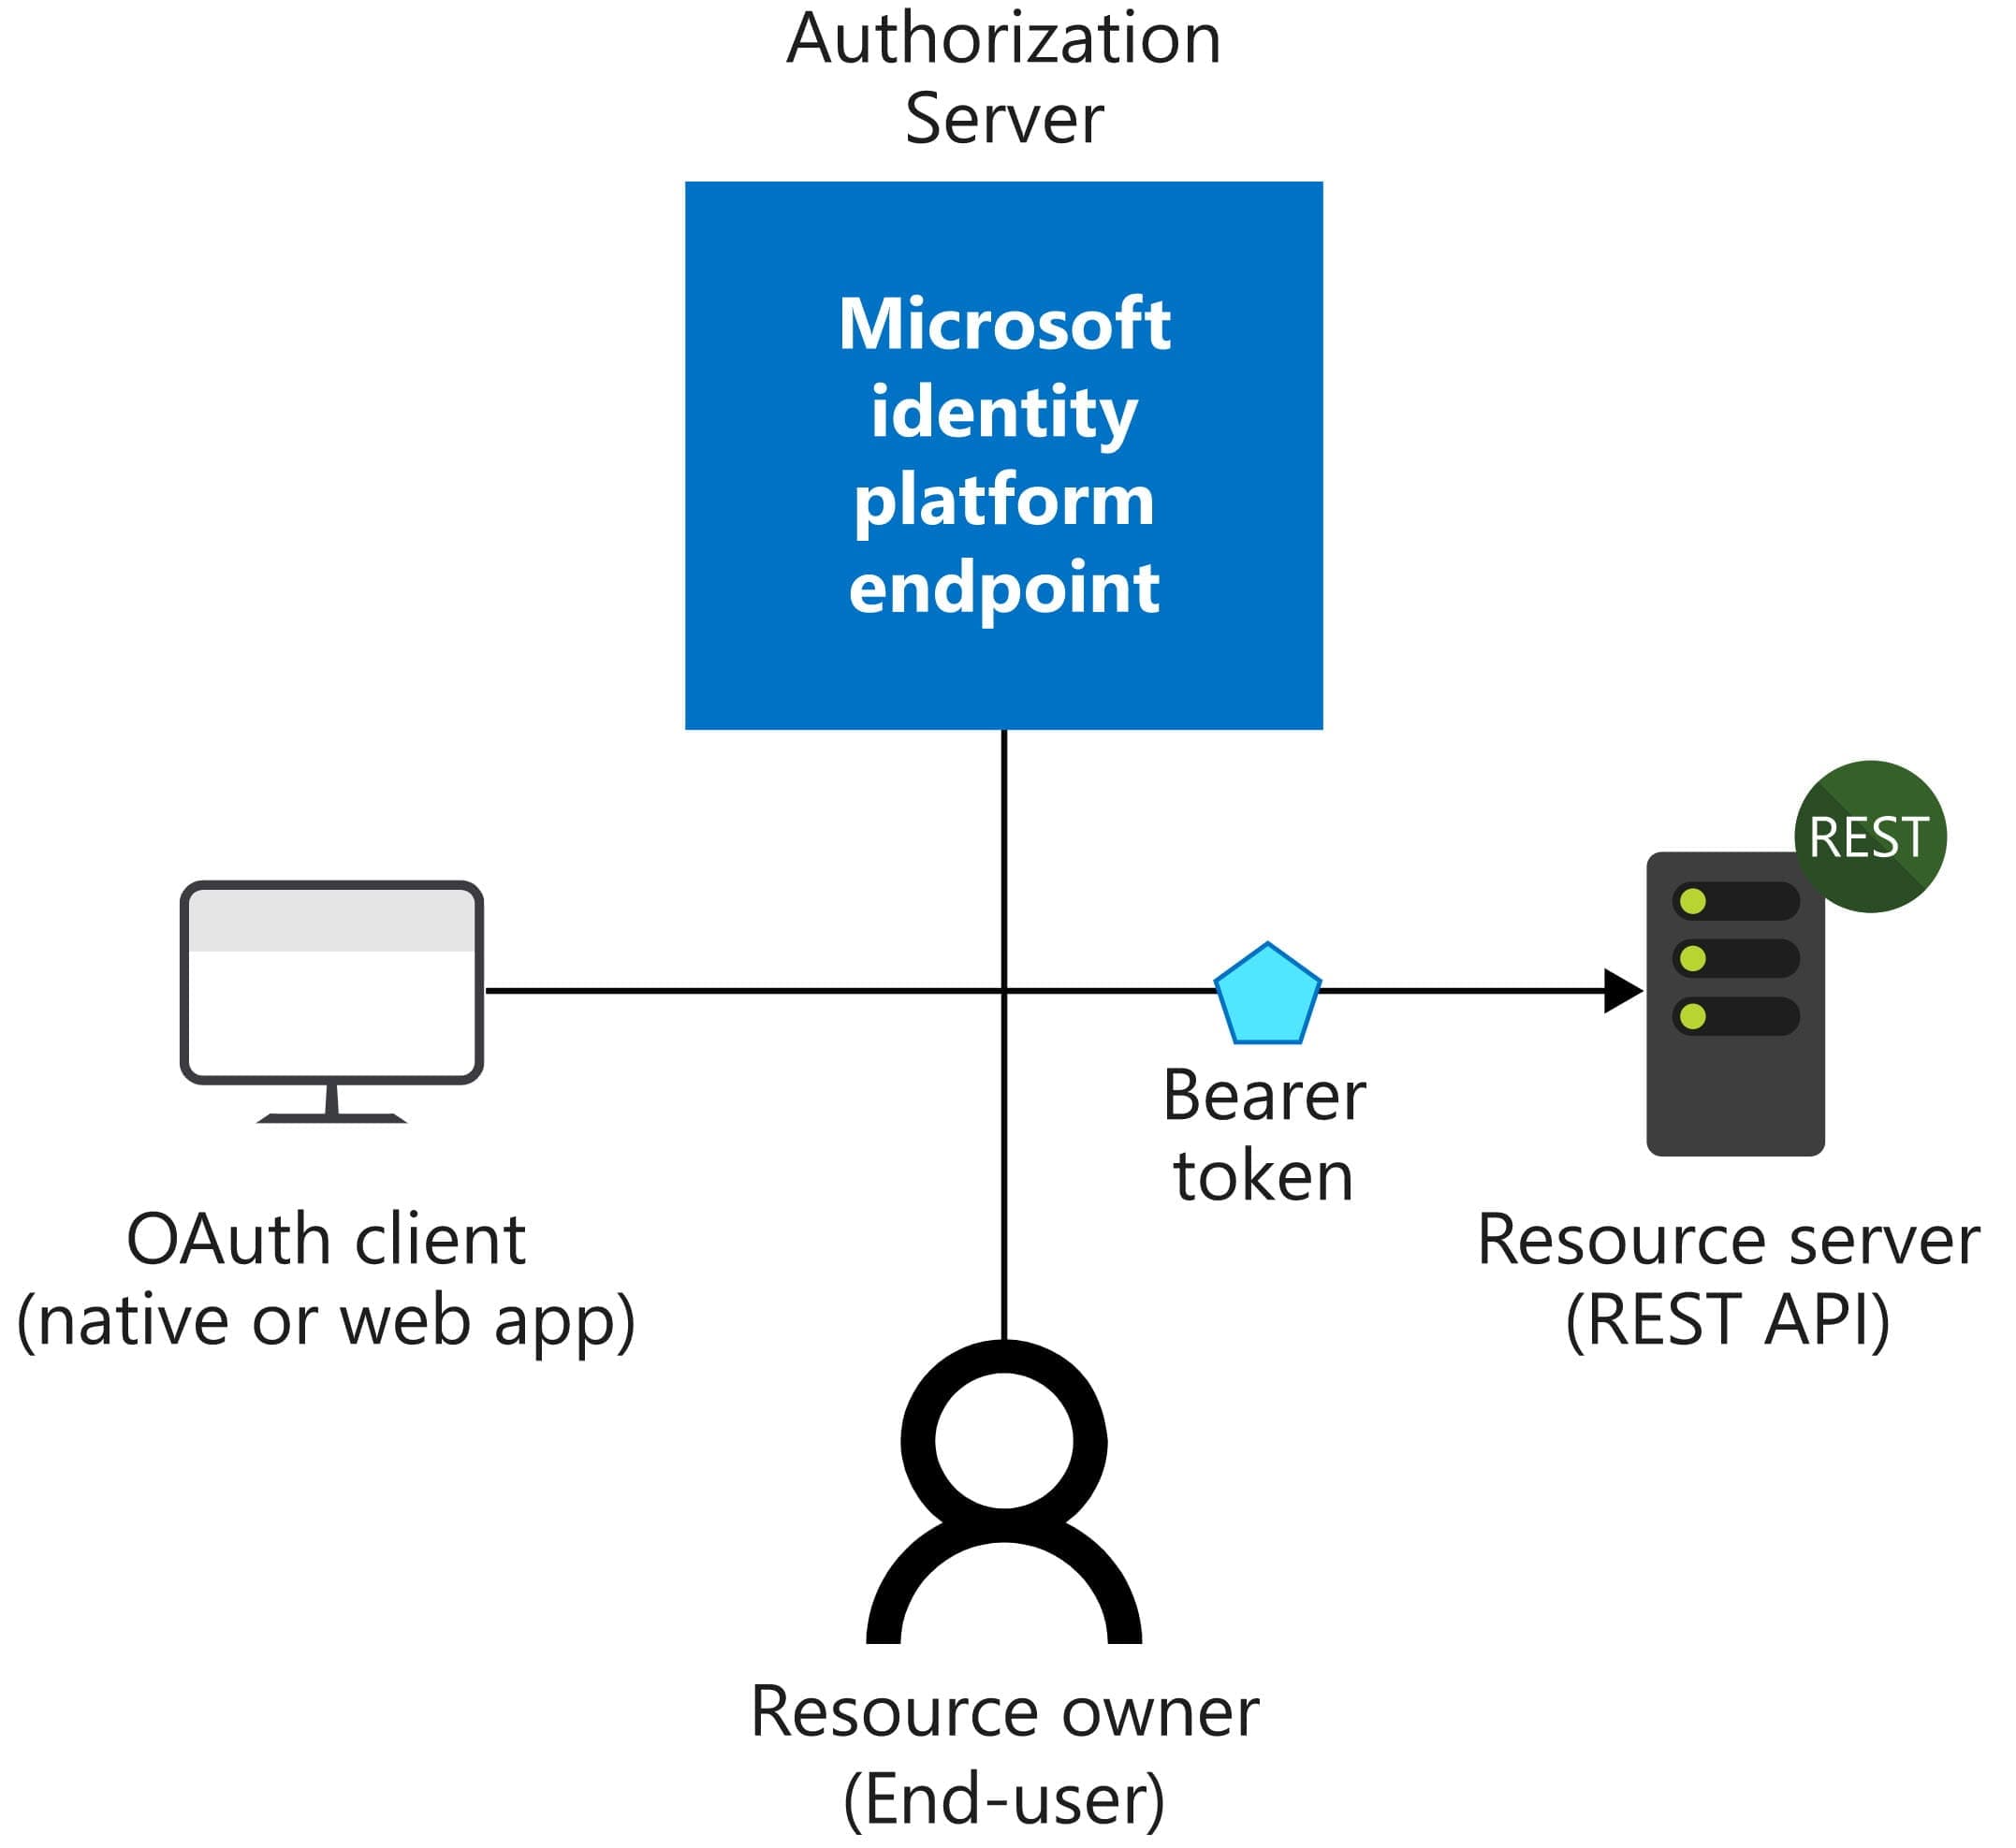
Before we go further into Azure AD, let's get a high-level understanding of the Authentication flow with Azure AD (or any Identity Provider)
In nearly all Authentication and Authorization flows, there are four parties involved in the exchange.
- Authorization Server → Responsible for Ensuring user's identity and managing tokens.
- Resource Owner → The end-user
- OAuth Client → Your Application, which the user interacts with.
- Resource Server → The place, application, or API where the data resides.
There might be multiple applications (referred to as OAuth Client above) that need to interact with the same or different Resource Server. Each of these applications might have different settings specific to its needs.
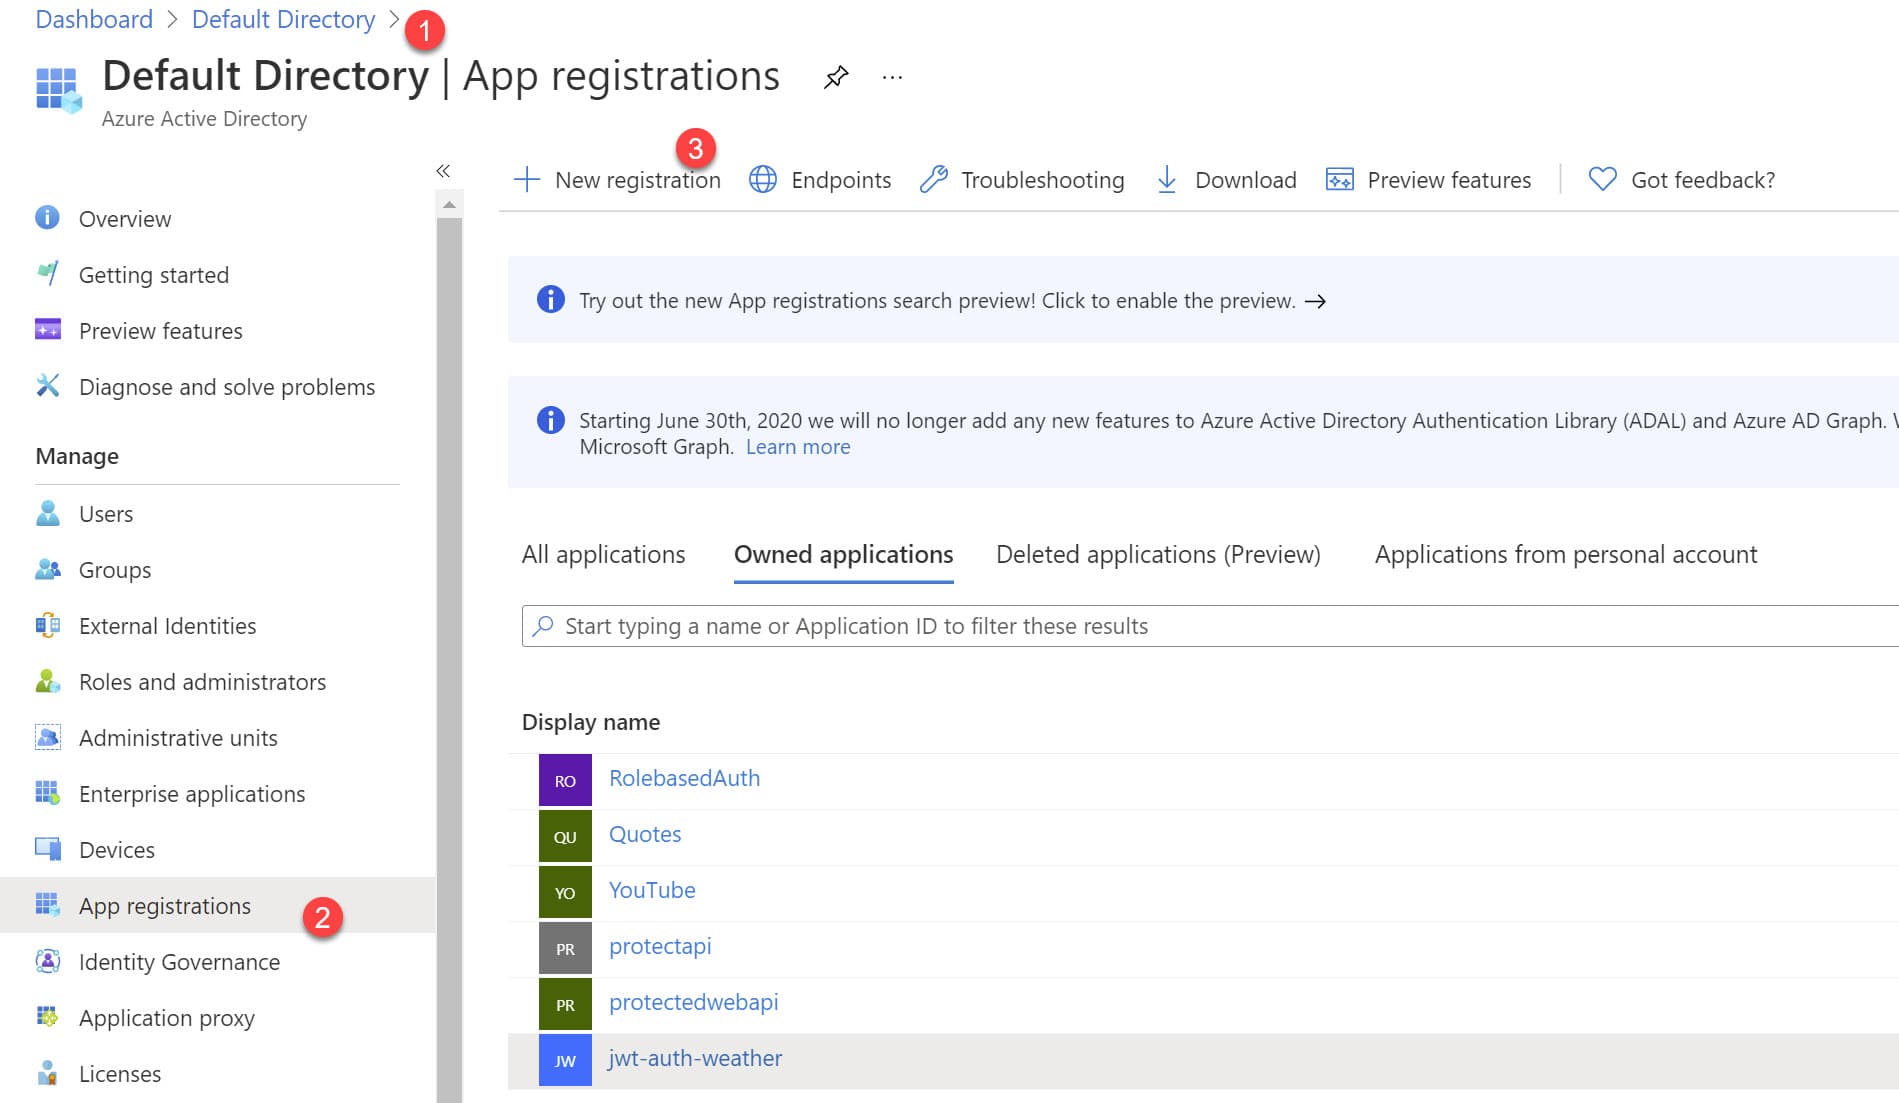
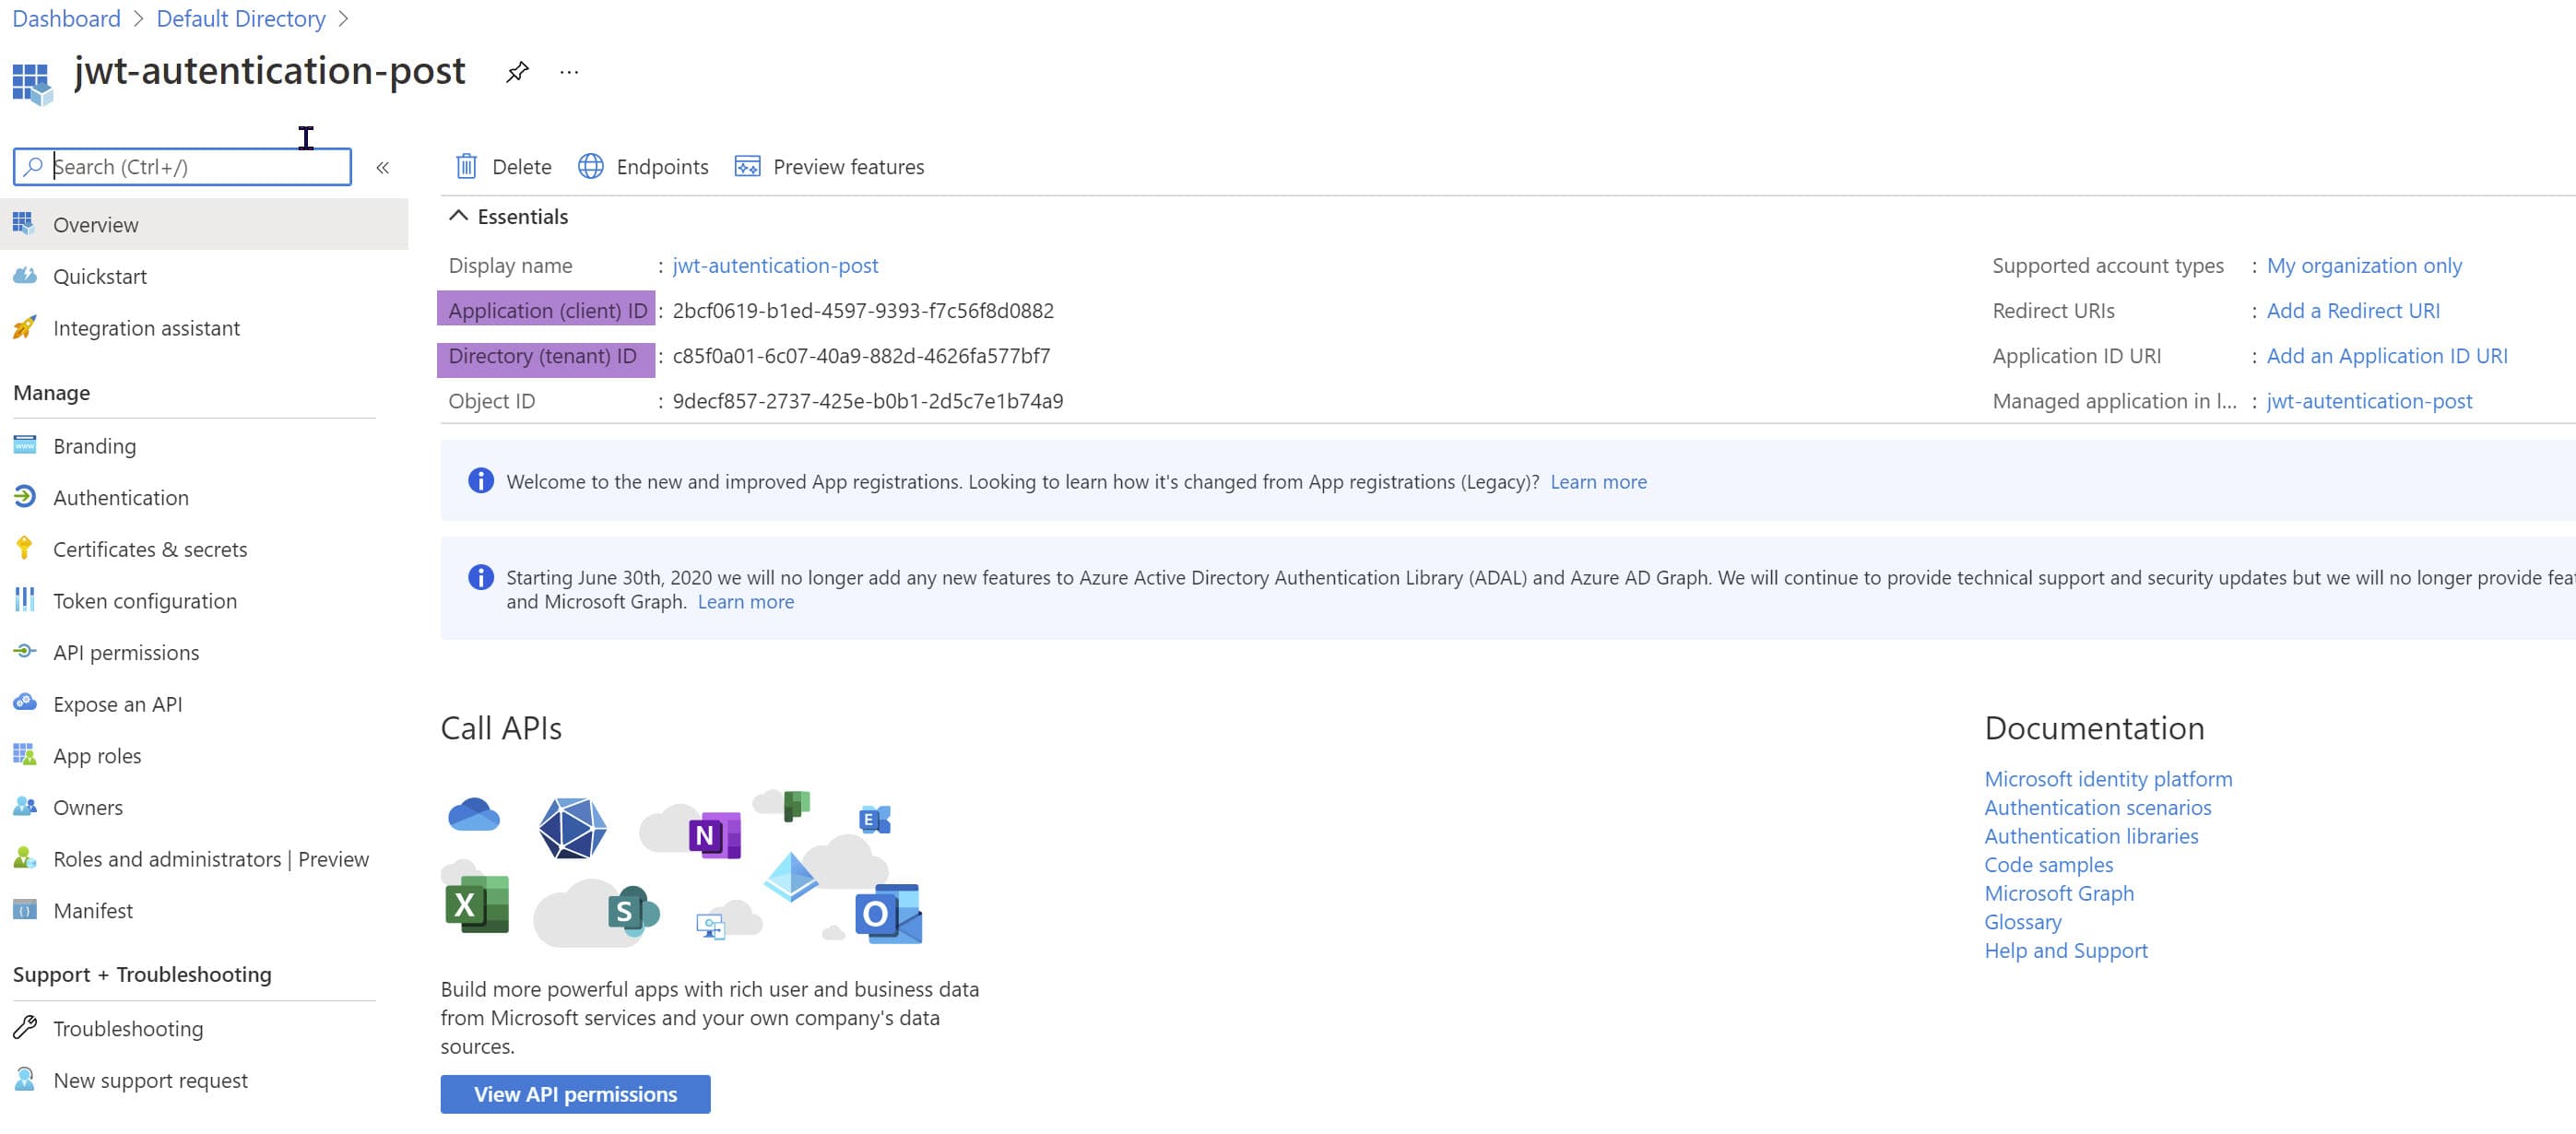
In Azure AD, we can create Application Objects, that can be seen as a one to one definition of our application. Application Objects are created as App Registrations in Azure Portal.
An Azure AD application is defined by its one and only application object, which resides in the Azure AD tenant where the application was registered, also known as home tenant
The Application Object describes three aspects of an application.
- how the service can issue Tokens
- Resources the application might need to access
- Actions that the application can take.
To create an Application Object, head over to the App Registrations section under your Azure Active Directory in the Azure Portal and use the 'New Registration.'
In the following screen, enter the name for your application and select the 'Supported account type.' If you are unsure which account type to choose, use the 'Help me choose' link to learn more.
Depending on the type of account, you select the version of the token that Azure AD creates will be different. (between v1 and v2). Let's not worry about it too much at the moment and select 'Accounts in this organizational directory only' as the option. (It will create a v1 token). You can read more about the token versions here.
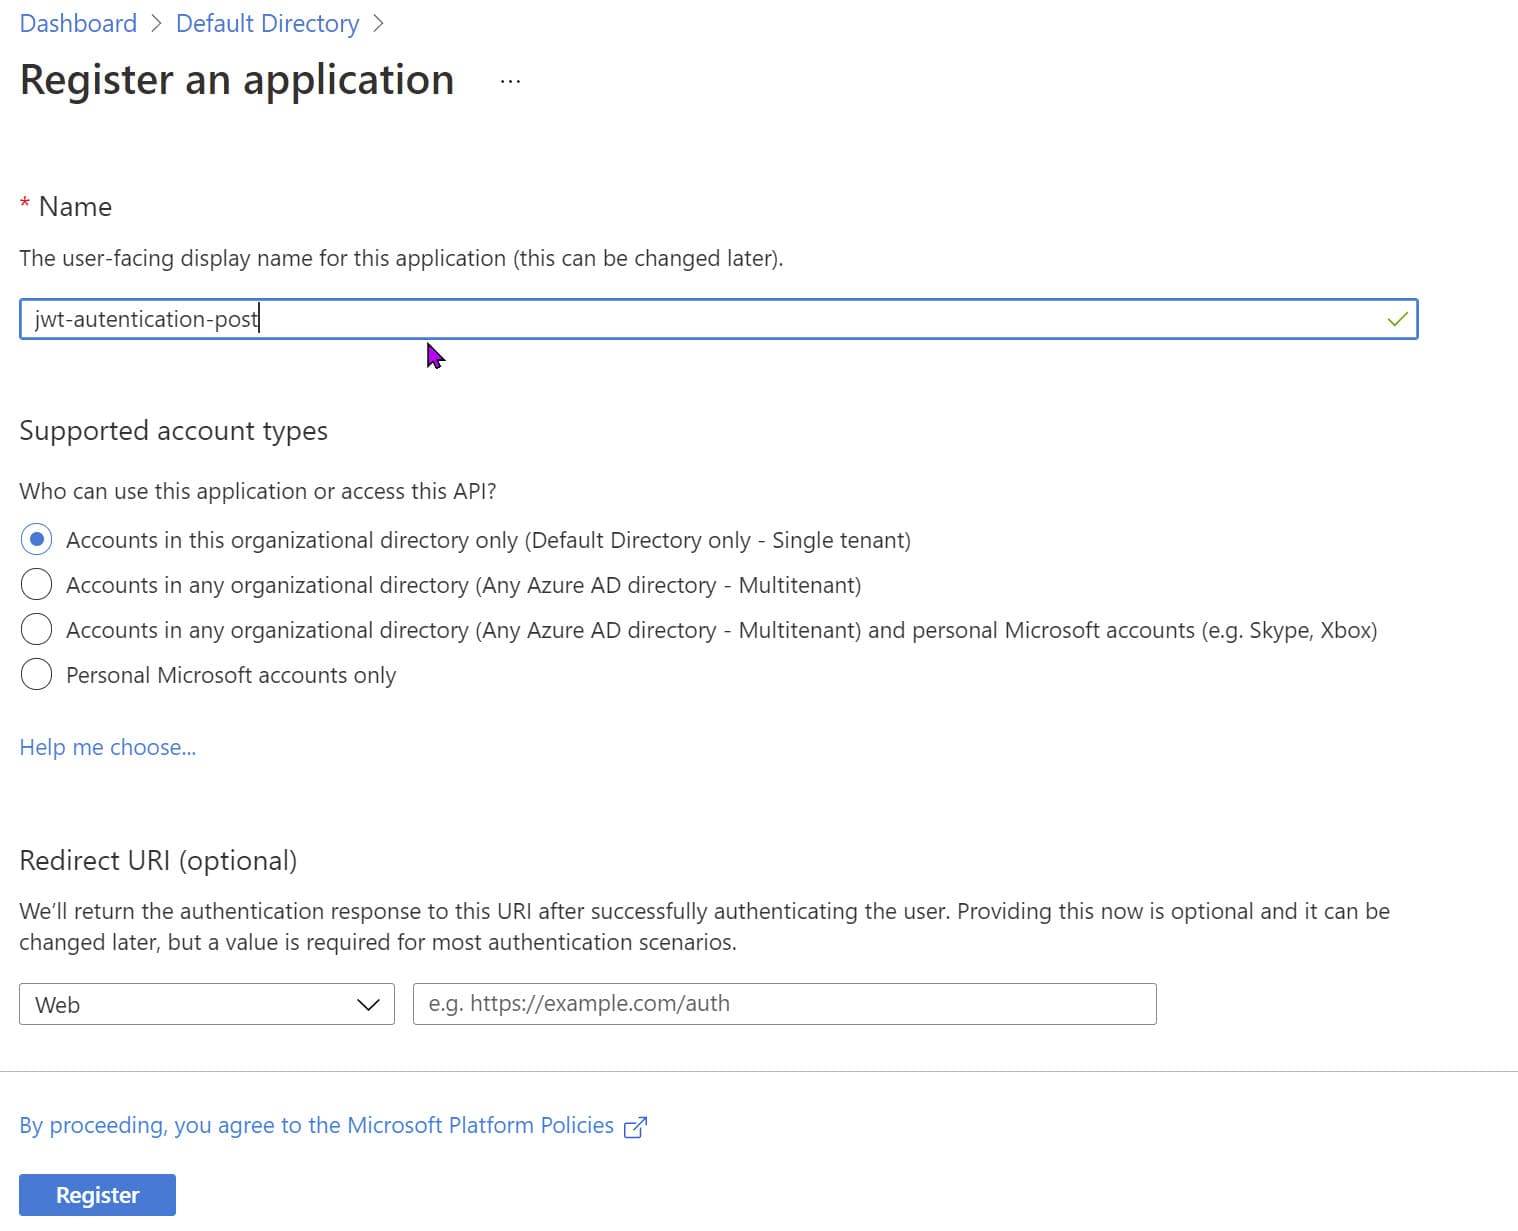
For the Redirect URI, you can leave it blank or give in the URL of your API endpoint (Since an end-user does not log in directly against the API, this can be blank).
Clicking Register will register the AD Application and show the relevant details of the application created.
The AD application is all set up .let's configure the web app to start using this AD Application for authentication.
Setting Up Web API To Use Azure AD
The Identity Provider, Azure AD, is only one part of the whole story. It takes out the responsibility of providing and managing the tokens.
Like in our example with the physical office setting and building passes, creating the card is only one part. There is still work in setting up the swipe sensors for the doors, making sure they are set up correctly to allow only people with the correct access level, pointing employees to the proper place to get the card, etc.
These very much exist when building applications and are usually managed with Nuget libraries, npm packages, etc.
Microsoft brings all these services, libraries, and tools under one name - The Microsoft Identity Platform.
The Microsoft identity platform is an authentication service, open-source libraries, and application management tools.
To start using this in our application, let's add the Microsoft.Identity.Web NuGet package. To configure Authentication support for our application, let's set it up in the ConfigureServices method.
services.AddMicrosoftIdentityWebApiAuthentication(Configuration);
The Configuration Instance is injected into the Startup.cs class automatically. The functionally internally expects an AzureAd configuration section defined with a specific set of values.
To set this up, we can update the appsettings.json file with the below details.
"AzureAd": {
    "Instance": "https://login.microsoftonline.com/",
    "ClientId": "",
    "TenantId": "",
    "Audience": ""
  }
The ClientId and TenantId is available from the AD application that we created (highlighted in the image above). Copy and paste those to the config file. The Audience value is the same as the ClientId in this instance. This changes based on the token version - the Identity web library defaults to v2 token values. Since ours is a v1 token, we need to set this explicitly.
All we have done now is to configure the application to use the authorization middleware. If we were to run this application now, it still allows any user to use the API.
To restrict access to only authenticated users, let's add a custom middleware check to ensure that the user is authenticated. Under the Configure method, let's remove the existing call to UseAuthorization (as we are not looking into authorization in this post) and add in the below code to configure Authentication.
The UseAuthentication call sets up authentication in the middleware, and the custom Use middleware code checks whether the User Identity is authenticated or not.
If not authenticated, it returns a 401 HTTP Status Code along with a response message. If authenticated, it continues with the next middleware in the pipeline.
public void Configure(IApplicationBuilder app, IWebHostEnvironment env)
{
   // Other configurations
    app.UseAuthentication();
    app.Use(async (context, next) =>
    {
        if (!context.User.Identity?.IsAuthenticated ?? false)
        {
            context.Response.StatusCode = 401;
            await context.Response.WriteAsync("Not Authenticated");
        }
        else await next();

    });
   // Other configurations
}
If we run the application now and navigate to the API endpoint, it will return 401 Unauthorized code.
Getting Token From Azure AD
To hit the API endpoint successfully, we now need to specify a valid token.
The Microsoft identity platform endpoint for identity-as-a-service implements authentication and authorization with the industry-standard protocols OpenID Connect (OIDC) and OAuth 2.0.
The platform uses OAuth for authorization and OpenID Connect (OIDC) for authentication. OpenID Connect is built on top of OAuth 2.0, so the terminology and flow are similar.
Based on the application scenario, we can use different OAuth flows to acquire the token. You can find a list of application scenarios and the supported authentication flows here.
Since we don't have any UI front-end and to keep things simple and easy, let's use the Implicit Grant Flow to get the token.
Note: This is purely for demo purposes, and in a real-world application, you would use the newer authorization code flow or other recommended flows to retrieve the token.
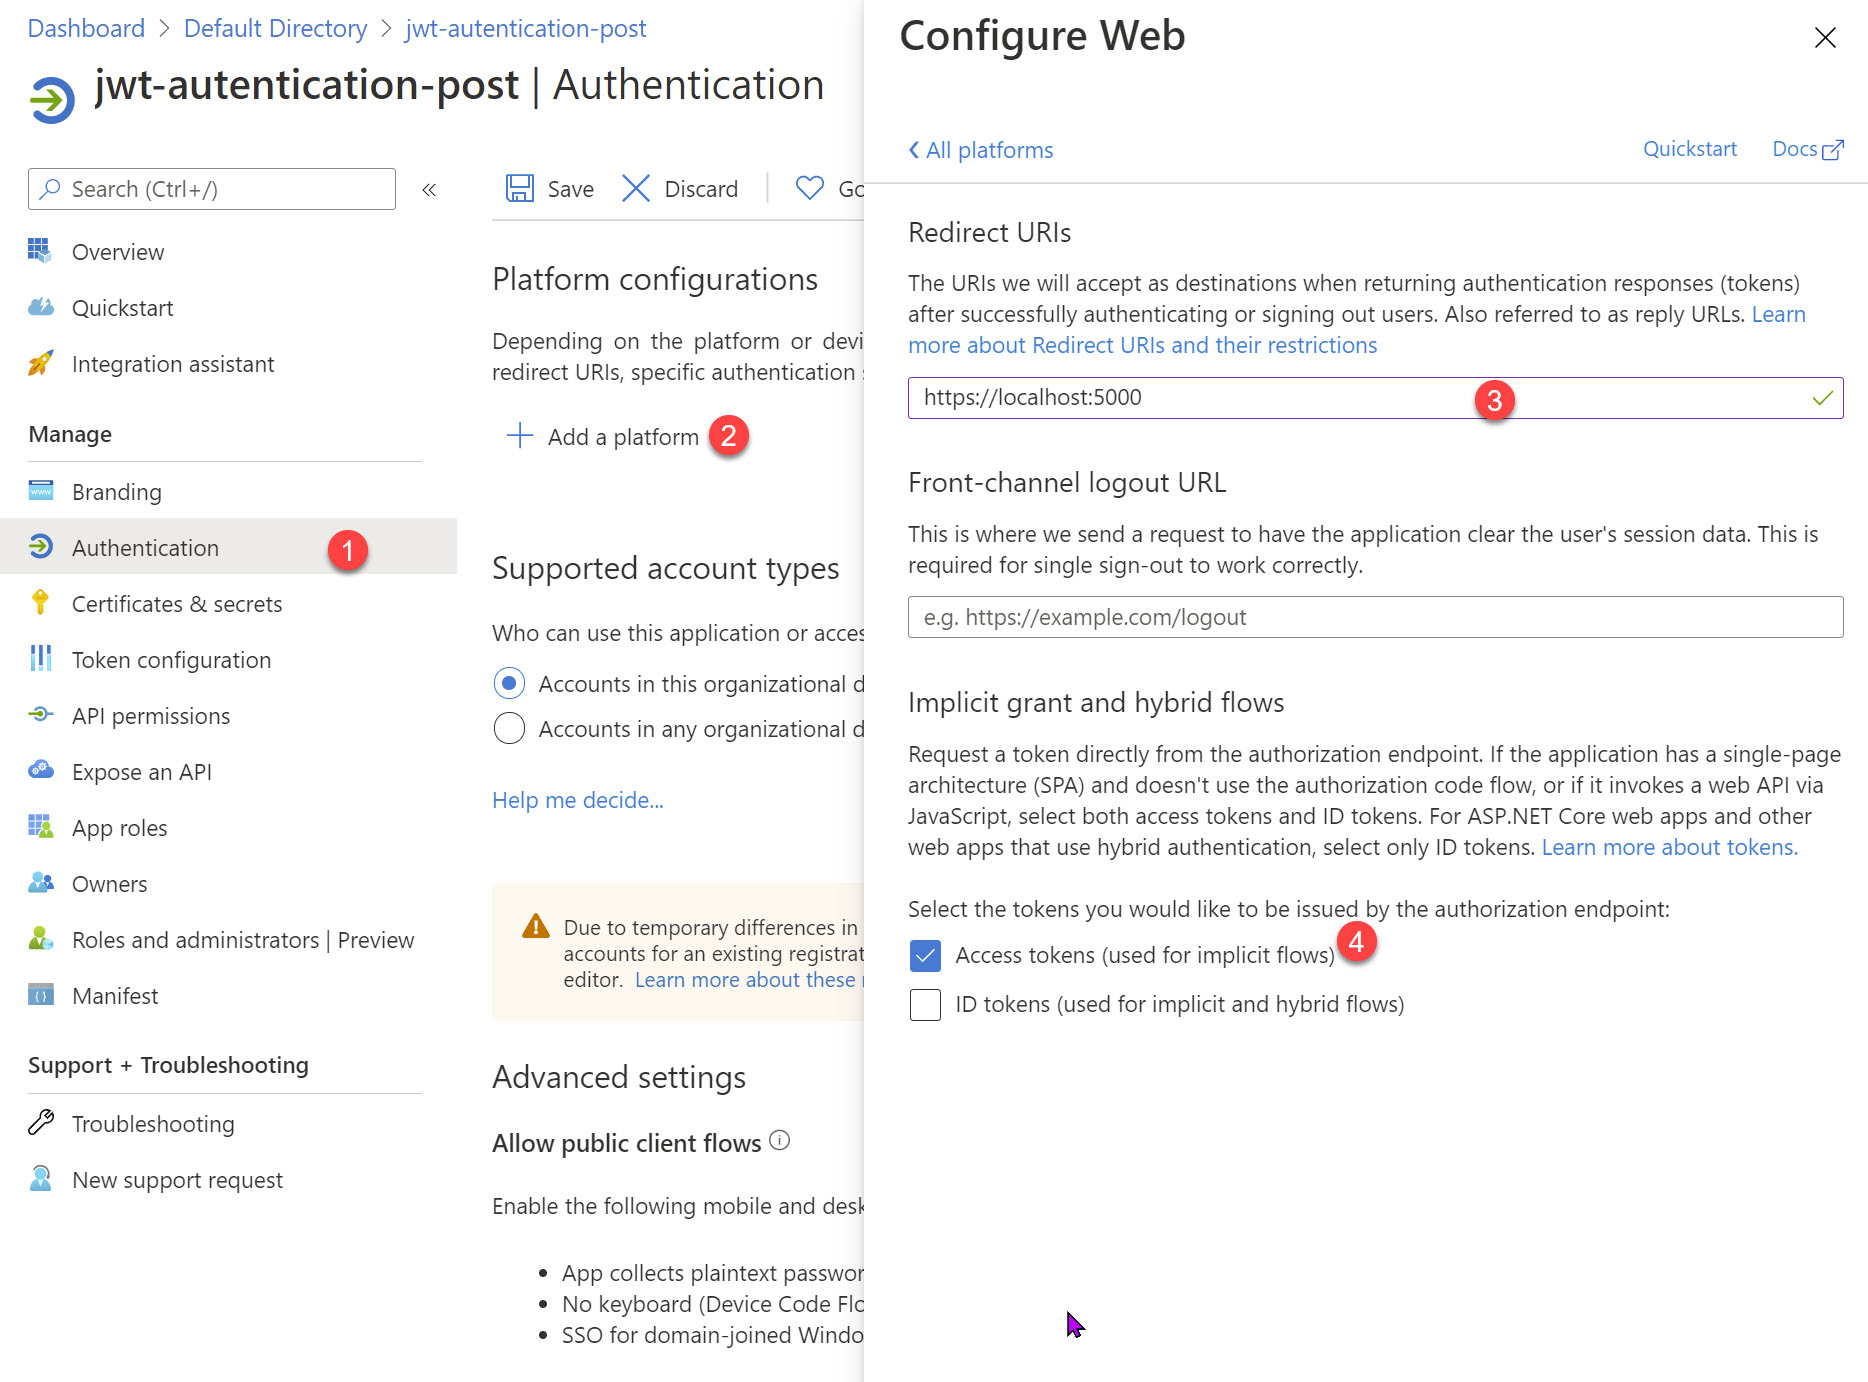
In Azure AD for the registered application, under Authentication tab we need to explicitly enable Access Token for Implicit Flow to be able to get a token. We need to first add a platform configuration using the 'Add a platform' button.
Below I add a Web platform, specify a Redirect URI and enable the Access token for implicit flow.
To use the Implicit flow to get the token from Azure AD, we need to request the OAuth2 authorize endpoint. The base URL is available from the Endpoints section (OAuth 2.0 authorization endpoint (v1)) under the AD application that we created above.
It needs to be passed a few variables, as shown below. Check here if you want to learn more.
https://login.microsoftonline.com/<TENANT ID>/oauth2/authorize?
client_id=<AD APP CLIENT ID>
&response_type=token
&redirect_uri=http%3A%2F%2Flocalhost%3A5000%2F // Redirect URL
&resource=<AD APP CLIENT ID>
&response_mode=fragment
&state=12345
&nonce=678910
Fill in the appropriate values for your AD Tenant and the AD Application details in the URL above. I have split it into multiple lines to show it easily here. Remove the line breaks from the URL and navigate to it in the browser.
It will launch the login screen for your Azure AD, and once granted permissions; it will redirect to the redirect_uri as specified in the URL above, along with the Bearer token and few other details as shown below.
http://localhost:5000/#access_token=<ACCESS_TOKEN_VALUE>
&token_type=<BEARER TOKEN>
&expires_in=3597
&state=12345
&session_state=b9446bcb-59fe-4ddf-abdc-d7c42996f1af
Extract the Bearer token from the URL above, and we can use this to authenticate against our Web API.
Since we cannot use the browser to add in the Bearer token as part of the Authorization header, let's use a tool like Postman. (available for free).
We can pass the Bearer token under the Auth section of the request as shown below, and it now successfully returns the data from our API since it is a valid token.

If we modify the token value (by removing or adding a few characters), the API again returns a 401 Unauthorized status code as expected.
How Web API Verifies Token?
How is the API verifying the token and making sure it is a valid token?
To understand this better, let's intercept the calls that the API application makes internally to the Azure AD Identity Provider when it receives a request.
To do this, let's use a tool called Fiddler, which is a web debugging proxy.
To configure ASP NET API calls to be routed through Fiddler, let's add a default proxy to all HTTPClient instances using the below code.
HttpClient.DefaultProxy = new WebProxy(new Uri("http://localhost:8866"));
It configures the default proxy for any HTTP client instances to the local proxy that Fiddler is listening to by default.
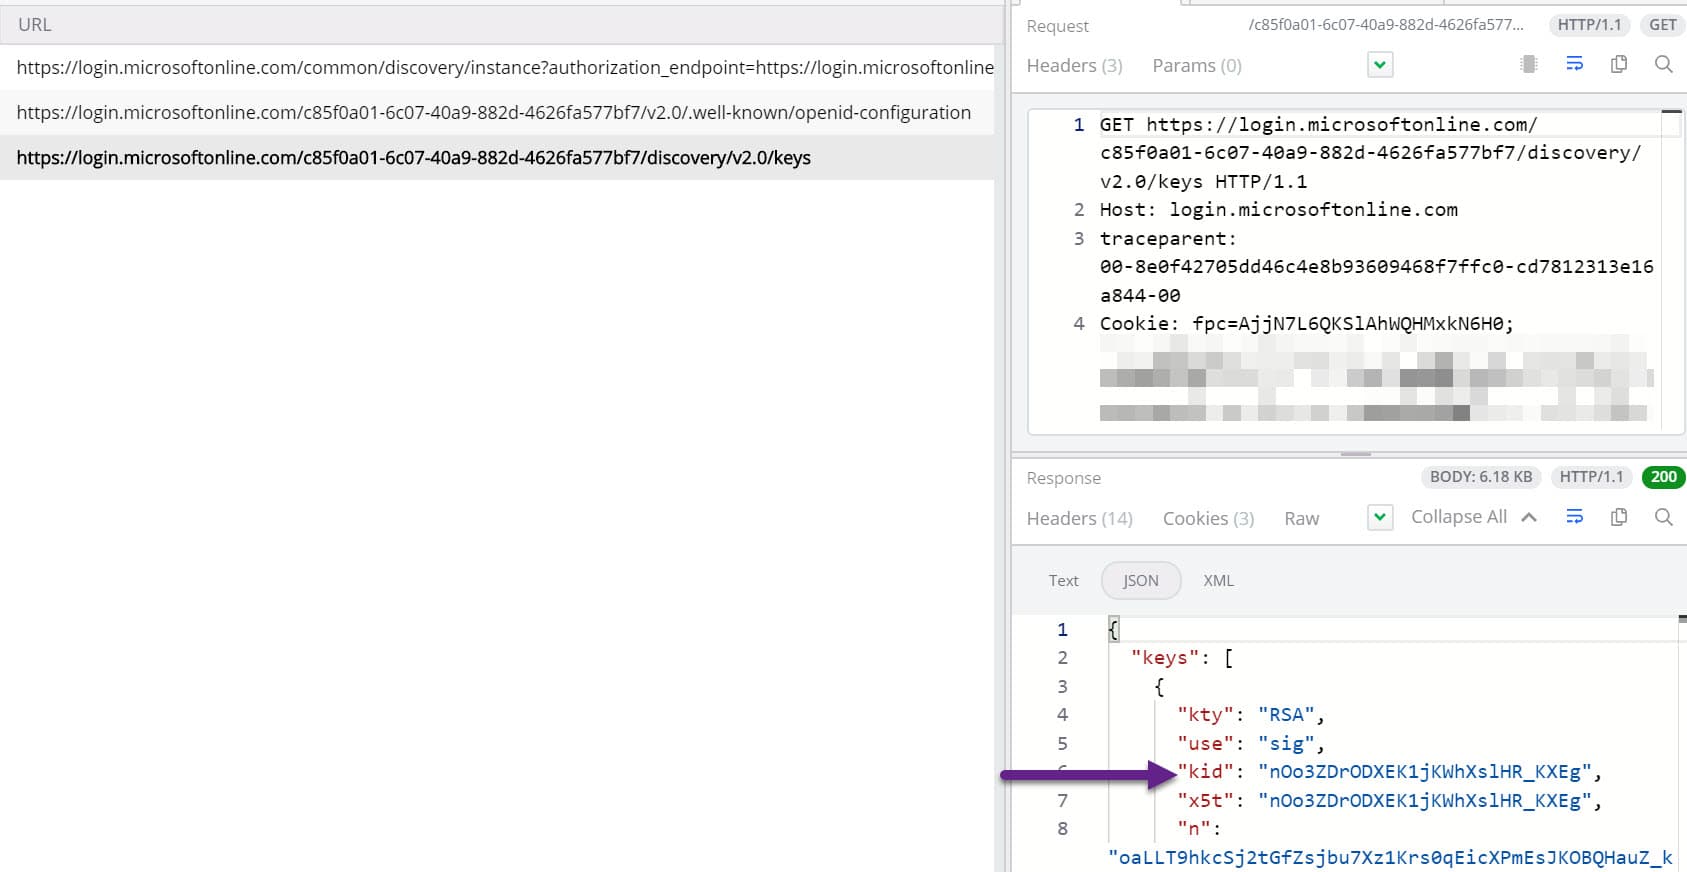
With this configured, if we rerun the application and call the API, we can see three additional calls to login.microsoftonline.com as shown below.
The first call is a discovery call, and the second one does an Open Id configuration call for our AD tenant. It gives the jwks_uri attribute, which retrieves all public keys (an array of keys) used by our Azure AD instance now.
The JWT token that we receive has information on the public key used to sign the token. It is available as kid property in the header of the token.
If we inspect the token using a tool like jwt.io or jwt.ms we can view this information (as shown in the screenshot below).
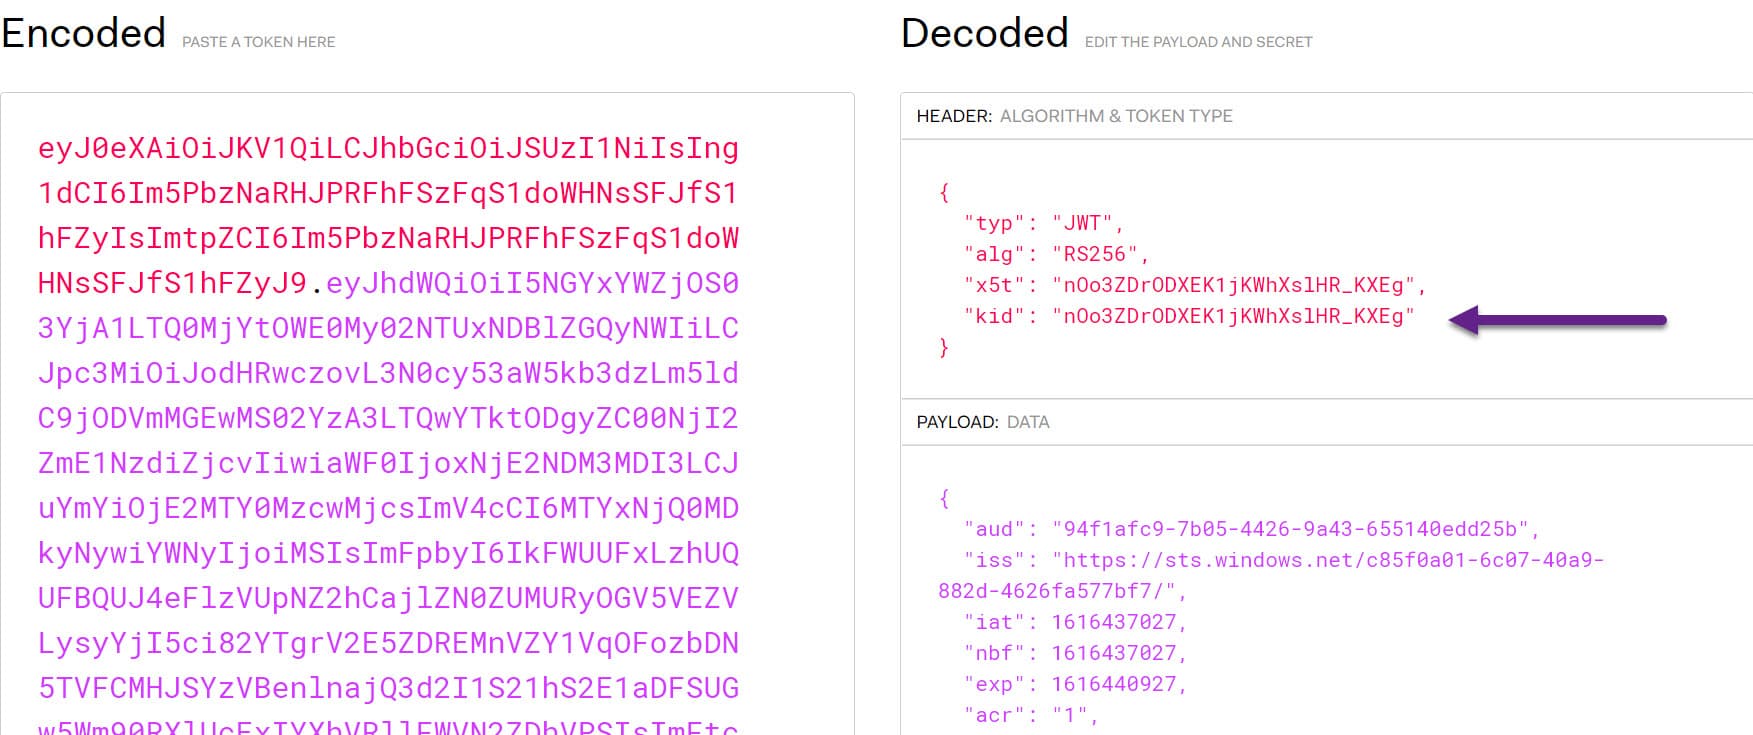
The keyid TDK attribute is matched to the correct public key from the call to the jwks_uri and used to verify the JWT token signature.
If the signature verification is successful, then the token is considered secure, and all values inside that are valid. If the values are tampered with, then the signature will be invalid, and the API server will reject the token and return a 401 Unauthorized error as before.
Don't forget to remove the ClientProxy that we set on the HttpClient
I hope this helps you understand the basic concepts about Authentication in ASP NET Web API and how it works under the hood. The flows are similar if we use a different Identity Provider instead of Azure, like Auth0, IdentityServer, etc.
Have a great time protecting your API's and stay tuned for more articles!
References

Rahul Nath Newsletter
Join the newsletter to receive the latest updates in your inbox.