.Net Core Web App and Azure AD Security Groups Role Based Access
Use Azure AD groups to enable/disable functionality for your users based on their Roles.
Getting your application to provide capabilities based on the role of the User using the system is a common thing. When using Azure Active Directory (AD), the Security Groups feature allows organizing users of your system into different roles. In the applications that we build, the group information can be used to enable/disable functionality. For, e.g., if your application has the functionality to add new users you might want to restrict this to only users belonging to the administrator role.
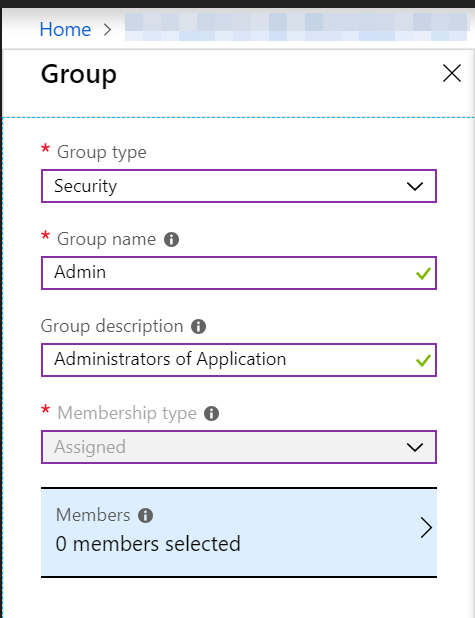
Adding new groups can be done using the Azure portal. Select Group Type, Security as it is intended to provide permissions based on roles.
For the Groups to be returned as part of the claims, the groupMembershipClaims property in application manifest needs to be updated. Setting it to SecurityGroup will return all SecurityGroups of the user.
{"groupMembershipClaims": "SecurityGroup"}
For each group created an ObjectId is assigned to it which is what gets returned as part of the claims. You can either add it as part of your applications config file or use Microsoft Graph API to query the list of groups at runtime. Here I have chosen to keep it as part of the config file.
"AdGroups": [{"GroupName": "Admin","GroupId": "119f6fb5-a325-47f9-9889-ae6979e9e120"},{"GroupName": "Employee","GroupId": "02618532-b2c0-4e58-a32e-e715ddf07f63"}]
Now that we have all the groups and associated configuration setup, we can wire up the .Net Core web application to start using the groups from the claims to enable/disable features. Using the Policy-based authorization capabilities of .Net core application we can wire up policies for all the groups we have.
Role-based authorization and claims-based authorization use a requirement, a requirement handler, and a pre-configured policy. These building blocks support the expression of authorization evaluations in code. The result is a richer, reusable, testable authorization structure.
We have an IsMemberOfGroupRequirement class to represent the requirement for all the groups, the IsMemberOfGroupHandler that implements how to validate a group requirement. The Handler reads the current user's claims and checks it contains the objectId associated with the Group as a claim. If a match is found the requirement check is marked as a success. Since we want the request to continue to match for any other group requirements the requirement is not failed explicitly.
public class IsMemberOfGroupRequirement : IAuthorizationRequirement{public readonly string GroupId ;public readonly string GroupName ;public IsMemberOfGroupRequirement(string groupName, string groupId){GroupName = groupName;GroupId = groupId;}}public class IsMemberOfGroupHandler : AuthorizationHandler<IsMemberOfGroupRequirement>{protected override Task HandleRequirementAsync(AuthorizationHandlerContext context, IsMemberOfGroupRequirement requirement){var groupClaim = context.User.Claims.FirstOrDefault(claim => claim.Type == "groups" &&claim.Value.Equals(requirement.GroupId, StringComparison.InvariantCultureIgnoreCase));if (groupClaim != null)context.Succeed(requirement);return Task.CompletedTask;}}
Registering the policies for all the groups in the application's configuration file and the handler can be done as below. Looping through all the groups in the config we create a policy for each with the associated GroupName. It allows us to use the GroupName as the policy name at places where we want to restrict features for users belonging to that group.
services.AddAuthorization(options =>{var adGroupConfig = new List<AdGroupConfig>();_configuration.Bind("AdGroups", adGroupConfig);foreach (var adGroup in adGroupConfig)options.AddPolicy(adGroup.GroupName,policy =>policy.AddRequirements(new IsMemberOfGroupRequirement(adGroup.GroupName, adGroup.GroupId)));});services.AddSingleton<IAuthorizationHandler, IsMemberOfGroupHandler>();
Using the policy is now as simple as decorating your controllers with the Authorize attribute and providing the required Policy names on it as shown below.
[Authorize(Policy = "Admin")][ApiController]public partial class AddUsersController : ControllerBase{....}
Hope this helps you to setup Role-based functionality for your ASP.Net Core applications using Azure AD as authentication/authorization provider.