RabbitMQ Direct Exchange Explained
A Direct Exchange routes messages to queues whose binding key matches the message routing key. Let's understand how to set up a Direct Exchange and how it routes messages to consumers.
Table of Contents
In RabbitMQ messages are published to an Exchange.
RabbitMQ supports four types of exchanges that route messages based on various parameters and bindings. The type of Exchange determines how the messages are routed to the consumers bound to it.
A Direct Exchange routes the message to a Queue whose binding key exactly matches the message routing key.
In this blog post, let's understand
- RabbitMQ Direct Exchange
- How Dire Exchange routes messages
- Set up a Direct Exchange from .NET app
I will use Amazon MQ, a managed message broker service that supports ActiveMQ and RabbitMQ engine types to host my RabbitMQ instance. However, you can use one of the various options that RabbitMQ provides to host your instance,
AWS sponsors this article and is part of my RabbitMQ Series.
What is a Direct Exchange in RabbitMQ?
When a message is sent to the Direct Exchange, it inspects its routing key.
If the routing key matches the binding key used to set up the Exchange, it routes the message to the specific Binding.
A Direct Exchange routes messages to queues whose binding key matches the message routing key
RabbitMQ Direct Exchange and Message Routing
A Binding connects an Exchange with a Queue.
One Queue can have one or more Bindings linked to it. These Bindings can also be to the same or different Exchanges.
Similarly, one Exchange can have one or more Bindings to the same or different Queues.
If a message routing key does not have any matching Bindings on the Exchange it is discarded by the Exchange.
For a Direct Exchange, when a Queue has only one Binding to an Exchange, as shown below, the messages coming to the queue are those with the exact match on the binding and routing keys.
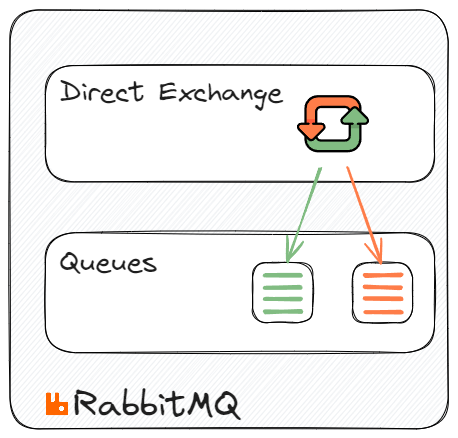
Any message with the 'green' routing key is sent to one of the queues with the green binding key, and the ones with the 'orange' routing key are sent to the other queue with the orange binding key.
A Queue can have multiple Bindings on the same Exchange, as shown below. Both 'green' and 'orange' routing key messages are sent to the Queue on the right.
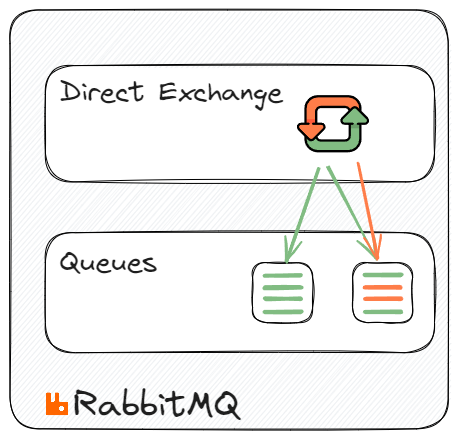
In the above scenario, the same routing key 'green' can also be bound to different Queues. The 'green' routing key is bound to two keys, which means a message with the 'green' routing key is sent to both Queues.
RabbitMQ Direct Exchange From .NET
To connect and send/receive messages from RabbitMQ, we will use a NuGet package - RabbitMQ.Client.
If you are new to building RabbitMQ from .NET applications, check out the Getting Started article below.
Create RabbitMQ Direct Exchange From .NET
Messages are sent directly to Exchanges. This means the sender application knows nothing about Queues or binding keys.
Exchanges are created using the Channel.
The ExchangeDeclare the method takes in an exchange name and its type. Below is an example of creating a RabbitMQ Direct Exchange in .NET.
var factory = new ConnectionFactory()
{
    Uri = new Uri("YOUR RABBIT INSTANCE URI"),
    Port = 5671,
    UserName = "<USERNAME FROM CONFIGURATION FILE>",
    Password = "<PASSWORD FROM CONFIGURATION FILE>"
};

using var connection = factory.CreateConnection();
using var channel = connection.CreateModel();

var exchangeName = "weather_direct";
channel.ExchangeDeclare(exchangeName, ExchangeType.Direct);
When sending a message, the sender specifies the Exchange and routing key..
channel.BasicPublish(exchangeName, routingKey, null, body);The Exchange uses the routing key to route the messages based on the binding keys specified on the Exchange to Queue binding.
Set Up Bindings on Direct Exchange From .NET
Messages are routed to Queues from Exchanges using the Binding information.
To create a Queue, use the QueueDeclare method. It will create a new Queue only if one doesn't exist with the same name.
var factory = new ConnectionFactory()
{
    Uri = new Uri("YOUR RABBIT INSTANCE URI"),
    Port = 5671,
    UserName = "<USERNAME FROM CONFIGURATION FILE>",
    Password = "<PASSWORD FROM CONFIGURATION FILE>"
};

using var connection = factory.CreateConnection();
using var channel = connection.CreateModel();

var queueName = "nsw";
channel.QueueDeclare(queueName, false, false, false, null);

var routingKey = "sydney";
channel.QueueBind(queueName, "weather_direct", routingKey);
Using the QueueBind method on the channel, we can bind the Queue with the Exchange and specify the routing key.
E.g., The above code creates a queue nsw (which stands for New South Wales, a state in Australia). In this case, weather forecast messages published for the city of Sydney (which is in NSW) are sent nsw queue.
Since an Exchange and Queue can have multiple Bindings, we can add more bindings as required.
E.g., The below code registers all weather updates for the city of Wollongong to be also sent to the same nsw queue.
var routingKey1 = "wollongong";
channel.QueueBind(queueName, "weather_direct", routingKey1);
Similarly, you can create multiple Queues as required and associate different Binding.

Rahul Nath Newsletter
Join the newsletter to receive the latest updates in your inbox.