Amazon MQ RabbitMQ: A Reliable Messaging Solution for Your .NET Projects
RabbitMQ is a powerful open-source message broker facilitating communication between systems or applications. Let's learn how to get started using RabbitMQ on Amazon MQ from .NET application.
Table of Contents
RabbitMQ is a powerful open-source message broker facilitating communication between systems or applications.
It ensures seamless data exchange by enabling asynchronous messaging, making it an essential tool for building scalable and resilient distributed systems.
In this post, we will learn how to set up RabbitMQ and start using it from a .NET application to send and receive messages.
This article is sponsored by AWS and is part of my RabbitMQ Series.
Setting Up RabbitMQ
RabbitMQ can be hosted through self-hosted deployments, major cloud providers, containerization with Docker and Kubernetes, managed RabbitMQ providers, etc, offering a wide range of options from complete control to fully managed solutions.
For this post, I will use Amazon MQ, a managed message broker service that supports ActiveMQ and RabbitMQ engine types.
However, you can use one of the various options that RabbitMQ provides to host your instance, including a local Docker instance.
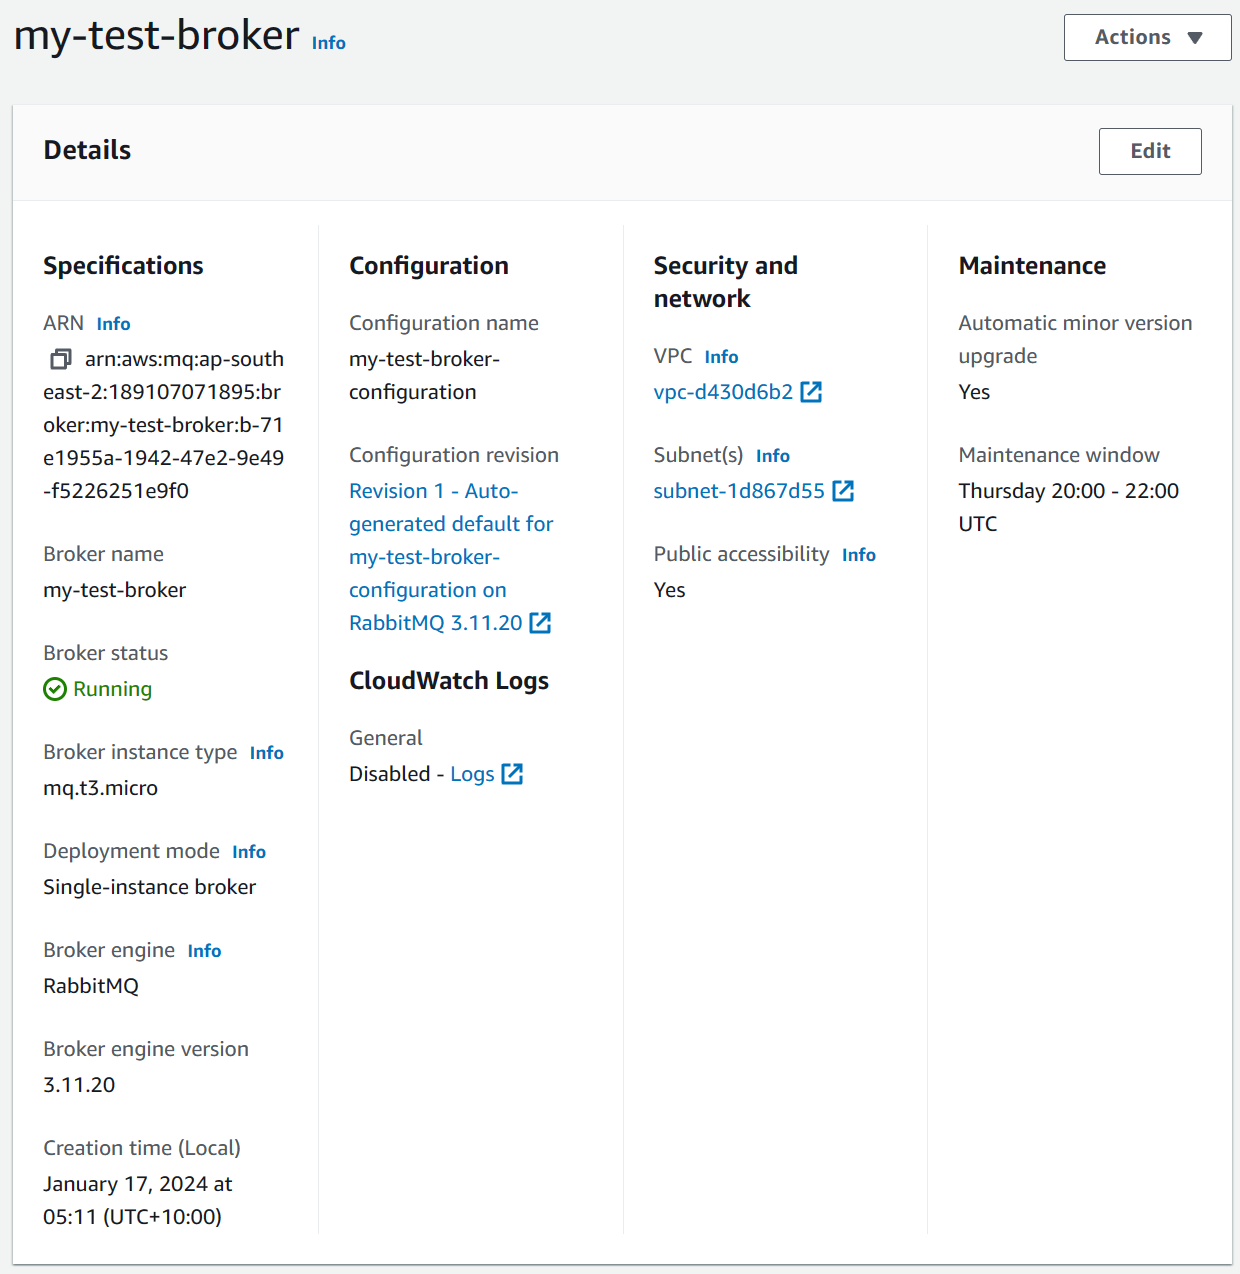
Creating RabbitMQ broker on Amazon MQ
Amazon MQ is a fully managed message broker service on AWS that supports popular messaging protocols, providing compatibility, reliability, scalability, and security for distributed applications.
Amazon MQ supports Apache ActiveMQ and RabbitMQ engine types.
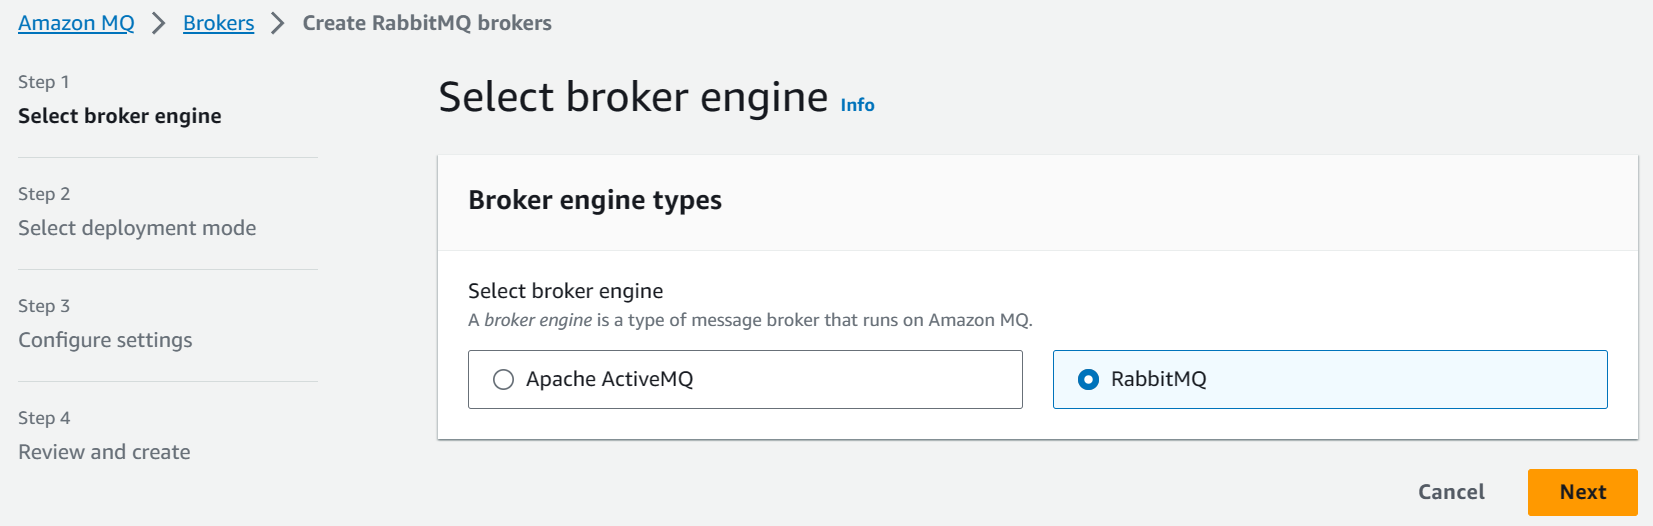
To create a RabbitMQ message broker, navigate to Amazon MQ in the AWS Console.
Create a new broker and choose RabbitMQ as the broker engine type, as shown below.
It then prompts you to choose the deployment mode.
- Single-instance broker → one broker in one Availability Zone, mainly used for development and testing.
- Cluster deployment → logical grouping of three RabbitMQ broker nodes behind a Network Load Balancer, each sharing users, queues, and a distributed state across multiple Availability Zones
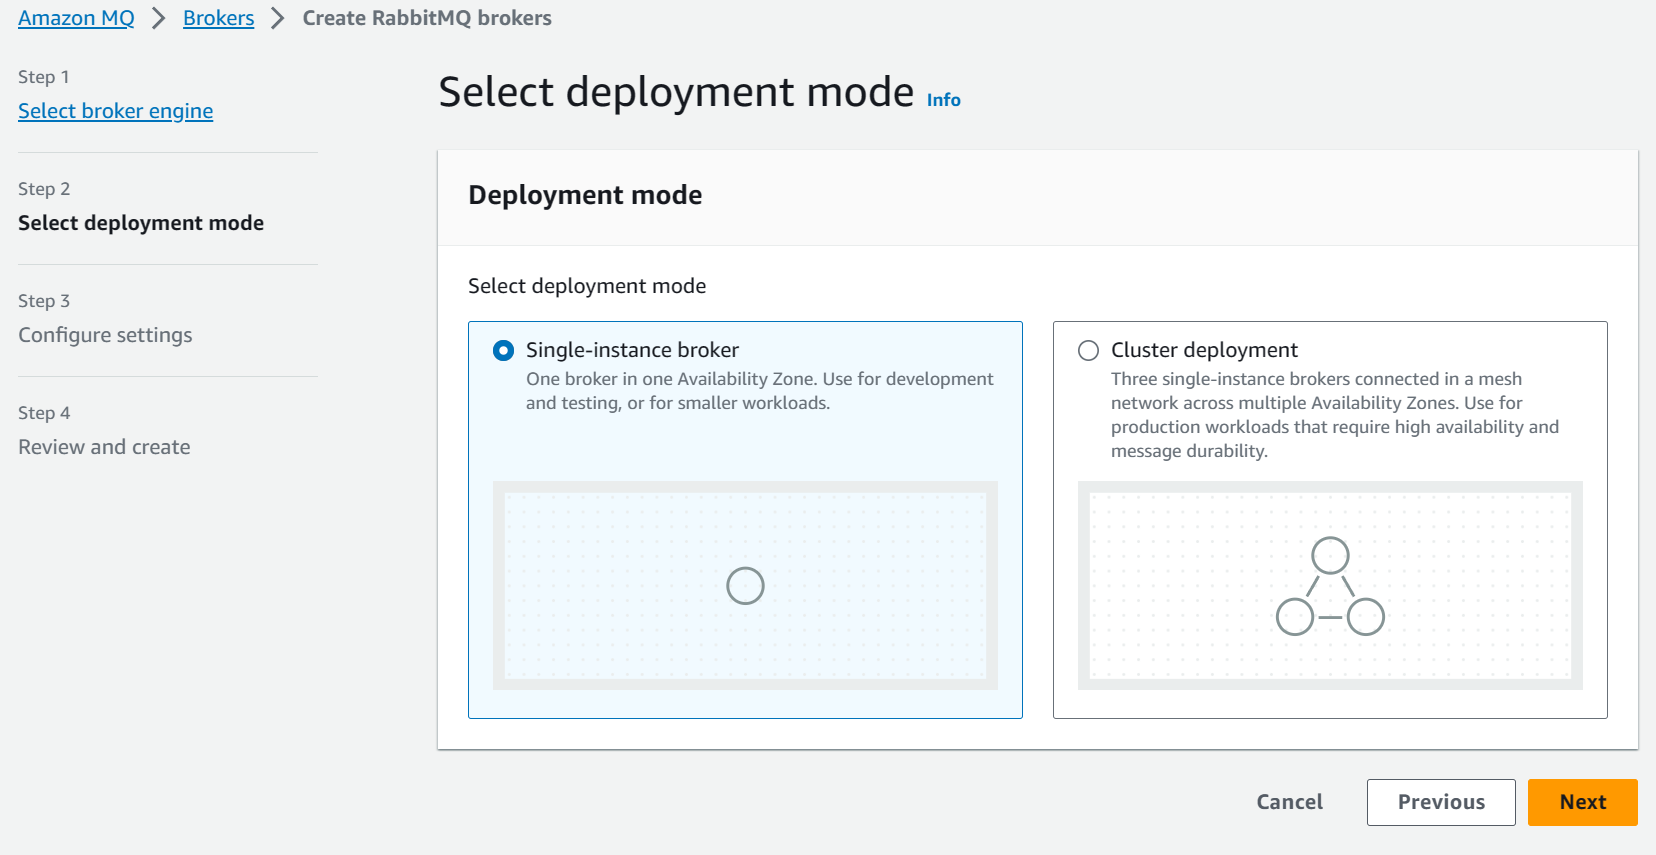
For purposes of this blog post, I am using a Single instance. However, choose Cluster deployment if you are setting up a production workload.
Once done you can configure the broker name, the instance type, username/password and other advanced configuration required.
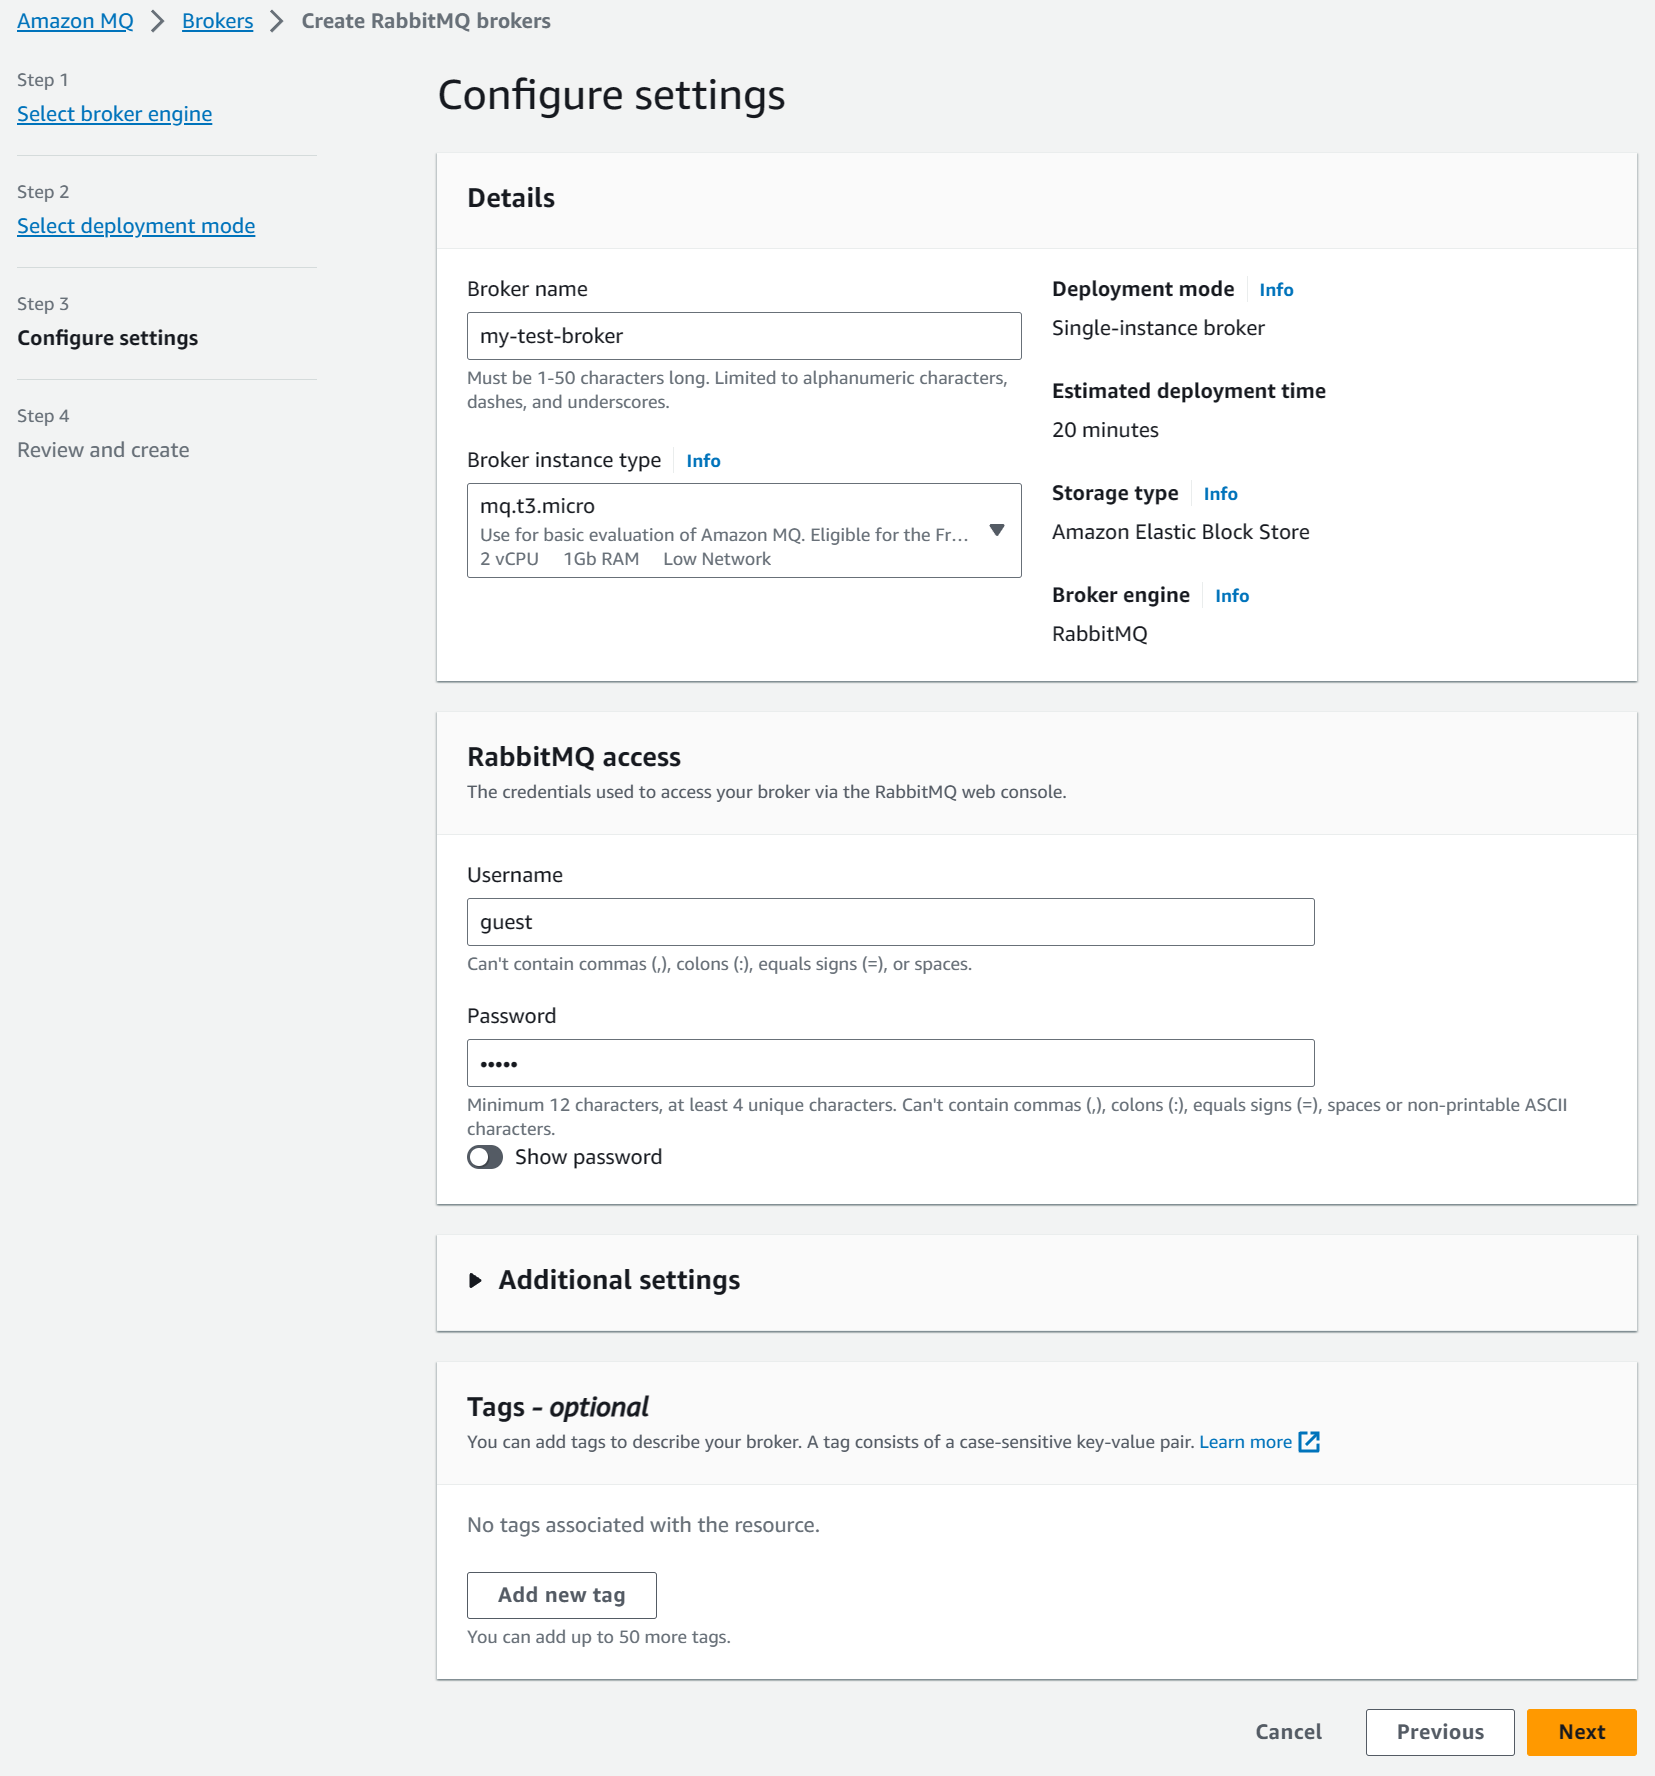
Review and create the RabbitMQ broker instance.
Creating .NET Application To Send/Receive Messages From RabbitMQ
RabbitMQ is a message broker.
This means you would typically have a sender/producer and a receiver/consumer when building applications on it. The sender sends messages, and the receiver receives and processes them.
To start using the RabbitMQ broker instance set up above, let's first create two console applications - Send and Receive.
To connect and send/receive messages from RabbitMQ, we will use a NuGet package - RabbitMQ.Client.
Below is a Powershell script to create the Send and Receive .NET console applications and add the required NuGet packages.
It creates a solution file, creates a Send console app with the start-up file as Send.cs , adds the NuGet package. It also creates a Receive console app with the start-up file Receive.cs and the required packages.
# Step 1: Create a new .NET solution
dotnet new sln -n rabbitmq-hello-world

# Step 2: Create the 'Send' console application
dotnet new console -n Send
dotnet add Send/Send.csproj package RabbitMQ.Client
dotnet sln rabbitmq-hello-world.sln add Send/Send.csproj
mv Send/Program.cs Send/Send.cs

# Step 3: Create the 'Receive' console application
dotnet new console -n Receive
dotnet add Receive/Receive.csproj package RabbitMQ.Client
dotnet sln rabbitmq-hello-world.sln add Receive/Receive.csproj
mv Receive/Program.cs Receive/Receive.cs
Core Connection Concepts With RabbitMQ
The two core concepts that you need to know in terms of connecting with RabbitMQ are
- Connection: This represents the TCP connection between your application and the RabbitMQ broker.
- Channels: A virtual connection within a connection. Used for specific tasks like publishing, consuming, and declaring queues and exchanges. Channels help organize and optimize communication between your application and the broker.
Since it's undesirable to have multiple TCP connections open at the same time from our applications to RabbitMQ, we can create one Connection and then use Channels to open lightweight connections with the broker.
Channels in RabbitMQ support efficient multiplexing, isolation, resource management, concurrency, and performance optimization while still sharing the same underlying TCP connection.
Connecting .NET Application with RabbitMQ
To connect to RabbitMQ, let's use the ConnectionFactory from the RabbitMQ.Client NuGet package to create a new TCP Connection.
var factory = new ConnectionFactory
{
    Uri = new Uri("amqps://b-71e1955a-1942-47e2-9e49-xxxxxxxxxxxx.mq.ap-southeast-2.amazonaws.com"),
    Port = 5671,
    UserName = "<USERNAME FROM CONFIGURATION FILE>",
    Password = "<PASSWORD FROM CONFIGURATION FILE>"
};
using var connection = factory.CreateConnection();
using var channel = connection.CreateModel();
The above code specifies the Uri to connect to the RabbitMQ instance in Amazon MQ and specify the username/password we used when configuring the RabbitMQ broker instance.
Using the Connection, it creates a Channel (referred to as Model in .NET speak), using the CreateModel function.
The Channel instance can then be used to send or receive messages from the RabbitMQ instance.
Creating a Queue in RabbitMQ From .NET Application
We first need to create a Queue to send or receive messages from RabbitMQ.
A Queue in RabbitMQ is a named message buffer that temporarily stores messages sent by producers and delivers them to consumers.
channel.QueueDeclare(queue: "hello",
    durable: false,
    exclusive: false,
    autoDelete: false,
    arguments: null);
The above code uses the QueueDeclare function on the channel instance to create a simple queue.
Creating a Queue is an idempotent operation.
It means a new Queue is created only if it does not already exist. So it's safe to have this same code in both our Send/Receive applications since we cannot guarantee which one will run first, and we need the Queue to exist regardless of the order in which they are run.
We can now use this Queue to send/receive messages from our .NET application.
Sending Messages to RabbitMQ From .NET Application
To send a message to RabbitMQ, we can use the BasicPublish method on the channel instance.
Below we get the message text to send from the console and send it as the message body.
string? message = null;
do
{
    Console.WriteLine("Enter Message. Press [enter] to exit.");
    message = Console.ReadLine();
    if (!string.IsNullOrEmpty(message))
        SendMessage(message, channel);
} while (!string.IsNullOrEmpty(message));

void SendMessage(string s, IModel channel)
{
    var body = Encoding.UTF8.GetBytes(s);

    channel.BasicPublish(exchange: string.Empty,
        routingKey: "hello",
        basicProperties: null,
        body: body);
    Console.WriteLine($" [x] Sent {s}");
}
Note that we specify the exchange as empty and routingKey as the queue name. This uses the default exchange that's available as part of RabbitMQ.
In a future blog post, we will learn more about Exchanges and the different types.
Receive Messages From RabbitMQ From .NET Application
With the message published successfully we are now ready to add in our first consumer/receiver for this message.
The channel instance provides a BasicConsumer method to register a consumer instance to a queue.
Console.WriteLine(" [*] Waiting for messages.");

var consumer = new EventingBasicConsumer(channel);
consumer.Received += (model, ea) =>
{
    var body = ea.Body.ToArray();
    var message = Encoding.UTF8.GetString(body);
    Console.WriteLine($" [x] Received {message}");
};
channel.BasicConsume(queue: "hello",
    autoAck: true,
    consumer: consumer);

Console.WriteLine(" Press [enter] to exit.");
Console.ReadLine();
The RabbitMQ.Client NuGet package provides a EventingBasicConsumer class we can use to handle the message processing.
The above code sets up the Received event handler with the function to process the message, in this case, writing the message body to the console.
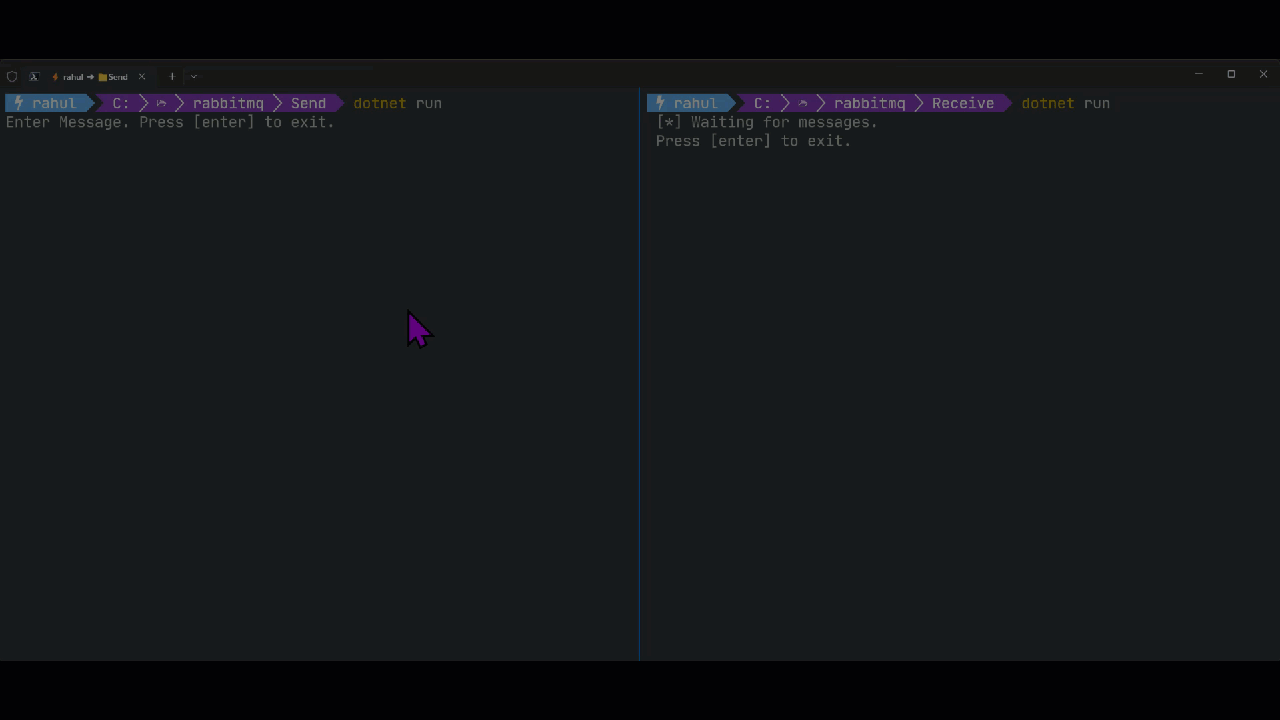
Send > 'Have a great day 😀'

Rahul Nath Newsletter
Join the newsletter to receive the latest updates in your inbox.