Azure DevOps Build Release Pipeline For Create React App
Table of Contents
Create-react-app is the defacto for most of the websites that I work on these days. In this post, we will see how to set up a build/deploy pipeline for create react app in Azure DevOps. We will be using the YML format for the pipeline here, which makes it possible to have the build definitions as part of the source code.
Build Pipeline
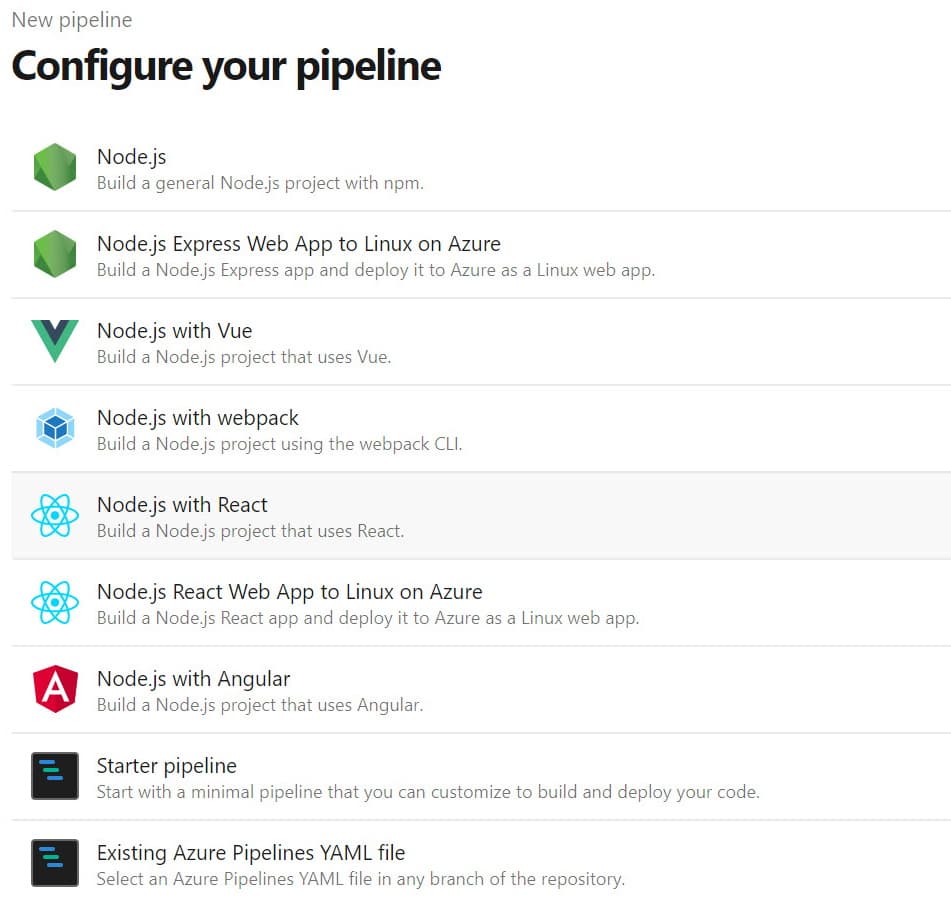
In the DevOps portal, start by creating a new Build pipeline and choose the 'Node.js with React' template. By default, it comes with the 'Install Node.js' step that installs the required node version and the 'npm script step' to execute any custom scripts. The output of the build step must be an artifact to deploy in the Release step. To support this we need to add two steps to the YML file.
- Install Node.js
- Build UI (Npm script)
- Create Archive
- Publish Artifacts
# Node.js with React
# Build a Node.js project that uses React.
# Add steps that analyze code, save build artifacts, deploy, and more:
# https://docs.microsoft.com/azure/devops/pipelines/languages/javascript

trigger:
  - master

variables:
  uiSource: "src/ui"
  uiBuild: "$(uiSource)/build"

pool:
  vmthumbnail: ../"ubuntu-latest"

steps:
  - task: NodeTool@0
    inputs:
      versionSpec: "10.x"
    displayName: "Install Node.js"

  - script: |
      pushd $(uiSource)
      npm install
      npm run build
      popd
    displayName: "Build UI"

  - task: ArchiveFiles@2
    displayName: Archive
    inputs:
      rootFolderOrFile: "$(uiBuild)"
      includeRootFolder: false
      archiveType: "zip"
      archiveFile: "$(Build.ArtifactStagingDirectory)/ui-$(Build.BuildId).zip"
      replaceExistingArchive: true

  - task: PublishBuildArtifacts@1
    displayName: Publish Artifacts
    inputs:
      PathtoPublish: "$(Build.ArtifactStagingDirectory)"
      ArtifactName: "drop"
      publishLocation: "Container"
The above pipeline generates a zip artifact of the contents of the 'build' folder.
Release Pipeline
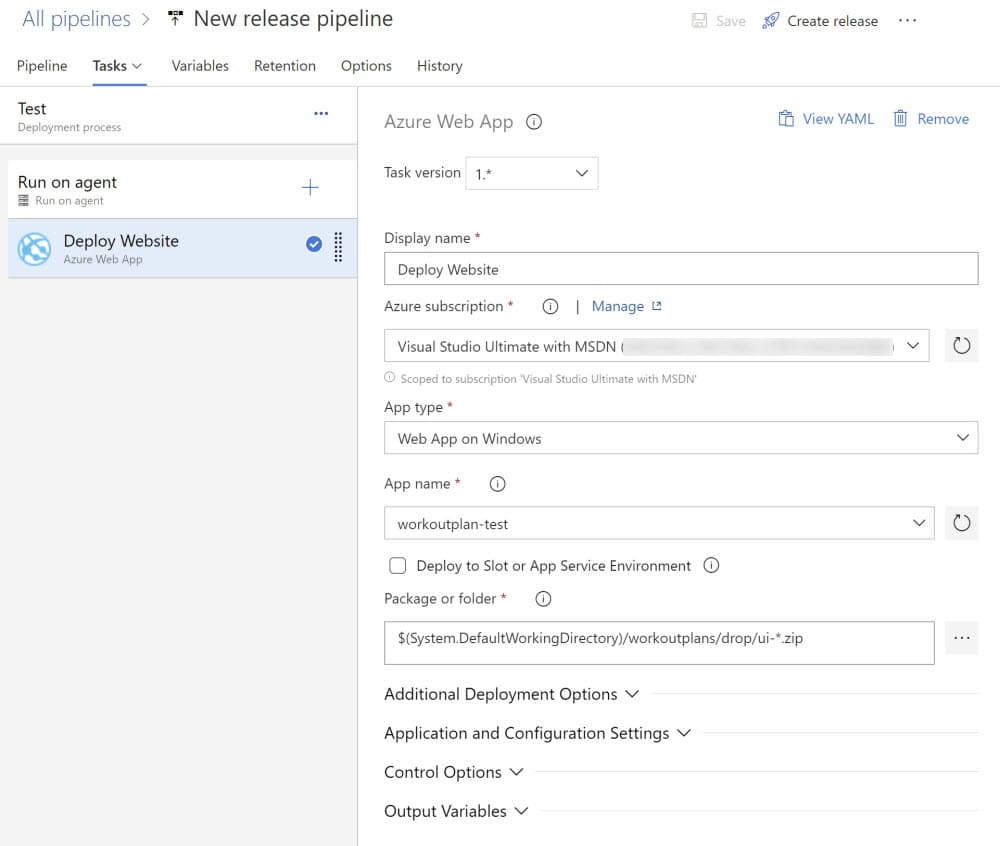
To release to Azure Web App, create a new release pipeline and add the Azure Web App Task. Link with the appropriate Azure subscription and select the web application to deploy.
Frontend Routing
When using React, you will likely use a routing library like react-router. In this case, the routing library must handle the URLs and not the server hosting the files. The server will fail to server those routes as you probably won't have anything to interpret those routes. When hosting on IIS (also for Azure Web App on Windows) add a web.config file to the public folder. This file will automatically get packaged at the root of the artifact. The file has a URL Rewrite config that takes any route and points it to the root of the website and have the Index.html file served. Eg. If the web site has a route 'https://example.com/customer/1223' and if a user hits this URL directly on the browser, IIS will redirect it to 'https://example.com' and have the default file (Index.html) served back to the user. React router will then handle the remaining route and server the appropriate React component for 'Customer/1223'.
If APIs are part of the same host, then it needs to be excluded from the URL Rewrite. Below config has '/api' ignored from being redirected. Same with any URL that matches a file on the server like CSS, js, images, etc.
<?xml version="1.0"?>
<configuration>
    <system.webServer>
        <rewrite>
            <rules>
                <rule name="React Routes" stopProcessing="true">
                    <match url=".*" />
                    <conditions logicalGrouping="MatchAll">
                        <add input="{REQUEST_FILENAME}" matchType="IsFile" negate="true" />
                        <add input="{REQUEST_FILENAME}" matchType="IsDirectory" negate="true" />
                        <add input="{REQUEST_URI}" pattern="^/(api)" negate="true" />
                    </conditions>
                    <action type="Rewrite" url="/" />
                </rule>
            </rules>
        </rewrite>
        <staticContent>
             <mimeMap fileExtension=".otf" mimeType="font/otf" />
        </staticContent>
    </system.webServer>
</configuration>
Environment/Stage Variables
When deploying to multiple environments like (Test, Staging, Production), I like to have the configs as part of the Azure DevOps Variable Groups. It allows having all the configuration for the application in one place and easier to manage. These variables are to be replaced in the build artifact at the time of release based on the environment it is getting released. One way to handle this is to have a script tag in 'Index.html' file as below.
<head>
  <script>
    window.BookingConfig = {
      searchUrl: "https://example.com/search-service/",
      bookingUrl: "https://example.com/booking-service/",
      isDevelopment: true,
      imageServer: ""
    };
  </script>
  <meta charset="utf-8" />
  <link rel="icon" href="%PUBLIC_URL%/favicon.ico" />
  ...
</head>
This file has the configuration for local development, allowing any developer on the team to pull down the source code and start running the application. Also add an 'Index.release.html' file, which is same as Index.html but with placeholders for the variables. In the example, isDevelopment is an optional config and is false by default, hence not specified in the Index.release.html file.
<head>
  <script>
    window.BookingConfig = {
      searchUrl: "#{SearchUrl}#",
      bookingUrl: "#{BookingUrl}#",
      imageServer: "#{ImageServer}#"
    };
  </script>
  <meta charset="utf-8" />
  <link rel="icon" href="%PUBLIC_URL%/favicon.ico" />
  ...
</head>
In the build step, add a command-line task to replace Index.release.html as Index.html.
This step must be before the npm step that builds the application to have the correct Index.html file packaged as part of the artifact.
- task: CmdLine@2
  inputs:
    script: |
      echo Replace Index.html with Index.release.html
      del Index.html
      ren Index.release.html Index.html
    workingDirectory: "$(uiSource)/public"
In the release step, add the Replace Tokens task to replace tokens in the new Index.html file (Index.release.html in source control). Specify the appropriate root directory and the Target files to have variables replaced. By default, the Token prefix and suffix are '#{' and '}#'. Add a new variable group for each environment/stage (Test, Staging, and Prod). Add the variables to the group and associate it to the appropriate stage in the release pipeline. The task will replace the configs from the Variable Groups at the time of release.
I hope this helps you to set up a Build/Release pipeline for your create-react-app!

Rahul Nath Newsletter
Join the newsletter to receive the latest updates in your inbox.

