Let Azure Manage The Username and Password Of Your SQL Connection String
Use Azure Managed Identities feature to connect to Azure SQL. One less sensitive information to manage.
Table of Contents
To connect to a SQL database, we usually use a connection string that has a username and password. We ensure that the connection string is stored and distributed securely.
However, the problem here is the very existence of having something sensitive to protect.
"ConnectionStrings": {
    "QuotesDatabase": "Server=tcp:quotetest.database.windows.net,1433;Database=quotes;User Id:<UserName>;Password:<YourPasswordHere>"
  }
Azure SQL supports Azure AD authentication, which means it also supports the Managed Identity feature of Azure AD. With Managed Identity, we no longer need the User Id and Password to connect. The credential is managed automatically by Azure and allows us to connect to resources that support Azure AD authentication.
In this post, let us look at how we can use Manage Service Identity to connect to Azure SQL from a web application running in Azure. Once set up, all we need is the database server details and the database name to connect to the database

Using Azure AD Token to Connect to SQL
Using the DefaultAzureCredential from Azure Identity SDK we can retrieve token from Azure AD. SqlConnection uses this token for authentication. Below is a sample code where the AccessToken property of the SqlConnection is the Azure AD token.
var connectionString = Configuration.GetConnectionString("QuotesDatabase");
services.AddTransient(a =>
{
    var sqlConnection = new SqlConnection(connectionString);
    var credential = new DefaultAzureCredential();
    var token = credential
        .GetToken(new Azure.Core.TokenRequestContext(
            new[] { "https://database.windows.net/.default" }));
    sqlConnection.AccessToken = token.Token;
    return sqlConnection;
});
When using Entity Framework, we need to use a slight workaround until EF Core will get full support for Azure AD token access. The easiest way to set up is to set the token for the underlying SqlConnection for EF explicitly. Also, check out this gist, for a different solution.
public QuoteContext(DbContextOptions options) : base(options)
{
    var conn = (Microsoft.Data.SqlClient.SqlConnection)Database.GetDbConnection();
    var credential = new DefaultAzureCredential();
    var token = credential
            .GetToken(new Azure.Core.TokenRequestContext(
                new[] { "https://database.windows.net/.default" }));
    conn.AccessToken = token.Token;
}
Setting Up SQL Server For Managed Identity
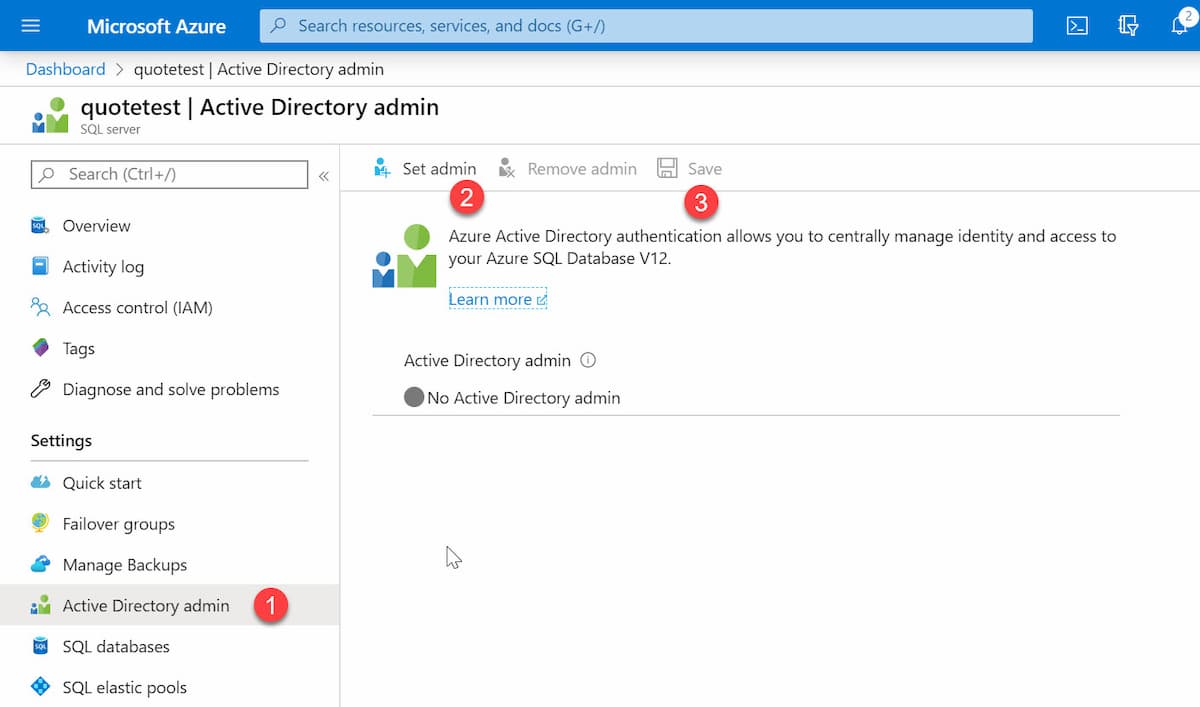
To manage Azure SQL for AD identities, we need to connect to SQL under the Azure user context. To do this, let us set up an Azure AD user as a SQL admin. It can be done from the Azure Portal under the Azure Directory Admin option for the database server, as shown below.

Using the SQL AD Admin credentials, you can connect via SQL Server Management Studio or sqlcmd and grant other AD identities access. The below script grants the user 'db_datareader, db_datawriter, and db_ddladmin' access.
CREATE USER [<identity-name>] FROM EXTERNAL PROVIDER;
ALTER ROLE db_datareader ADD MEMBER [<identity-name>];
ALTER ROLE db_datawriter ADD MEMBER [<identity-name>];
ALTER ROLE db_ddladmin ADD MEMBER [<identity-name>];
GO
<identity-name> is the name of the managed identity in Azure AD. For a system-assigned identity, the name is the same as the App Service name. It can also be an Azure AD Group (use the group name in this case). It gives you multiple options on how you want to manage access to the database. For local development, you can either create a separate AD application and use the ClientId/Secret for EnvironmentCredential, or add all developers to an Azure AD group and grant the AD group access or explicitly add in each user to the database.
No longer we need any credentials to connect to the SQL database running on Azure. This makes it one less sensitive information to manage for our application.
"ConnectionStrings": {
    "QuotesDatabase": "Server=tcp:quotetest.database.windows.net,1433;Database=quotes"
  }
Hope this helps you!
Rahul Nath Newsletter
Join the newsletter to receive the latest updates in your inbox.
