
How to Run and Access DynamoDB Local For Easy Development and Testing
Learn how to set up and run DynamoDB database on your local development machine. We'll see how to connect using AWS CLI, from .NET application and using GUI tools like Dynobase and NoSQL Workbench.
Table of Contents
Amazon DynamoDB is a managed NoSQL database service. It provides fast and predictable performance with seamless scalability.
DynamoDB Local is available as a download that is useful to develop and test applications without accessing the DynamoDB Web Service. The database is self-contained and runs on your computer.
Having the local version helps save time and money when building applications. It is also helpful for spinning up new database instances for automated testing.
In this blog post, let's explore how to set up a local instance of DynamoDB, access it from applications and the different modes it supports. We will also look at how the various GUI tools can interact with the locally installed database instance.
The downloadable version of Amazon DynamoDB is an executable .jar file. It runs on Windows, Linux, macOS, and other platforms that support Java. It is also available as a Docker image, making it even easier to get started and run.
In this post, I will use the Docker image to set up the DynamoDB. Make sure you have Docker setup on your local machine before proceeding.
DynamoDB Local Using Docker
The below command sets up DynamoDB Local (amazon/dynamodb-local) docker image,
- With name 'dynamodb' (-- name)
- Exposes 8000 port in the container on port 8000 on Docker host (-p)
- Runs in the background and detached (-d or--detach)
- With the jar file as the entry point
docker run `
--name dynamodb `
-p 8000:8000 `
-d amazon/dynamodb-local `
-jar DynamoDBLocal.jar
The Docker instance is up and running as shown below in the Docker Desktop UI.

Accessing DynamoDB
The Local DynamoDB is very similar to the instance available in AWS infrastructure. All ways of accessing the AWS instance also works for the local.
Let's look at some of the common ways and learn how to access the local DynamoDB instance we just set up.
Using AWS CLI
The AWS Command Line Interface, also called AWS CLI is an open-source tool to interact with AWS services from within the command-line shell.
Check out the Installing AWS CLI docs to get it set up on your local machine.
If you are on the Windows platform, you can use Chocolatey, which is a Package Manager for Windows. It makes installing software a breeze, including awscli → choco install awscli
Once installed, to start accessing the DynamoDB, we need to configure the credentials. This local version requires any random string as its AWS Access Key ID and Secret Access Key.
Run aws configure from the command line and provide fake keys, as shown below.
aws configure
AWS Access Key ID: "fakeMyKeyId"
AWS Secret Access Key: "fakeSecretAccessKey"
region: "ap-southeast-2"
Once that is set up, we can use the aws dynamodb command to interact with DynamoDB.
aws dynamodb create-table `
    --table-name WeatherForecast `
    --attribute-definitions `
        AttributeName=City,AttributeType=S `
        AttributeName=Date,AttributeType=S `
    --key-schema AttributeName=City,KeyType=HASH AttributeName=Date,KeyType=RANGE `
    --provisioned-throughput ReadCapacityUnits=1,WriteCapacityUnits=1 `
    --endpoint-url http://localhost:8000

AWS dynamodb list-tables --endpoint-URL http://localhost:8000
The above command creates (create-table) a new Table named WeatherForecast with City as the Hash Key and Date the Range Key. The list-tables lists all the tables in the specified local instance.
The above commands uses the default region (ap-southeast-2), since region is not explicitly specified. Pass in --region attribute to explicitly specify a region.
The DynamoDB Local instance creates a unique database file for the AWS Access Key Id and the AWS Region.
For our current set up we have the Access Key id as fakeMyAccessKeyId, and the region is ap-southeast-2. Because of this the file created is 'fakeMyAccessKeyId_ap-southeast-2.db'.
We can see this file by opening the cli for the Docker instance and listing the files in there (as shown below)
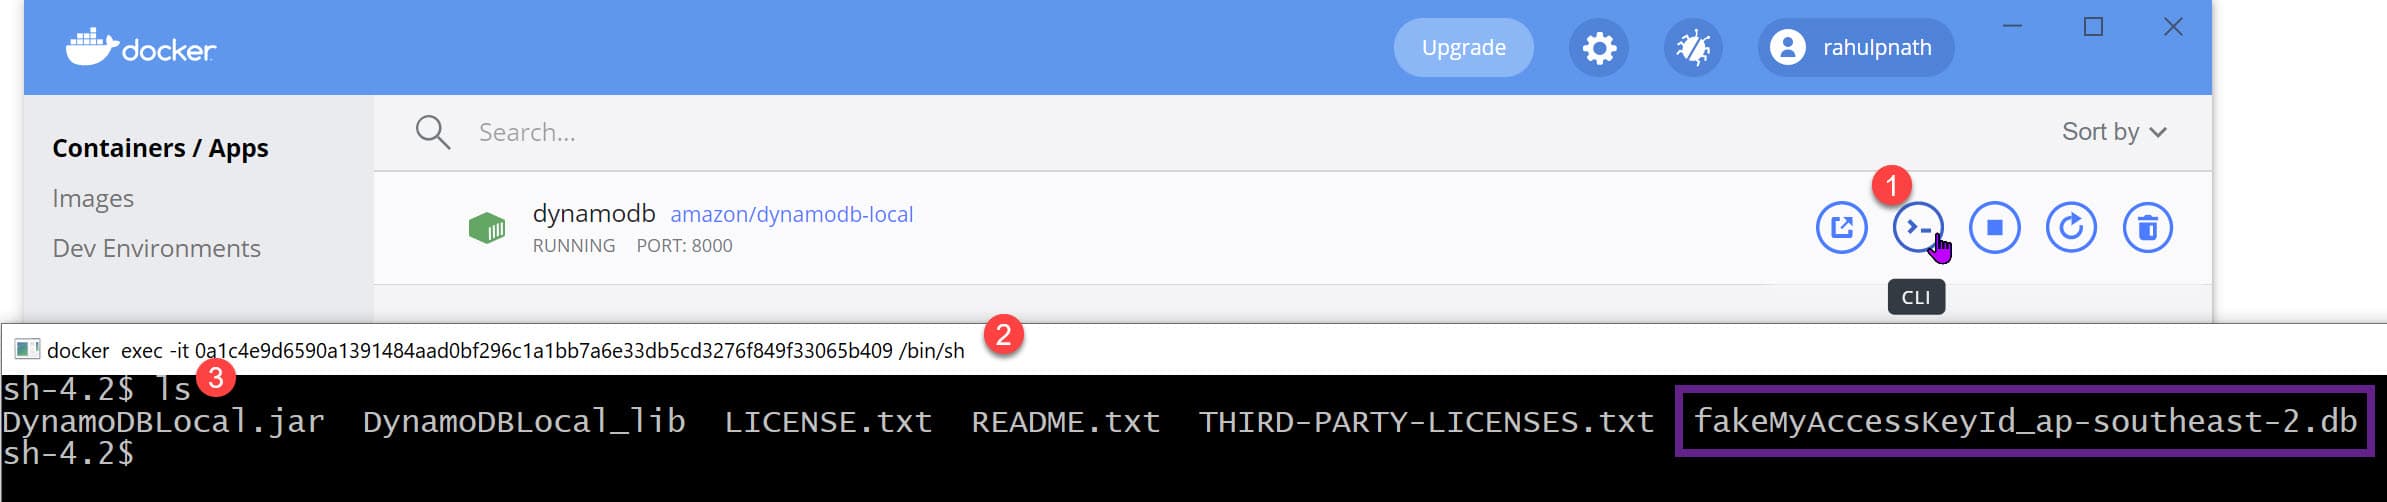
Any actions against this combination of Access Key and Region are stored in this file. If we delete this file, we will lose all data. Similarly, if we use a different Access Key or Region, it will create a new file.
From .NET Application
In an earlier post, I had walked through in detail how to get started with DynamoDB from .NET.
Using the AWSSDK.DynamoDBv2 package and the DynamoDbContext class we can connect to the DynamoDB Local instance as well. The setup is very similar to that of connecting to DynamoDB Web Service, as shown below.
Instead of specifying the RegionEndpoint property, we need to specify the ServiceURL and AuthenticationRegion properties as part of the AmazonDynamoDbConfig class. Since the database instance depends on the Access Key Id (as we saw before), we need to pass in the BasicAWSCredentials with the fake keys.
var creds = new BasicAWSCredentials("fakeMyKeyId", "fakeSecretAccessKey");
var config = new AmazonDynamoDBConfig()
{
	ServiceURL = "http://localhost:8000",
	AuthenticationRegion="ap-southeast-2"
};
var client = new AmazonDynamoDBClient(creds,config);
var context = new DynamoDBContext(client);

await context.SaveAsync(new WeatherForecast() { City="test", Date ="testDate" });

var data = await context.ScanAsync<WeatherForecast>(null).GetRemainingAsync();
The above code adds a new item to WeatherForecast and runs a Scan operation on the table to get back all the data.
Using Dynobase
Dynobase is a GUI client, which helps to explore and interact with DynamoDB easily. It has lots of features and is a popular tool to help manage DyanmoDB databases. It has a free 7-day trial but requires payment after.
The configuration to connect to the local instance of DynamoDB is available under Settings → Offline Settings (as shown below).
Set the appropriate Port, Regions, and the Access Key Id.
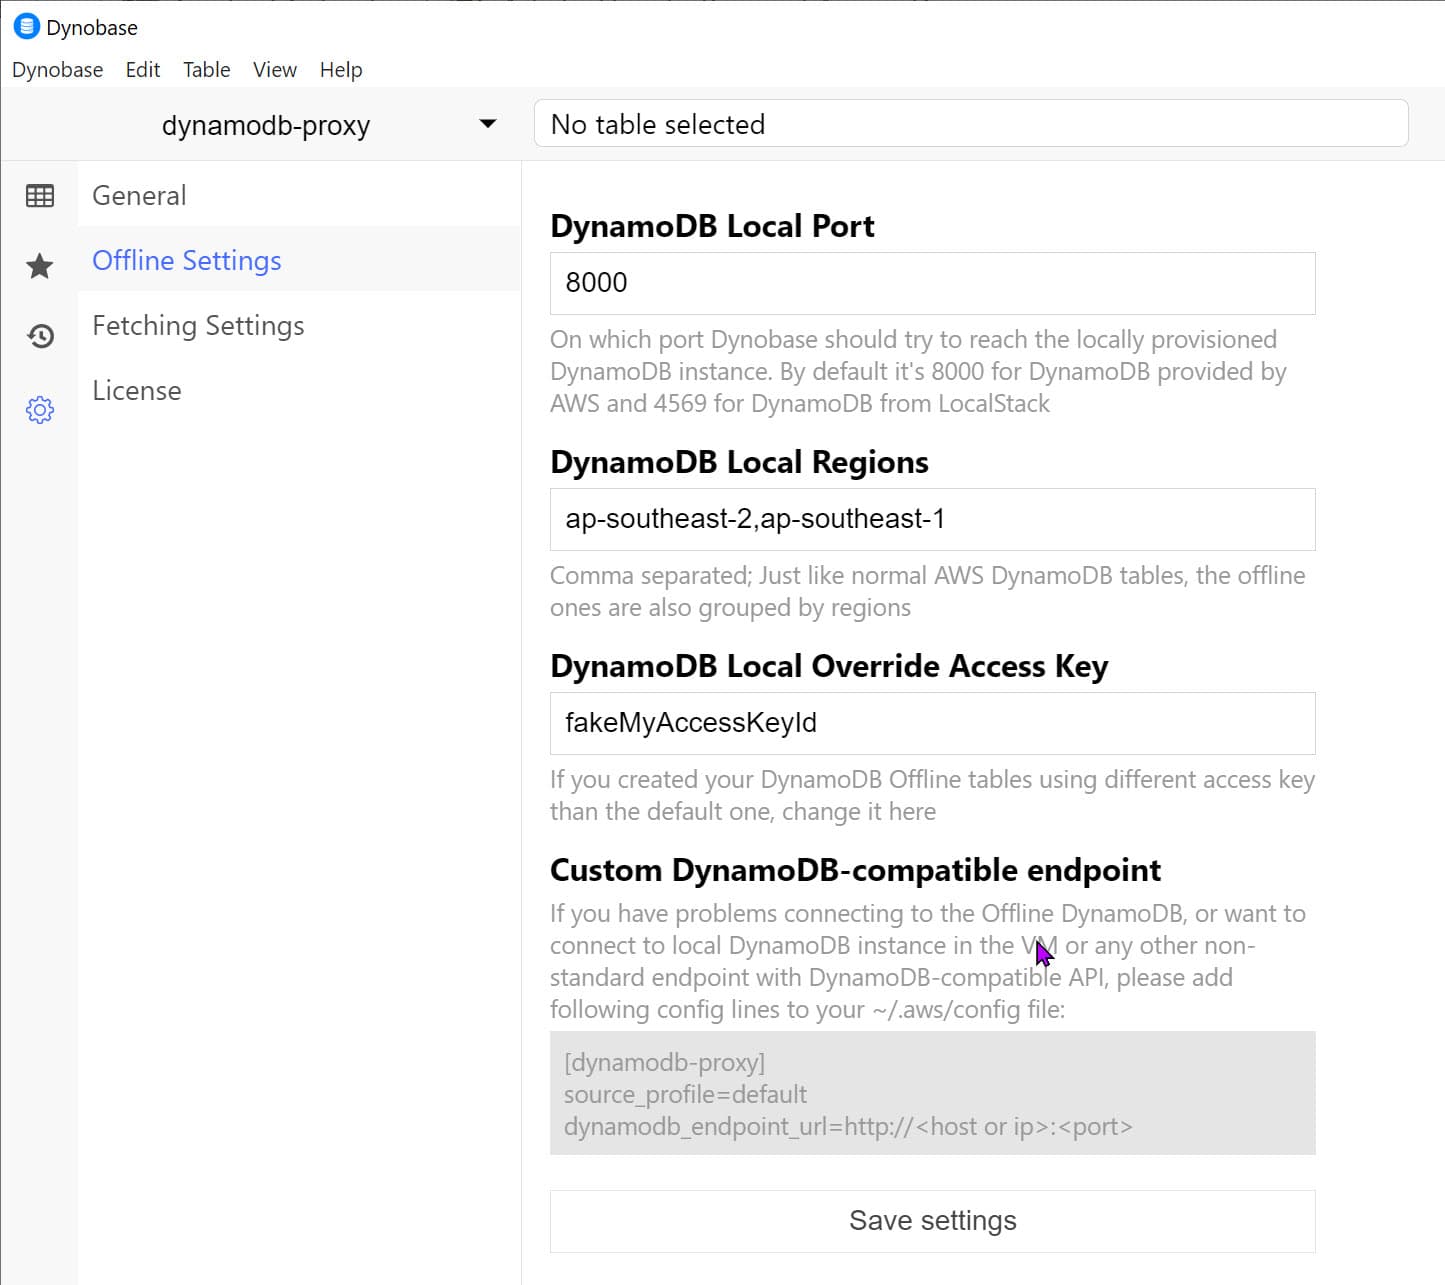
To get the tool to work, I had to update the AWS config file with the dynamodb-proxy as shown in the screenshot above.
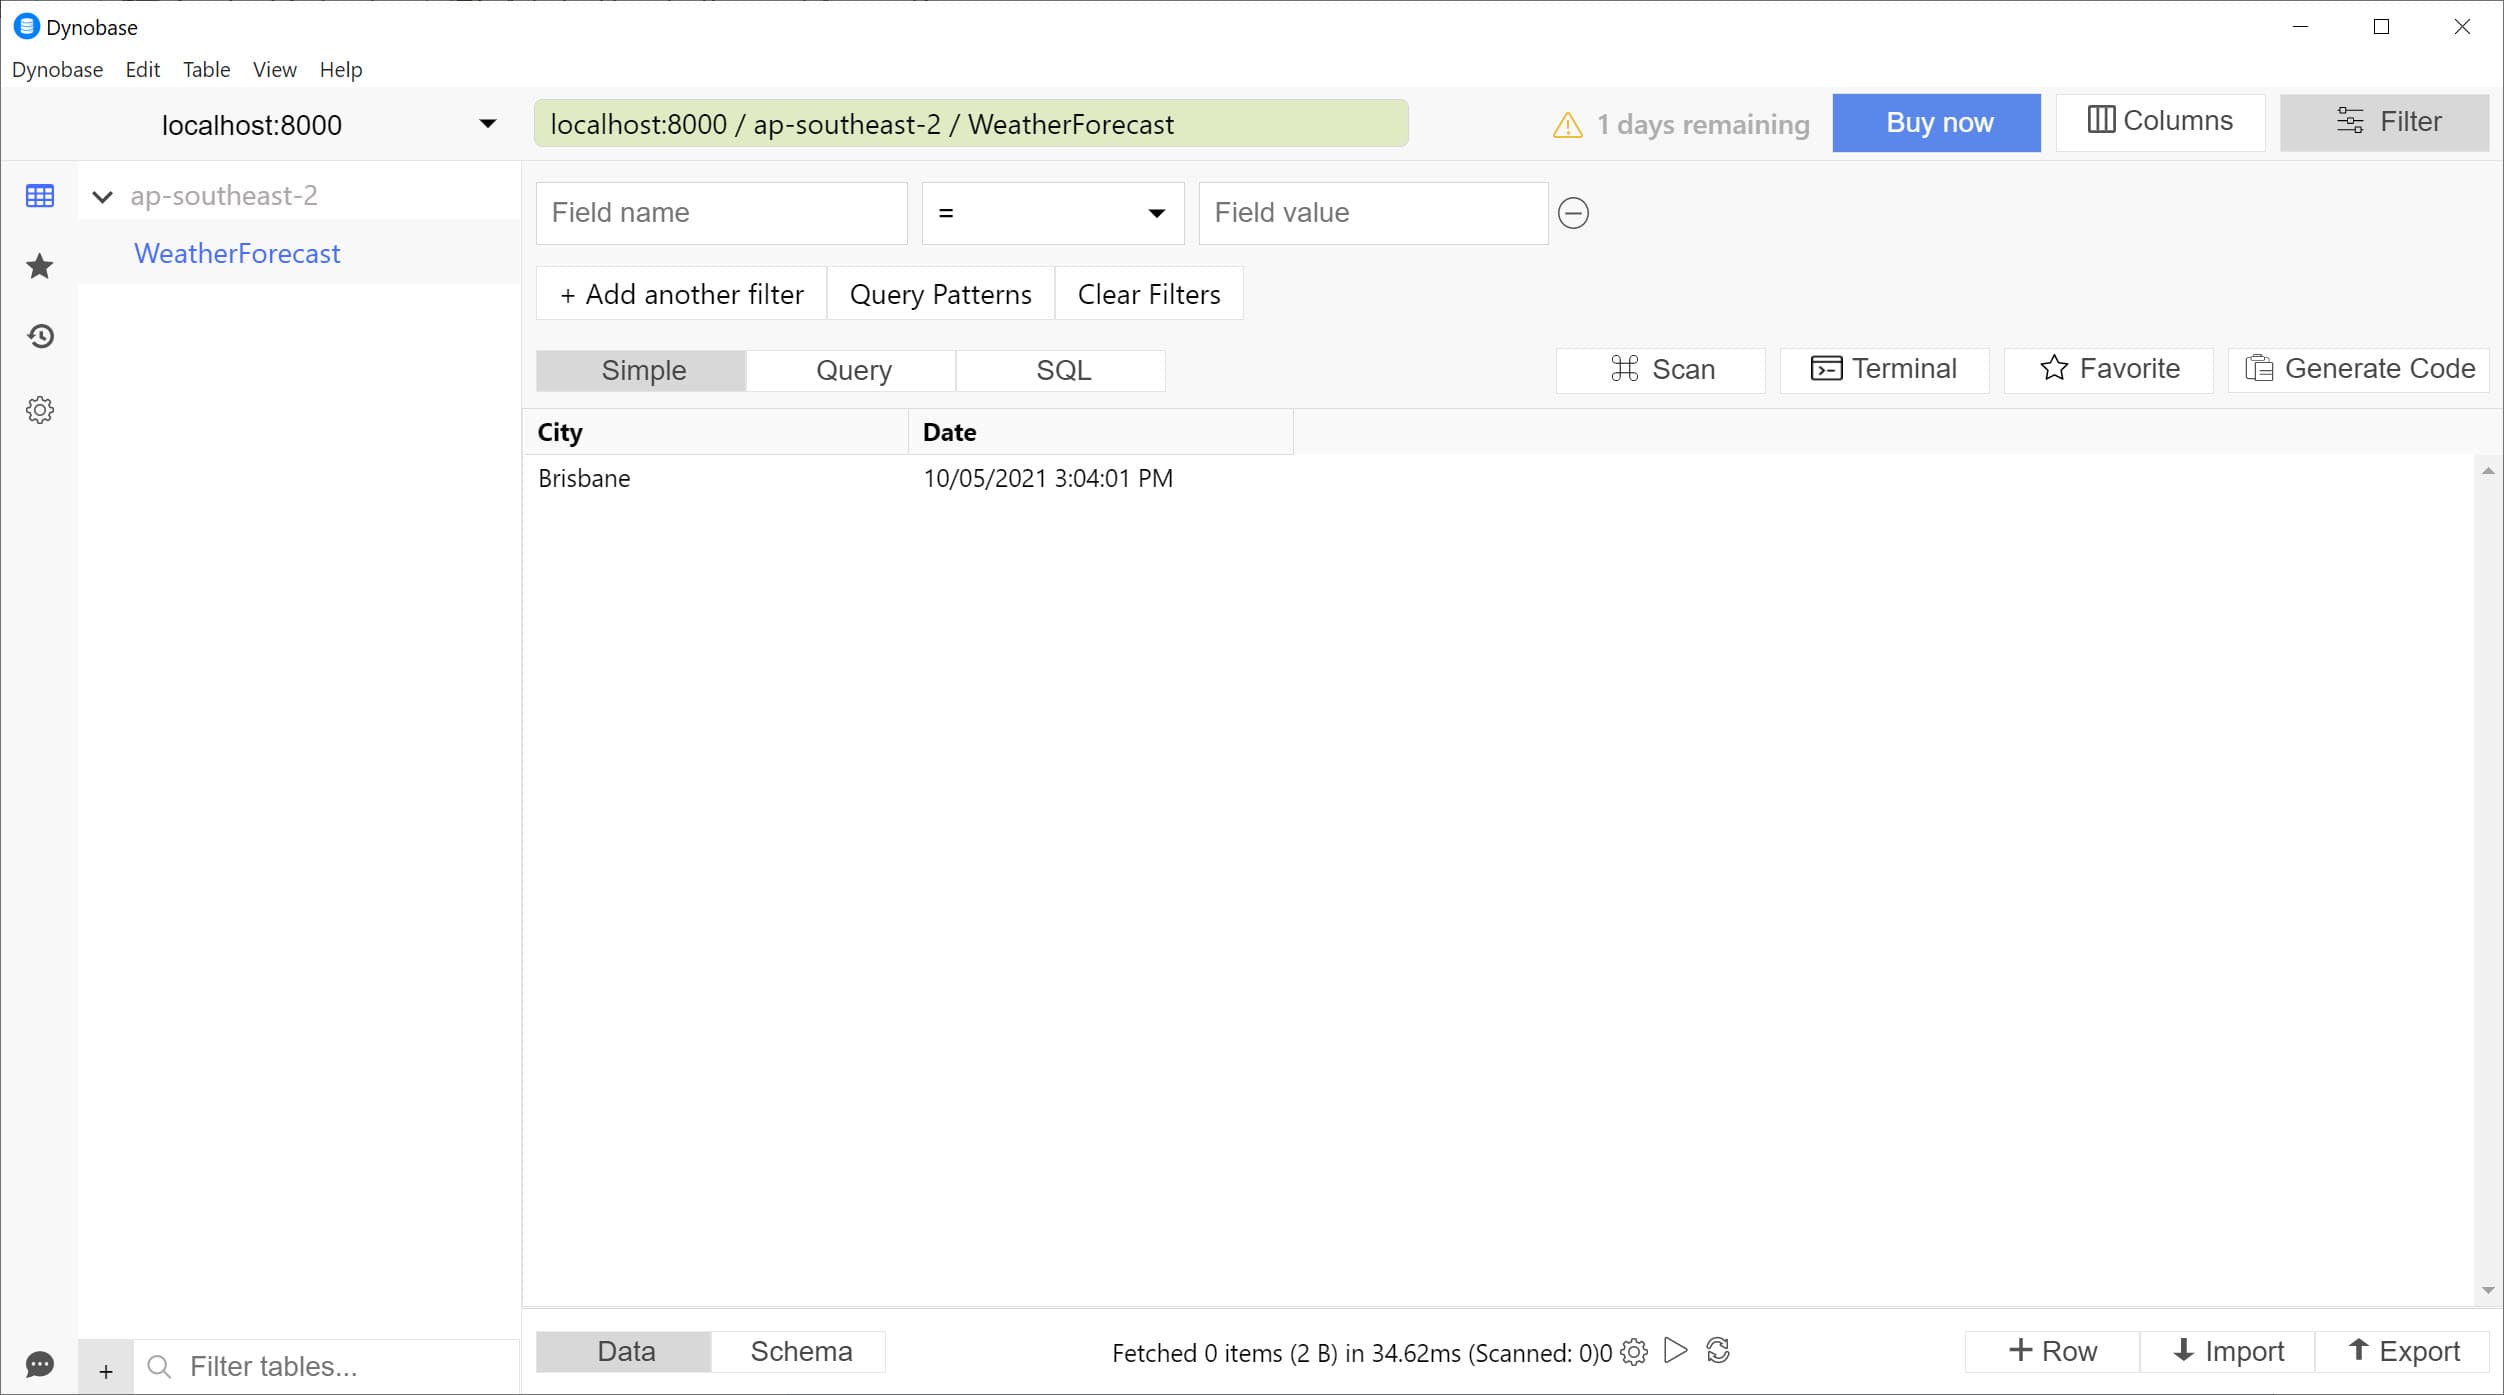
Once set, we can browse the local instance as shown below. It allows to browse the tables, add data, and a lot more features.
SharedDB Mode
DynamoDB Local also supports a single database file version. In this, the same file is used regardless of the region or the access key.
We need to pass in extra parameters when creating the docker instance.
- -sharedDb → creates single database file named shared-local-instance.db.
- -dbPath → directory where the database file will be written. (DON'T MISS the '.' after the attribute, which specifies to create in the root folder.)
docker run `
--name dynamodb-shared `
-p 8002:8000 `
-d amazon/dynamodb-local `
-jar DynamoDBLocal.jar `
-sharedDb -dbPath .
To avoid conflicts with the previous local instance, I have updated the name and the Docker host port to be 8002.
It creates a new instance of the DynamoDB Local database, as shown below. Exploring the CLI, it also shows the single database file created.
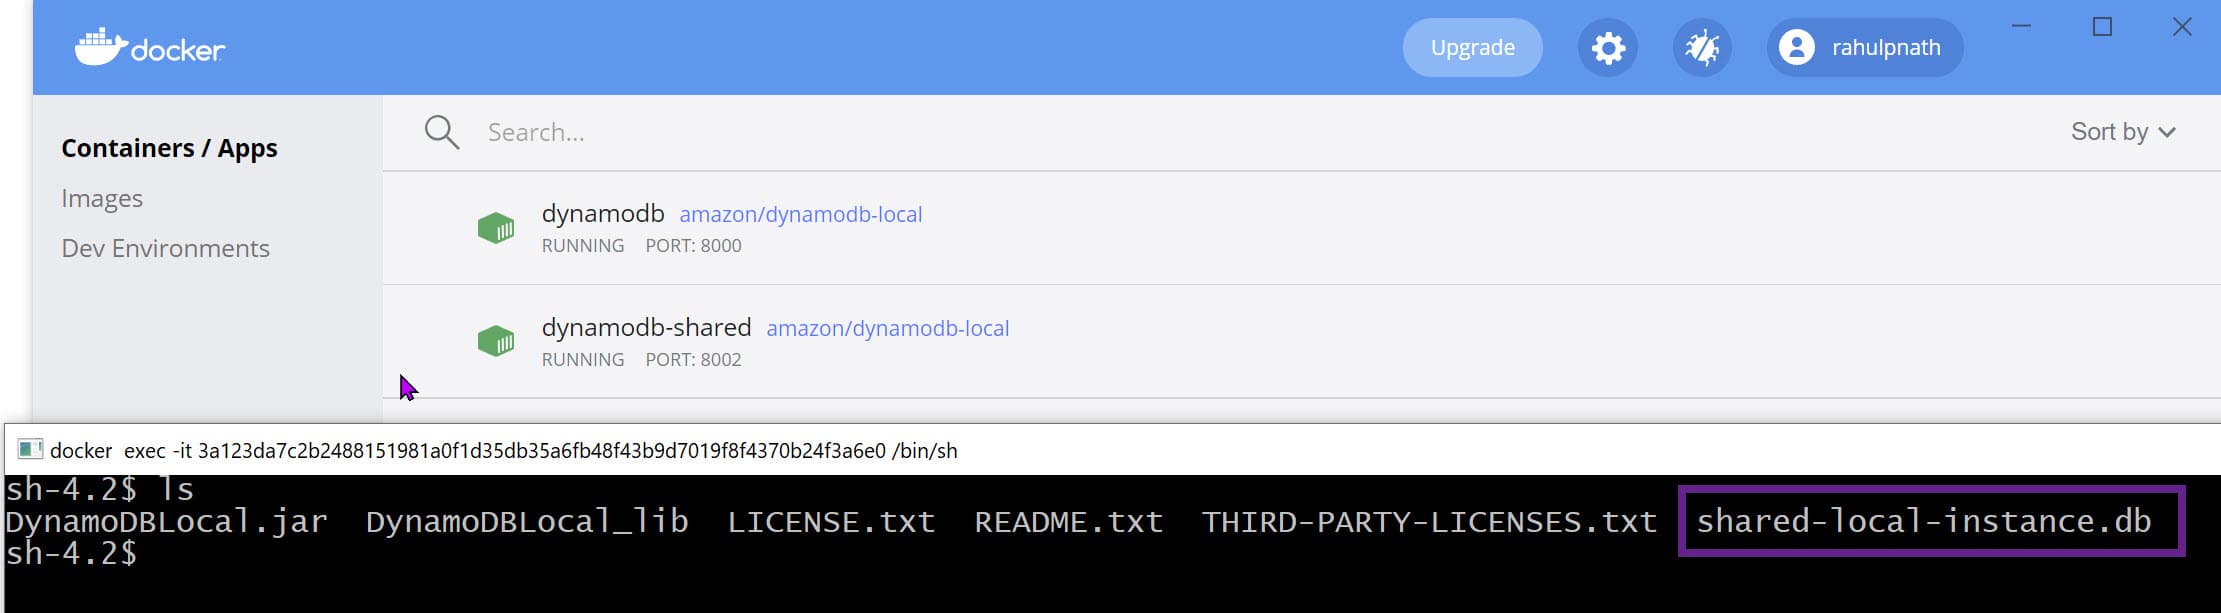
Connecting to http://localhost:8002 from any region of access key will always fetch data from the single database file.
NoSQL Workbench
NoSQL Workbench for Amazon DynamoDB is a cross-platform GUI application for DynamoDB. It is free and provides data modeling, data visualization, query development features, etc.
Under the Operation Builder (as shown below), we can connect to the local instance specifying the port details.
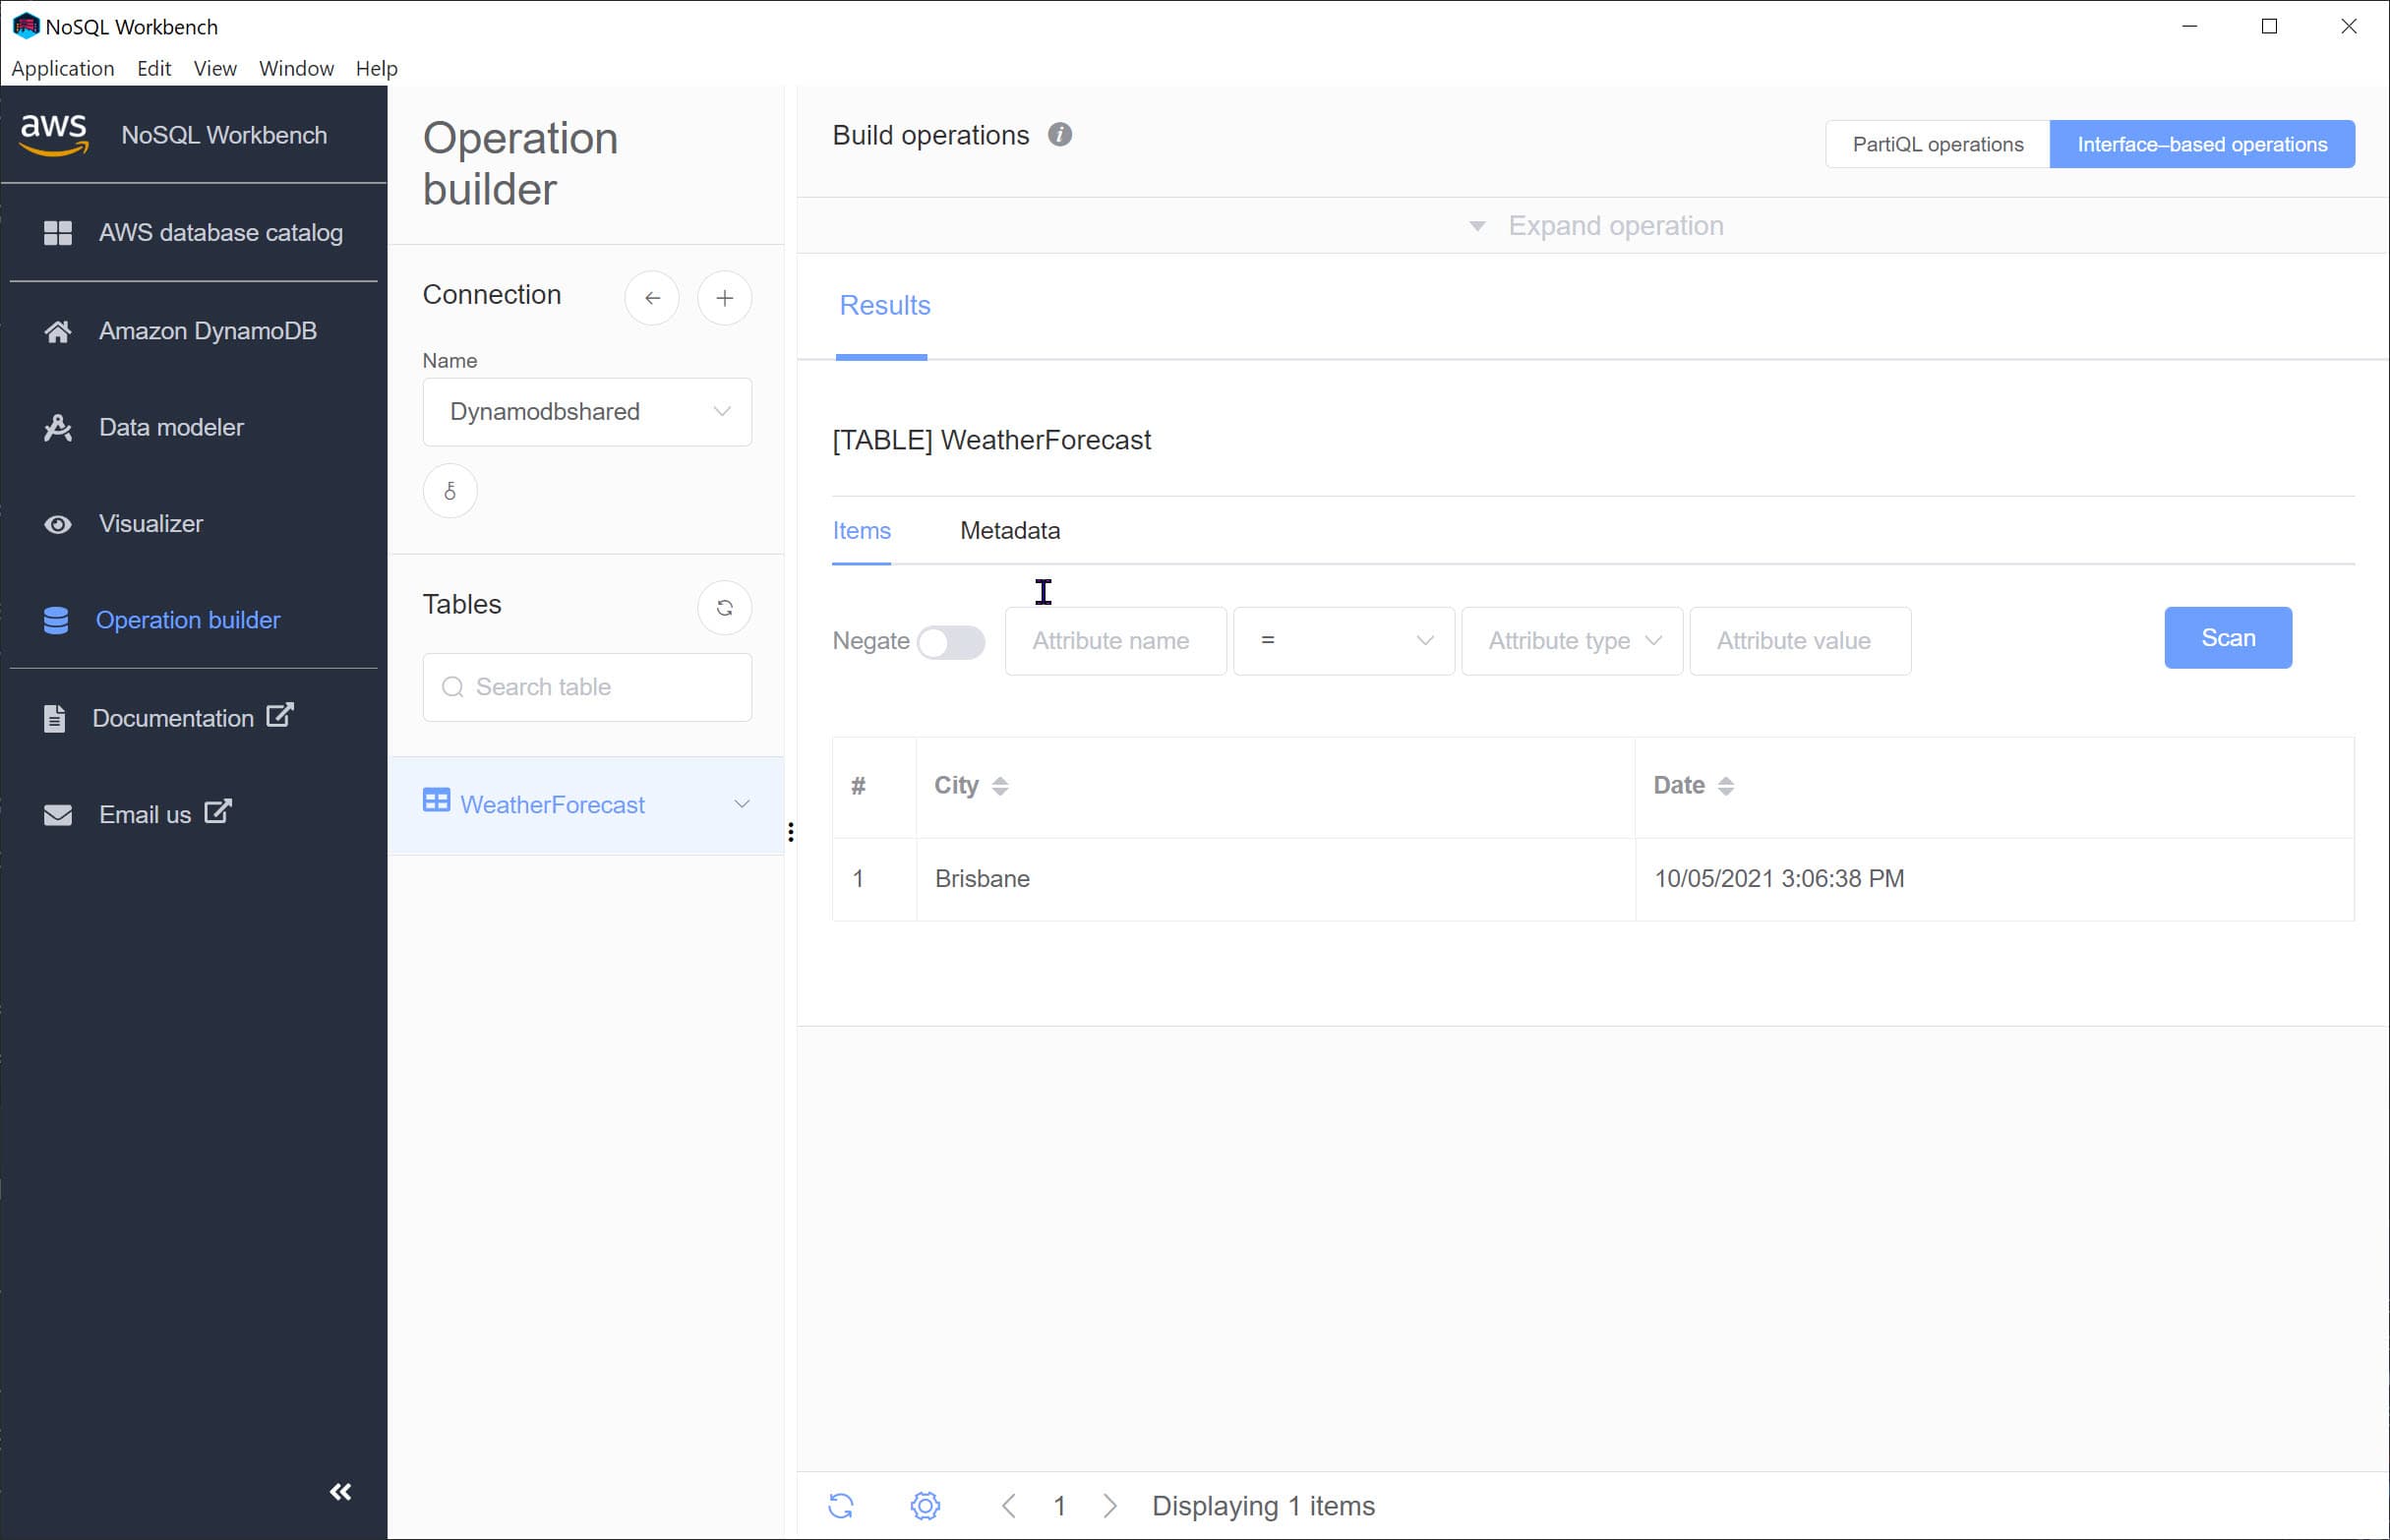
Note: With NoSQL Workbench, we can only connect and explore local DynamoDB in Shared mode. The GUI tool does not support specifying Access Key Id, which is required to connect when not in shared mode.
I hope this helps you to set up and get started with DynamoDB Local. The Local instance helps speed up the development process. It avoids the overhead of setting up an AWS account and databases for local development machines.
The local instances also allow to spin up instances for automated testing easily. I will explore this in a future post. Until then, have a great time and see you soon!
Cover Photo by Christopher Gower on Unsplash.

Rahul Nath Newsletter
Join the newsletter to receive the latest updates in your inbox.