AWS DynamoDB For The .NET Developer: How To Easily Get Started
Learn how to get started with AWS DynamoDB with .NET Core by updating the default ASP NET Web API template to use DynamoDB as it's data store. We will learn to do basic Creat, Read, Update and Delete operations from the API.
Table of Contents
DynamoDB is a cloud-hosted NoSQL database provided by Amazon Web Services (AWS). DynamoDB provides reliable performance, a managed experience, and a convenient API access to interact with it.
Amazon DynamoDB is a fully managed NoSQL database service that provides fast and predictable performance with seamless scalability.
With DynamoDB, you can create database tables that can store and retrieve any amount of data and serve any level of request traffic. DynamoDB supports on-demand backups and can also enable point-in-time recovery of the data.
It also supports automatic expiry of items to reduce storage and associated cost.
DynamoDB is a fully managed database, which means you don't need to spin up server instances, software installations, or other maintenance tasks.
In this post, let's learn more about DynamoDB and using it from a .NET application. We will learn how to create tables and do basic Create Read, Update and Delete (CRUD) operations from the .NET application using the DynamoDB SDK.
To get started, let's create an ASP NET Web API application from the default template. If you are using the dotnet CLI, you can use dotnet new webapi command to create a new Web API application.
It will create an API application with a default WeatherForecast Controller that returns some hardcoded data. It also comes with Swagger Endpoint setup.
Let's move this hardcoded data into DynamoDB and starting retrieving it from there.
Let's add an extra property, City, to the WeatherData class to identify the city of the weather data. We will use this shortly.
Set Up DynamoDB
To create a Table to hold the Weather Data, head off to the AWS Console and navigate to DynamoDB (by searching in the top bar, Alt+S). Make sure you are in the appropriate Region where you want to create the Table.
The core components in DynamoDB are Tables, Items and Attributes.
A Table is a collection if Items and each Item is a collection of Attributes.
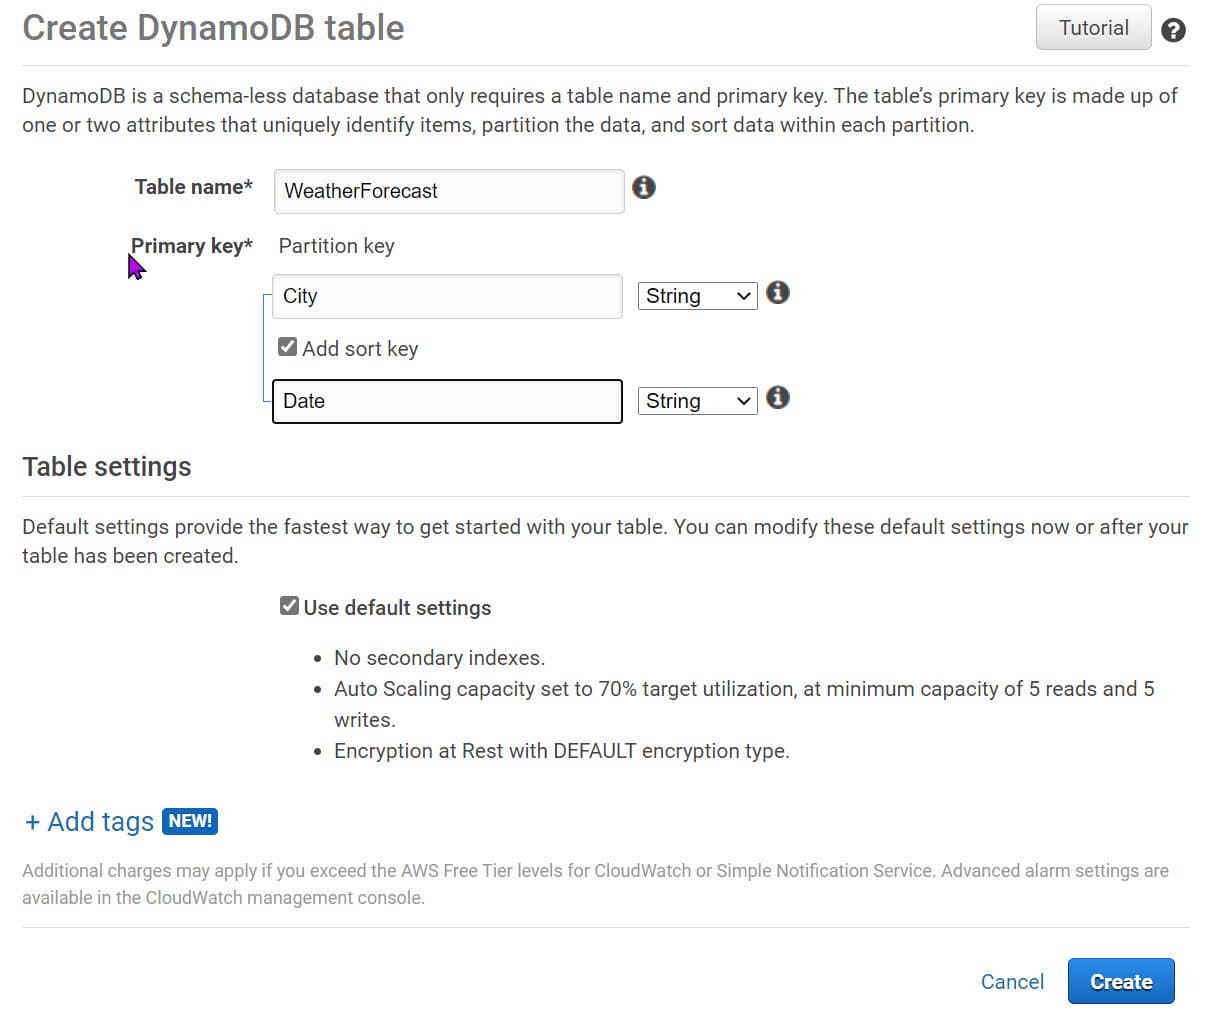
To create a table, use the 'Create table' button on the DynamoDB page. It prompts you to enter the Table Name and Primary key as shown below.
DynamoDB supports two different kinds of primary keys.
- Partition Key → A simple primary key, with just one attribute. Not two items can have the same partition key value
- Partition Key and Sort Key → A composite primary key composed of two attributes. One attribute is the partition key, and the other a sort key. It's possible for two items to have the same partition key; however, they must have different sort keys. The combination of them must be unique.
To store the WeatherFOrecast let's create a new table with the same name (you can use a different name if you want). For the Primary key, since the weather data is retrieved based on the city, we will make that the Partition key. For the Sort key, we can use the Date property.
In this case, we can only have one Item for a city with a particular date time. If we decide to store only the date part, excluding the time, then only one record for a day.
To add items to the Table from the portal, use the Create Item button.
Since we specified City and the Date as the composite primary key, any item added to this table must have those two properties.
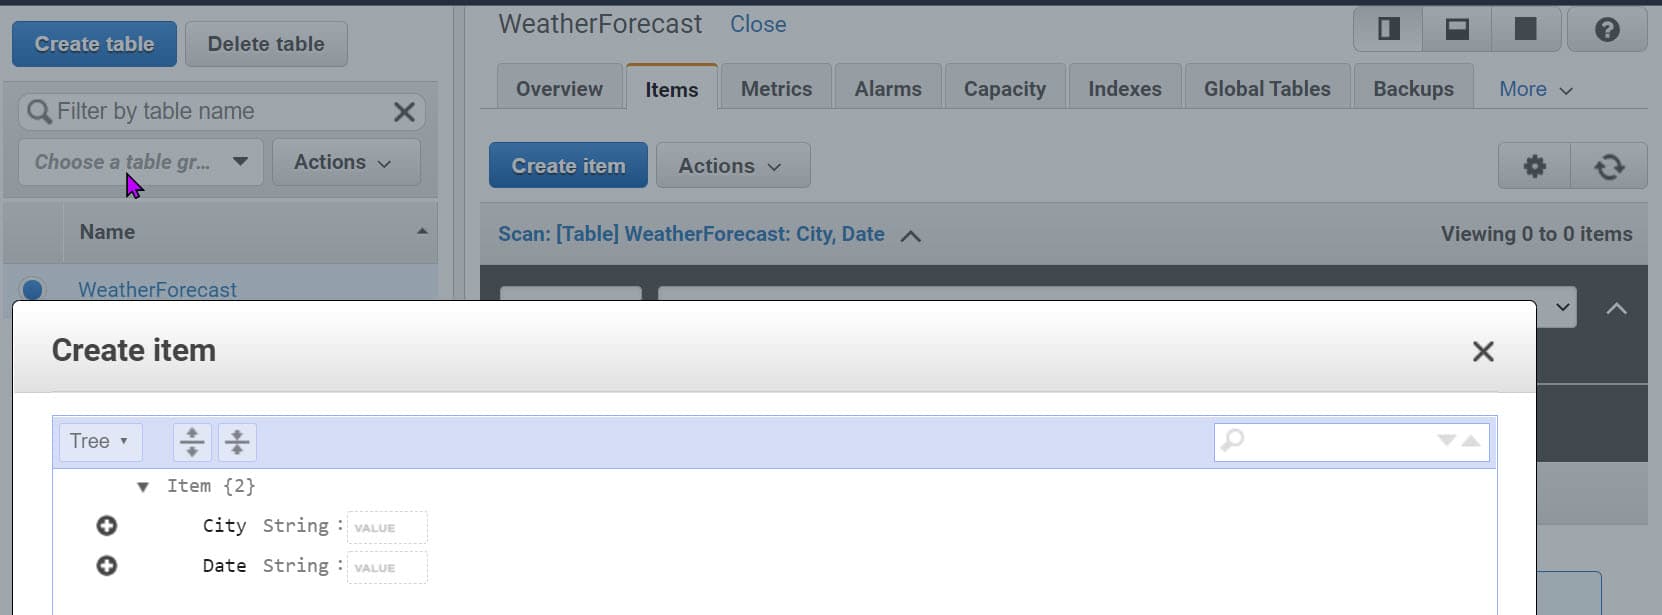
There can be any other property on the Item and necessarily need not be the same for each item.
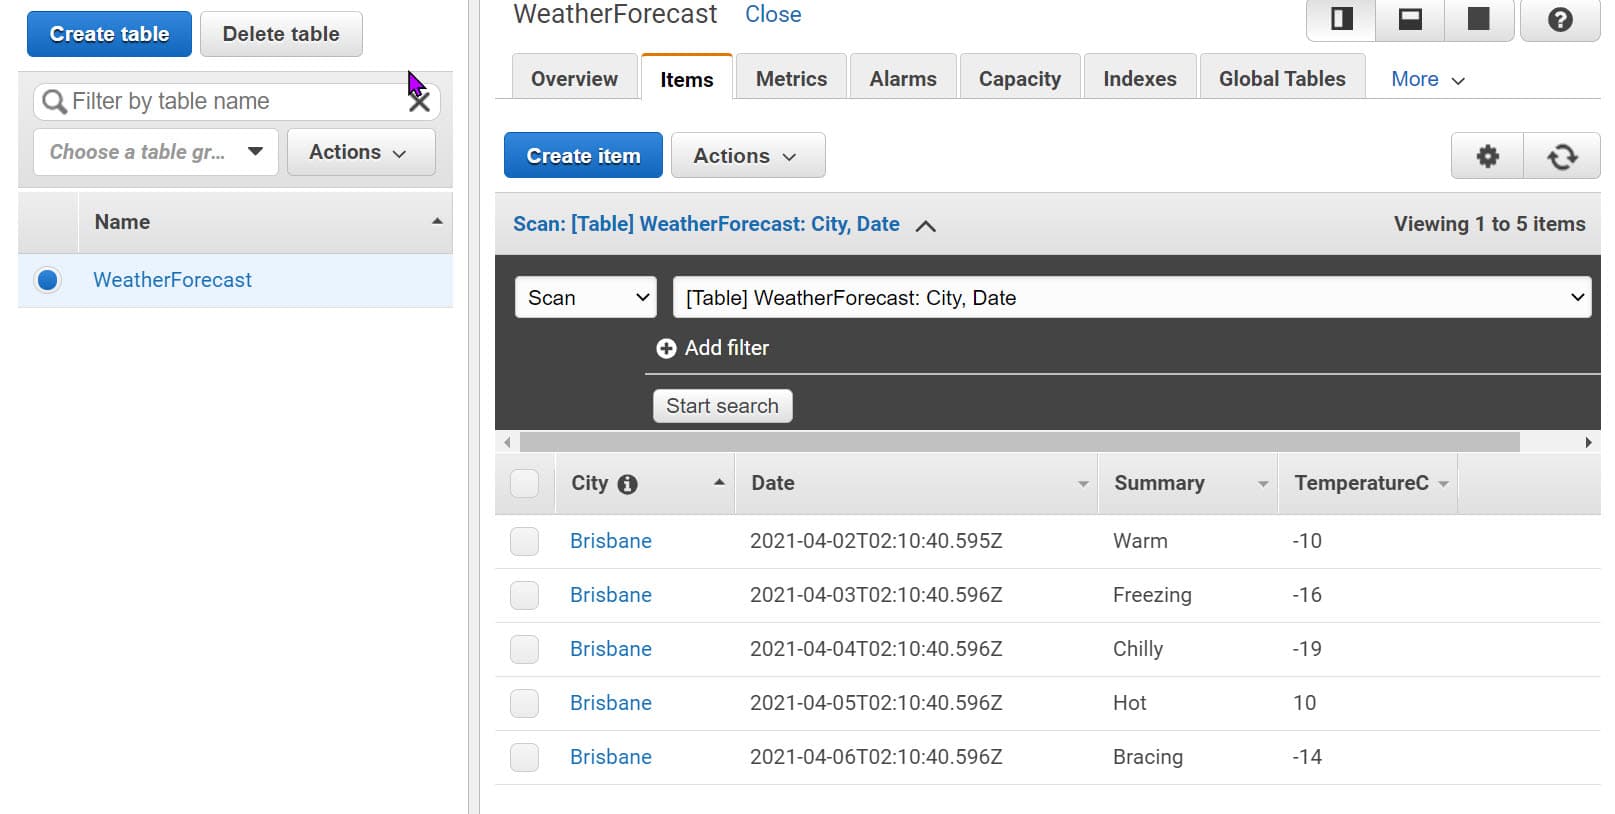
We can add JSON data to the table as below → On top of City and Date properties, it contains Summary and Temperature in Celsius as our WeatherForecast class.
{
  "City": "Brisbane",
  "Date": "2021-04-02T02:10:40.595Z",
  "Summary": "Warm",
  "TemperatureC": 20
}
Below is a snapshot of the Table with a few items added to it.
Set up App to Use DynamoDB
With the data set up in DynamoDB, let's update the Web API application to retrieve the data from DynamoDB.
To get started, let's first add the DynamoDB NuGet package. → AWSSDK.DynamoDBv2 .
The IDynamoDBContext provides the necessary methods to interact with DynamoDB. Update the WeatherForecastController constructor to take in the interface.
If you have used Entity Framework in the past, this context is very similar to the EF Context. (If you haven't don't worry, I've got you covered).
Usually, we want to get the weather forecast for a city, so let's update the Get method to take in a city name. Based on the city name (which is the hash/partition key), we can retrieve all the items in that partition.
The Query operation allows selecting multiple items with the same partition/hash key and (if specified) apply filter conditions on the range/sort keys.
The Get method below uses the DynamoDBContext to perform the Query operation and get back all the items with the given city name as the partition key.
public WeatherForecastController(
    IDynamoDBContext dynamoDbContext,
    ILogger<WeatherForecastController> logger)
{
    _dynamoDbContext = dynamoDbContext;
    _logger = logger;
}

[HttpGet]
public async Task<IEnumerable<WeatherForecast>> Get(string city = "Brisbane")
{
    return await _dynamoDbContext
        .QueryAsync<WeatherForecast>(city)
        .GetRemainingAsync();
}
The Get function now returns all the weather forecast data for the given city name. But the initial hard-coded data we replaced was returning only the weather forecast for the upcoming 5 days.
We can add a filter condition on the date (range key) to match the original functionality.
return await _dynamoDbContext
    .QueryAsync<WeatherForecast>(
        city,
        QueryOperator.Between,
        new object[] { DateTime.Now.Date.AddDays(1), DateTime.Now.Date.AddDays(5)})
    .GetRemainingAsync();
The above query uses the Between operator on the date range key to filter out the items between a specific date range. Similarly, there are different operators like Equal, LessThan, GreaterThanOrEqual, BeginsWith, etc.
Based on the operator, the number of parameters passed as the third parameter differs. Since Between requires the from and to date, I am passing 2 dates above.
Dependency Injection
With the Controller now using the IDynamoDBContext let's wire up the application to be able to dependency inject an implementation for it.
NOTE: To keep things simple, I've hard-coded the Access Key and the Secret Key in the code. You should move this into Configuration file and use Secret Manager for local development.
var credentials = new BasicAWSCredentials("<ACCESS_KEY>", "<SECRET_KEY>");
var config = new AmazonDynamoDBConfig()
{
    RegionEndpoint = RegionEndpoint.APSoutheast2
};
var client = new AmazonDynamoDBClient(credentials, config);
services.AddSingleton<IAmazonDynamoDB>(client);
services.AddSingleton<IDynamoDBContext, DynamoDBContext>();
The above code creates an AmazonDynamoDBClient using the credentials and Region to access DynamoDB for your account. The DynamoDBContext requires only the AmazonDynamoDBClient.
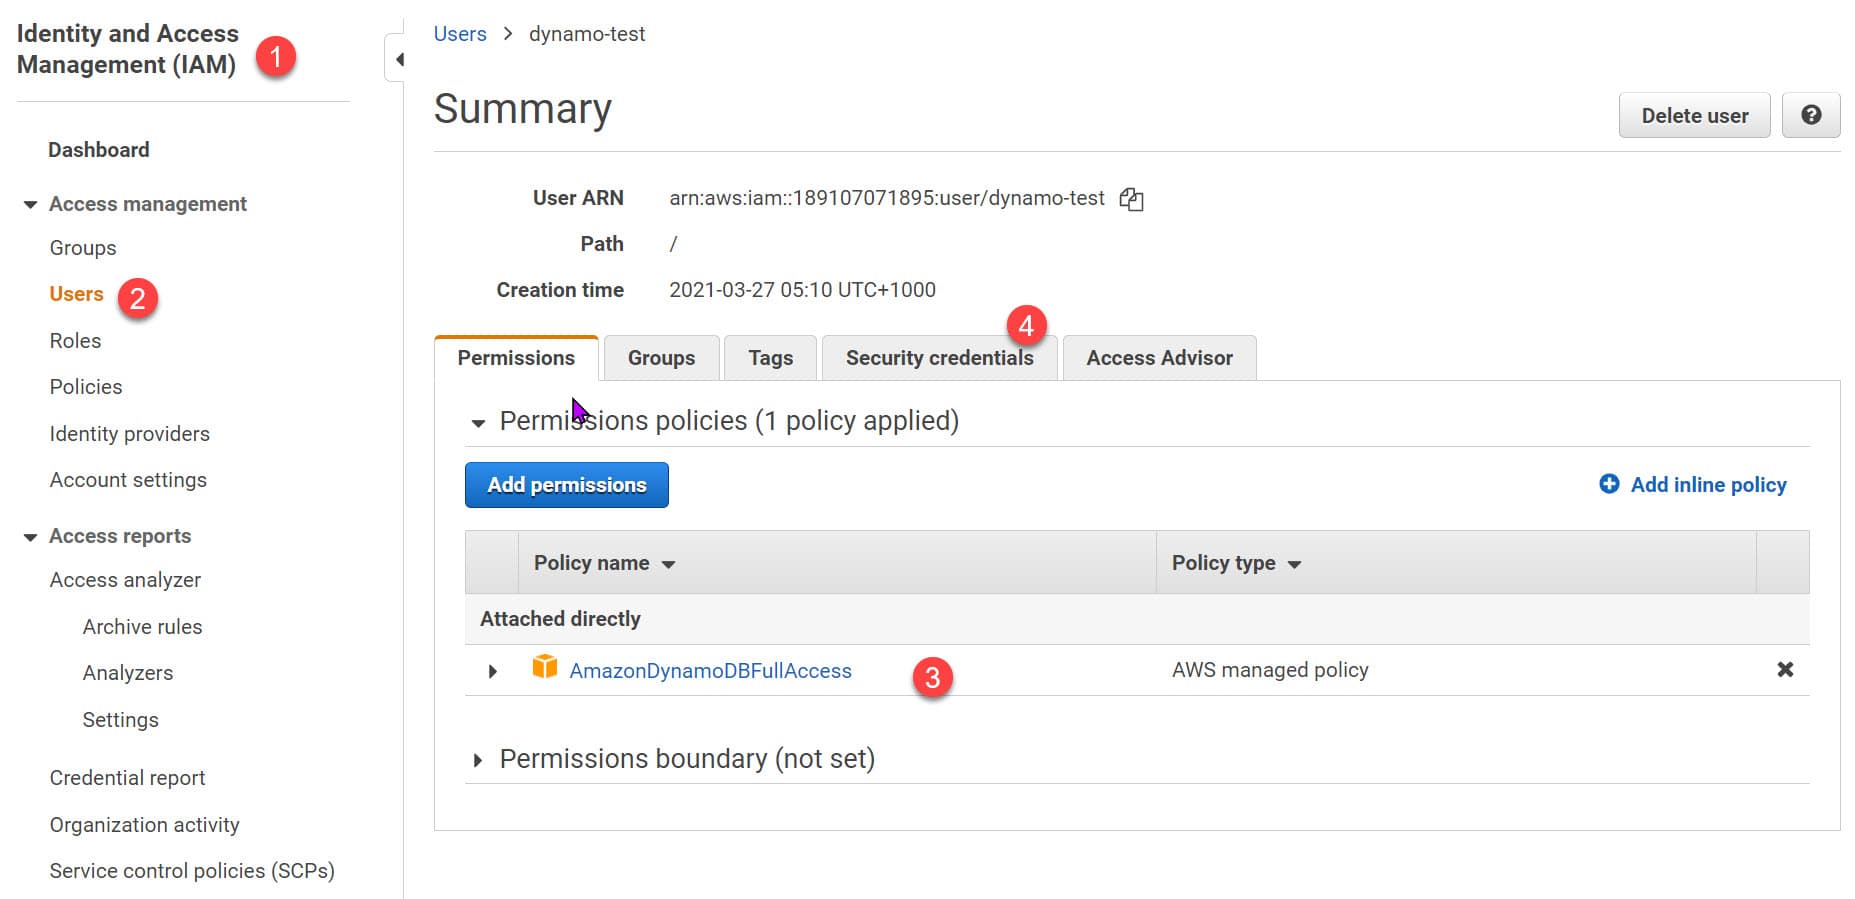
To set up ACCESS_KEY and SECRET_KEY navigate to the Identity And Access Management (IAM) in the Console and under Users, create a new user. Add the appropriate permissions for DynamoDB.
In the below case, I have given arn:aws:iam::aws:policy/AmazonDynamoDBFullAccess which grants full access to DynamoDB resources.
Run the application, and voila! We have the API now retrieving the data from DynamoDB.
CRUD Operations
The IDynamoDBContext has other methods that help with the basic Create, Read, Update and Delete (CRUD) operations.
The SaveAsync method creates a new Item if the primary key does not already exist. If it exists, it will overwrite the existing item with the new item values.
Below I use the GenerateDummyData to generate some weather forecast given a city name. Using the SaveAsync method, we can write back to DynamoDB.
[HttpPost]
public async Task Post(string city)
{
    var data =  GenererateDummyData(city);
    foreach (var d in data)
        await _dynamoDbContext.SaveAsync(d);
}
private static WeatherForecast[] GenererateDummyData(string city)
{
    var rng = new Random();
    return Enumerable.Range(1, 5).Select(index => new WeatherForecast
        {
            City = city,
            Date = DateTime.UtcNow.Date.AddDays(index),
            TemperatureC = rng.Next(-20, 55),
            Summary = Summaries[rng.Next(Summaries.Length)]
        })
        .ToArray();
}
If you want to update an existing item's property, use the LoadAsync method to load the Item, update the property, and save it back using the SaveAsync method.
var todayForecast = await _dynamoDbContext
    .LoadAsync<WeatherForecast>(city, DateTime.Now.Date );
todayForecast.TemperatureC = 20;
await _dynamoDbContext.SaveAsync(todayForecast);
Similarly, the DeleteAsync method deletes an item by specifying the partition and the range key or the Item itself.
[HttpDelete]
public async Task Delete(string city)
{
    await _dynamoDbContext
        .DeleteAsync<WeatherForecast>(city, DateTime.Now.Date);
}
There are more methods available for Batch Get, Batch Write, etc. that you can explore here.
DynamoDB API Overview
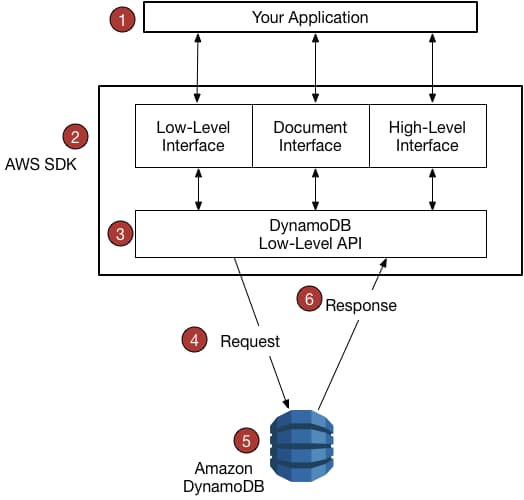
The Amazon DynamoDB support provided in the AWS SDK for .NET is divided into three layers:
- Low-Level Interface → found under the namespaces
Amazon. DynamoDB'and' Amazon.DynamoDB.Model. It is the API most closely related to the service model, with little overhead or helper functionality. - Document Interface → found under the namespace
Amazon.DynamoDB.DocumentModel. It's an API based around Table and Document classes. - High-Level Interface → found under the namespace
Amazon.DynamoDB.DataModel. Easiest to work with .NET classes and is what we used in the code samples above.
Not all functionality is available via the High-Level interface, e.g., to create a new table. In these cases, we will need to fall back to the lower-level APIs.
I hope this helps you to get a basic understanding of DynamoDB and how to get started with it from .NET.
In future posts, I'll show you how to automate creating tables and avoid manual creation. I'll also show how to set up a local development environment using docker and more.
*Subscribe to my Newsletter below to stay updated and have a great time learning!*
References
Rahul Nath Newsletter
Join the newsletter to receive the latest updates in your inbox.
