
How To Set Up AWS .NET Mock Lambda Test Tool on JetBrains Rider
Learn how to setup .NET Mock Lambda Test Tool to work with JetBrains Rider IDE.
Table of Contents
This article is sponsored by AWS and is part of my AWS Series.
The AWS .NET Mock Lambda Test Tool is used to test and debug AWS Lambda functions on your local development machine.
Based on the IDE you use for your development you can attach it to the lambda test tool and debug and step through the function code. When using Visual Studio the default Lambda Function template has everything set up and ready to use with the Lambda test tool.
However, this is not the case if you are using the JetBrains Rider.
In this post, let’s quickly learn how to set up JetBrains Rrider to work with the .NET Mock Lambda test tool.
AWS .NET Mock Lambda Test Tool
The Mock Lambda Tool helps test the Lambda function locally without deploying it to an AWS environment.
The tool is available as a .NET Global tools and can be installed via command line from NuGet. You can find more installation instructions here.
dotnet tool install -g Amazon.Lambda.TestTool-6.0Setting Up JetBrains Rider With Mock Lambda Test Tool
You can find the official instructions to set up the mock lambda test tool with JetBrains Rider here.
We will see two different ways to set up Mock Lambda Test Tool to work with Rider.
Using Rider .run file
JetBrains Rider uses run/debug configurations to run, debug, deploy, and test your code. Each configuration is a named set of startup properties that define what to execute and what parameters and environment should be used.
- Add a new Configuration
- Select .NET Executable Configuration Type as shown below
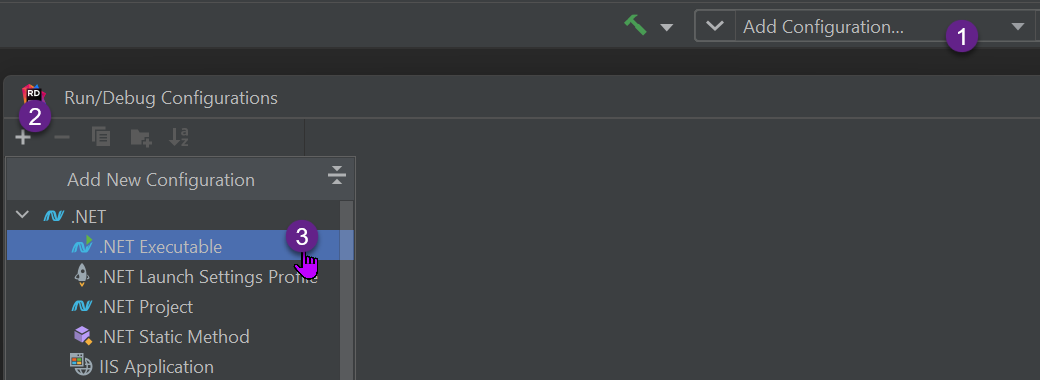
3. Specify the 'Exe path' for the configuration → This is the path to the global Mock Lambda Test tool dll (Amazon.Lambda.TestTool.BlazorTester.dll).
You can find the DLL in the /.dotnet/tools folder where the global tools are installed.
4. Specify the 'Working Directory' → This is the root of the AWS Lambda Function Project.
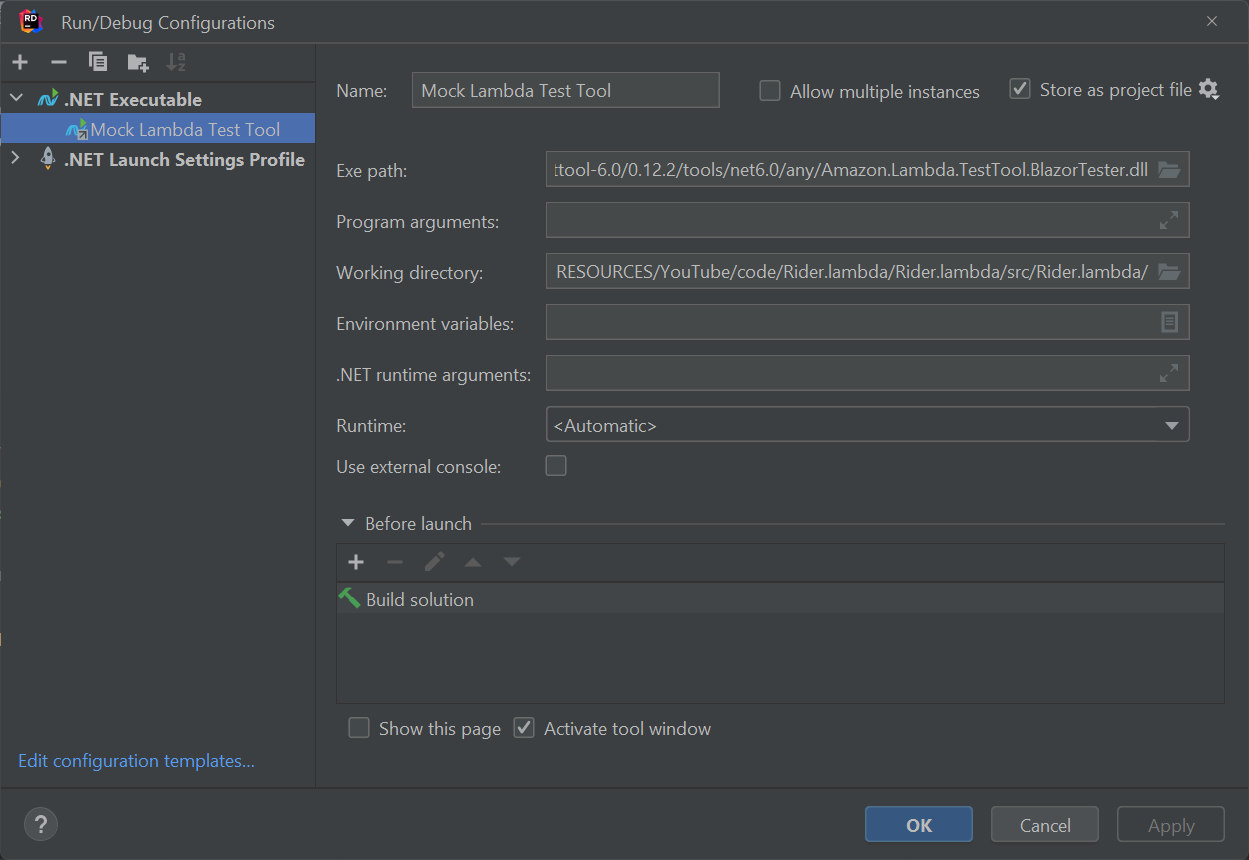
Clicking apply and running the project with the new configuration, launches and attaches Rider to the Mock Lambda Test Tool for debugging.
Save Configuration to Source Control
To save the configuration file as a project file, you can choose the Store as project file option, when creating the run/debug configuration.
This will save the config to a file in the solution and can be checked into source control so that it's available to all team members using JetBrains Rider.
Below is a sample run.xml file with the Mock Lambda Test Tool configuration.
Since it uses a relative path to the .NET mock lambda test tool and the project folder, this will work fine on any machine as long as they have the mock tool installed.
<component name="ProjectRunConfigurationManager">
  <configuration default="false" name="Mock Lambda Test Tool" type="RunExe" factoryName=".NET Executable">
    <option name="EXE_PATH" value="$USER_HOME$/.dotnet/tools/.store/amazon.lambda.testtool-6.0/0.12.2/amazon.lambda.testtool-6.0/0.12.2/tools/net6.0/any/Amazon.Lambda.TestTool.BlazorTester.dll" />
    <option name="PROGRAM_PARAMETERS" value="" />
    <option name="WORKING_DIRECTORY" value="$PROJECT_DIR$/Rider.lambda/src/Rider.lambda/" />
    <option name="PASS_PARENT_ENVS" value="1" />
    <option name="USE_EXTERNAL_CONSOLE" value="0" />
    <option name="USE_MONO" value="0" />
    <option name="RUNTIME_ARGUMENTS" value="" />
    <method v="2">
      <option name="Build Solution" enabled="true" />
    </method>
  </configuration>
</component>
Using launchsettings.json File
Visual Studio by default uses the launcsettings.json file to store the mock labda test tool run/debug configuration.
Below are the default settings when creating an AWS Lambda project in Visual Studio.
{
  "profiles": {
    "Mock Lambda Test Tool": {
      "commandName": "Executable",
      "commandLineArgs": "--port 5050",
      "workingDirectory": ".\\bin\\$(Configuration)\\net6.0",
      "executablePath": "%USERPROFILE%\\.dotnet\\tools\\dotnet-lambda-test-tool-6.0.exe"
    }
  }
}
This automatically sets up the .NET Mock Lambda Test tool and is automatically launched as soon as you run the application.
The same config however does not work with JetBrains Rider.
However, we can slightly modify this (or add a new profile) to work with JetBrains Rider.
Instead of running the dotnet-lambda-test-tool-6.0.exe directly, we can run it as a dotnet application just like we set up the .NET Executable run/debug configuration in the previous method.
{
  "profiles": {
    "Mock Lambda Test Tool (Rider)": {
      "commandName": "Executable",
      "commandLineArgs": "%USERPROFILE%/.dotnet/tools/.store/amazon.lambda.testtool-6.0/0.12.2/amazon.lambda.testtool-6.0/0.12.2/tools/net6.0/any/Amazon.Lambda.TestTool.BlazorTester.dll --port 5050",
      "workingDirectory": "$(ProjectDir)",
      "executablePath": "dotnet"
    }
  }
}
The above profile uses the dotnet executable and launches the Mock Lamba Test Tool ( Amazon.Lambda.TestTool.BlazorTester.dll) on port 5050.
Selecting this profile on Rider and running the application also launches the Mock Lambda Test tool and attaches the debugger to the application code.
The same profile also works with Visual Studio. You can choose to use the same or have two profiles - one for Visual Studio and one for Rider.

Rahul Nath Newsletter
Join the newsletter to receive the latest updates in your inbox.

