
How To PGP Encrypt An S3 File Using AWS Lambda Running Docker Images
Learn how to set up and run Docker Container Images from AWS Lambda. We will PGP sign and encrypt a file from AWS S3 in a lambda running a Docker image hosted in AWS ECR.
Table of Contents
I recently worked on an integration with a Third-Party provider, and it required sending them data files PGP signed and encrypted.
Let's not go into the why PGP question since I don't have an answer.
What I do have is, How I did it.
My team is primarily on AWS Serverless, running everything on Lambda, and wanted to run this PGP Encrypt/Sign job there.
There are a lot of libraries out there for PGP encryption (PgpCore, OpenPGP.js etc.). However, these did not integrate with this third-party provider. Their decryption software seems to work only with the files encrypted using GnuPG.
It meant more work since we had to run a command-line tool to encrypt and sign a file.
I couldn't get the command-line tool to run on the default language runtimes available (.NET, Node.js), I decided to use Docker and run custom code within that to get this done.
So here's how you can encrypt/sign a file in Amazon S3 using the command-line gpg tool running on AWS Lambda within a Docker Container. I use .NET as my programming language, but I am sure this is very similar to any other programming language.
Setting up PGP
Before we go any further, let's first understand how PGP works and how to Sign and Encrypt
*Pretty Good Privacy (PGP) is an encryption program that provides cryptographic privacy and authentication for data communication*
PGP works with a Private/Public key pair. Data sent can either be signed or encrypted or both.
When signing, the Private key of the Sender is used, which can later be verified using the public key of the Sender at the Recipient side.
For encrypting the data, the Sender uses the Recipients Public Key, which can then be decrypted using the Recipient's Private key once they receive it.
To see this in action, first install the GnuPG tool from here. If you are on Linux or use the Windows Subsystem for Linux, you would most likely have this already installed.
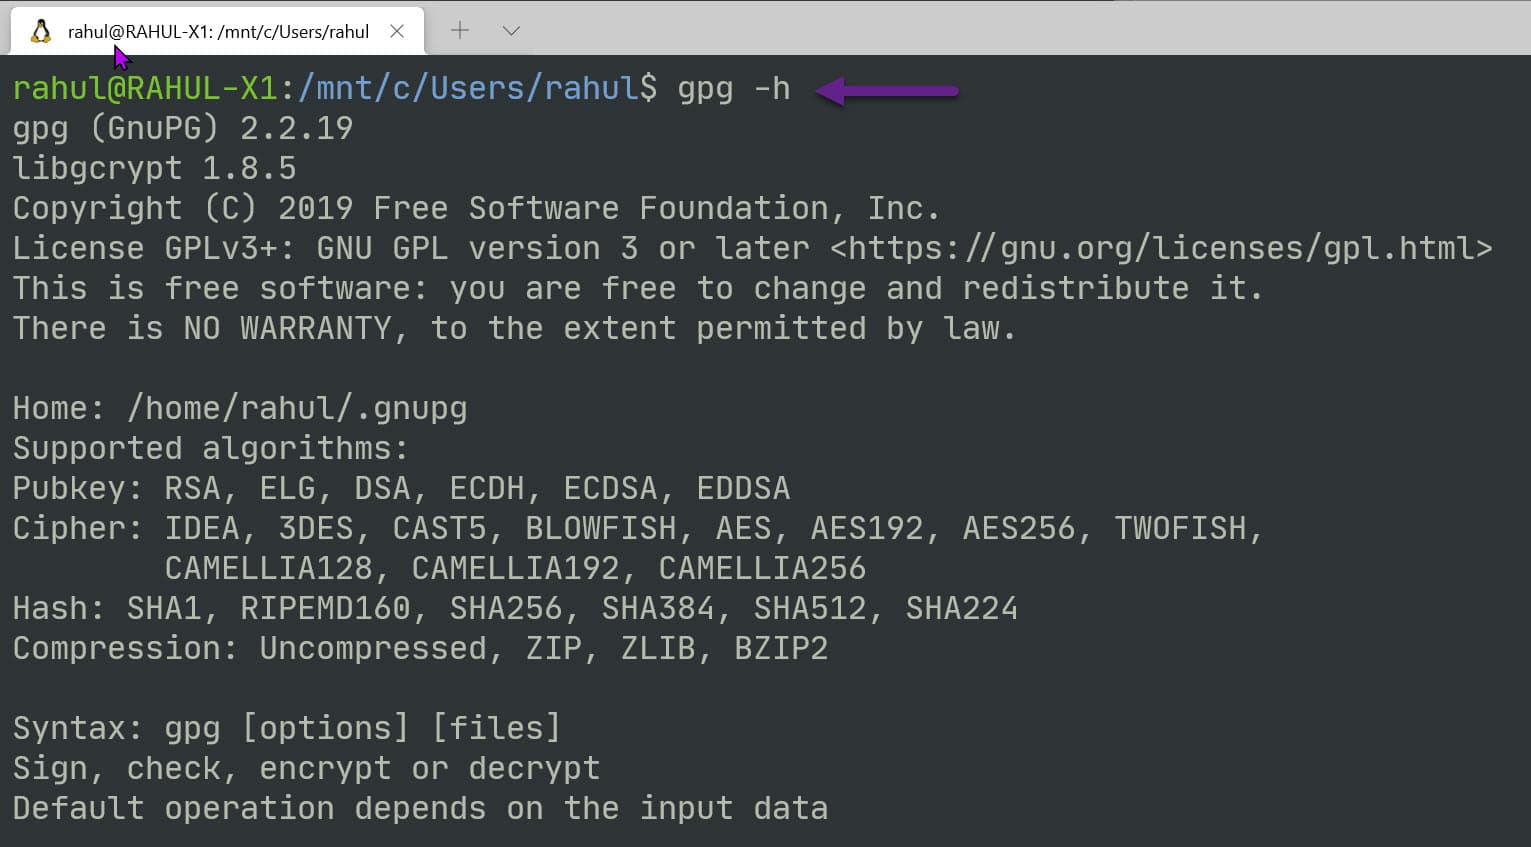
Type in gpg -h to get details and help on how to use the tool.
To get started using the tool, we need two certificates - for Sender and Recipient.
In a real-world scenario, we will only have access to the other party's public key (Sender or Recipient).
To generate keys, we can use the gpg --full-gen-key command, which will ask few more details to create the certificate. You can also save all the options to a file and pass that as an argument using the --batch flag.
gpg --full-gen-key

OR

gpg --batch --full-gen-key Sender # Certificate parameters in the file named Sender
gpg --batch --full-gen-key Recipient # Certificate parameters in the file named Recipient
Here's an example of a file with all the arguments. This is for the Sender; you can create one for the Recipient.
# Sender file
%echo Generating a basic OpenPGP key
Key-Type: RSA
Key-Length: 2048
Subkey-Type: RSA
Subkey-Length: 2048
Name-Real: Sender
Name-Comment: Sender
Name-Email: sender@email.com
Expire-Date: 1y
Passphrase: sender_password
# Do a commit here, so that we can later print "done" :-)
%commit
%echo done
The certificates can be exported into private and public key files using the export command. You can use this command if you want to share the public key file with the other party.
The below commands exports the Sender certificate. Do the same for the Recipient certificates.
Export Key
gpg --output sender_public.pgp --armor --export sender@email.com
// Will prompt for paraphrase
gpg --output sender_private.pgp --armor --export-secret-key sender@email.com
To encrypt and sign a plain text file, use the below command, which specifies the Recipient and the sender details, as shown below. It will prompt for the Sender's private key Passphrase (if you haven't noticed, is there in the Sender file we created above, which must be securely stored).
# Encrypt and Sign
gpg --recipient recipient --encrypt --sign --local-user sender --armor PlainFile.txt
By default, the above command creates a file with the same name as the input appended with .asc in the end. You can override this if you want.
To decrypt and verify this on the Recipient side, we can use the below command. Since the Recipient certificates are present in my gpg keyring (since I created them on my computer), it automatically picks up the correct certificate.
You can also see the signature public key details in the output below, which verifies the message is not tampered.
gpg --output TestFile.decrypt.txt --decrypt TestFile.txt.asc

PGP From .NET Core
The Process class in .NET Core provides access to local and remote processes. It enables you to start and stop local system processes.
It applies to PGP command-line tool as well. Using the below code, I can run the gpg tool with any provided arguments.
The --homedir is by default set to '/tmp' directory. This is because when running this from within an AWS Lambda Docker image (which we will shortly), this is the only directory where we have write access.
private const string Root = "/tmp";

private async Task RunGpgExternalProcess(string arguments)
{
    using (System.Diagnostics.Process proc = new System.Diagnostics.Process())
    {
        string result = "";
        proc.StartInfo.FileName = "gpg";
        proc.StartInfo.Arguments = $"--homedir \"{Root}/\" {arguments}";
        proc.StartInfo.UseShellExecute = false;
        proc.StartInfo.RedirectStandardOutput = true;
        proc.StartInfo.RedirectStandardError = true;
        proc.Start();
        result += await proc.StandardOutput.ReadToEndAsync();
        result += await proc.StandardError.ReadToEndAsync();
        proc.WaitForExit();
        logger.LogInformation($"GPG External Process - {result}");
    }
}
Setting up Certificates
To run the pgp, we first need to import the certificates into the environment on which we are running it. In this case, we need to import it into the lambda container where our function will be running.
For demo purposes, I have added the below configuration settings to appsettings.json. To store this securely, you can move it to AWS Parameter Store and use it from there.
"PgpSettings": {
  "SenderUserId": "Sender",
  "RecipientUserId": "Recipient",
  "RecipientPublicKey": "<base64 encoded recipient public key>",
  "SenderPrivateKey": "<base64 encoded sender private key>",
  "SenderPassphrase": "sender_password"
}
To import the certificates into the gpg keyring, we first need to make it available on the local disk.
The SaveCertsToDisk function decodes the base64 encoded string and writes it into the */tmp*' folder. The ImportCertificatesIntoPgp` uses the PGP CLI via the External process command and imports the file into the keyring. To import the private key, we specify the Passphrase as well.
Note in this case, I am only importing the Sender's private key (for signing) and the Recipients Public Key (for encrypting). This is very similar to how it will be in a real-world Sender application.
private readonly string RecipientPublicKeyFile = $"{Root}/RecipientPublicKey.pgp";
private readonly string SenderPrivateKeyFile = $"{Root}/PrivateKey.pgp";
private readonly string OriginalFile = $"{Root}/Original.csv";
private readonly string OutputFileName = $"{Root}/PGP.csv";

private async Task SaveCertsToDisk()
{
    logger.LogInformation("Saving GPG Certificates Locally");
    string recipientPublicKey = PgpSettings.RecipientPublicKey.Base64Decode();
    string senderPrivateKey = PgpSettings.SenderPrivateKey.Base64Decode();
    await System.IO.File.WriteAllTextAsync(RecipientPublicKeyFile, recipientPublicKey);
    await System.IO.File.WriteAllTextAsync(SenderPrivateKeyFile, senderPrivateKey);
    logger.LogInformation("Saved GPG Certificates Locally");
}

private async Task ImportCertificatesIntoPgp()
{
    logger.LogInformation("Importing Certificates into pgp keyring");
    string passphrase = PgpSettings.SenderPassphrase;
    await RunGpgExternalProcess( // Import Private Key into Key Ring
        $"--passphrase \"{passphrase}\" --import {SenderPrivateKeyFile}");
    await RunGpgExternalProcess( // Import Public Key into Key Ring
        $"--import {RecipientPublicKeyFile}");
    logger.LogInformation("Imported Certificates into pgp keyring");
}
Encrypt And Sign
Let's put this all together. The Convert function takes in the un-encrypted file content as byte[] and passes it to the PgpEncryptAndSign function.
The code below writes the content into a local file (again inside the /tmp folder) to make the file locally available.
With all the certificates imported into the gpg keyring, we can now use the --encrypt and --sign method to encrypt the original file. It returns the encrypted content as byte[].
public async Task<byte[]> Convert(byte[] fileContent)
{
    await SaveCertsToDisk();
    await ImportCertificatesIntoPgp();
    return await PgpEncryptAndSign(fileContent);
}

private async Task<byte[]> PgpEncryptAndSign(byte[] fileContent)
{
    logger.LogInformation("Starting PGP EncryptAndSign File Contents");
    var senderUserId = PgpSettings.SenderUserId;
    var recipientUserId = PgpSettings.RecipientUserId;
    var passphrase = PgpSettings.SenderPassphrase;
    await System.IO.File.WriteAllBytesAsync(OriginalFile, fileContent);
    await RunGpgExternalProcess(
        $"--no-tty --trust-model always --batch --passphrase {passphrase} --recipient {recipientUserId} --encrypt --sign --local-user {senderUserId} --armor -o {OutputFileName} {OriginalFile}");
    return await System.IO.File.ReadAllBytesAsync(OutputFileName);
}
Function Handler
I used the Visual Studio Toolkit to create the AWS Lambda project and selected the Simple S3 Function Blueprint template. It sets up a basic template to react to S3 events.

The FunctionHandler method handles S3Event, raised based on the events that we listen to on the Lambda (will be set up later when we deploy to Lambda). We first read the file's contents, encrypt it using PGP and upload it back into an S3 bucket (conventionally named with an '-encrypted' at the end).
public async Task FunctionHandler(S3Event evnt, ILambdaContext context)
{
    var s3Event = evnt.Records?[0].S3;
    if (s3Event == null) return;
    var bucketName = s3Event.Bucket.Name;
    var fileName = s3Event.Object.Key;
    try
    {
        Console.WriteLine($"New File {bucketName} {fileName}");
        var byteContent = await ReadFileContent(bucketName, fileName);
        var encryptedFileContents = await cryptoService.Convert(byteContent);
        await SaveEncryptedFile(
                        $"{bucketName}-encrypted", fileName, encryptedFileContents);
        Console.WriteLine("File Successfully encrypted and saved");
    }
    catch (Exception e)
    {
       // Log and handle
    }
}
Setting up Docker Image
To create a Docker image, we can use the base image available from Amazon for .NET Lambda functions. The high-level steps to create a package are available here for reference.
The below Dockerfile uses the base image from the public ECR repository, builds and publishes our project, and packages the assemblies into the /var/task folder within the docker image.
The CMD instructs the details to the FunctionHandler and is the entry point for our Lambda Function.
FROM public.ecr.aws/lambda/dotnet:core3.1 AS base

FROM mcr.microsoft.com/dotnet/sdk:3.1 as build
WORKDIR /src
COPY ["AWSLambdaS3.csproj", "base/"]
RUN dotnet restore "base/AWSLambdaS3.csproj"

WORKDIR "/src"
COPY . .
RUN dotnet build "AWSLambdaS3.csproj" --configuration Release --output /app/build

FROM build AS publish
RUN dotnet publish "AWSLambdaS3.csproj" \
            --configuration Release \
            --framework netcoreapp3.1 \
            --self-contained false \
            --output /app/publish

FROM base AS final
WORKDIR /var/task
COPY --from=publish /app/publish .
CMD ["AWSLambdaS3::AWSLambdaS3.Function::FunctionHandler"]
Packaging & Publishing - Manually
Publish To ECR
AWS Lambda uses docker images from ECR.
Amazon Elastic Container Registry (Amazon ECR) is a fully managed container registry that makes it easy to store, manage, share, and deploy your container images and artifacts anywhere.
Head over to your AWS console (or use the AWS CLI) to create a new repository. The Lambda function and the ECR registry repository must be under the same account.
Below I have created 'rahulpnath-test' repository, with all the default options selected on create.
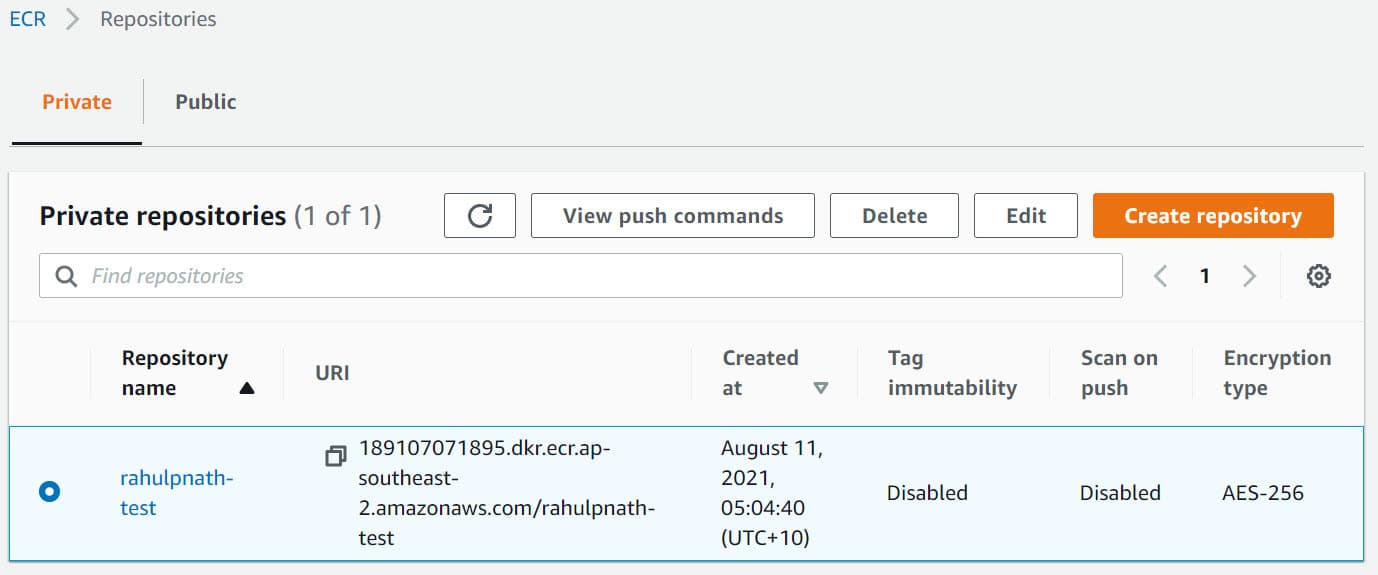
To upload images to this repository, click the 'View push commands' button to see the commands.
It logs into our private ECR repository using the AWS CLI, and then builds, tags, and pushes the image to the repository.
You can find more details about it here.
aws ecr get-login-password --region ap-southeast-2 | docker login --username AWS --password-stdin 189107071895.dkr.ecr.ap-southeast-2.amazonaws.com
docker build -t rahulpnath-test .
docker tag rahulpnath-test:latest 189107071895.dkr.ecr.ap-southeast-2.amazonaws.com/rahulpnath-test:latest
docker push 189107071895.dkr.ecr.ap-southeast-2.amazonaws.com/rahulpnath-test:latest
If you get an ERROR [internal] load metadata for public.ecr.aws/lambda/dotnet:core3.1, with a 40 Forbidden, you have to login to the public repository as well.
aws ecr-public get-login-password --region us-east-1 | docker login --username AWS --password-stdin public.ecr.aws
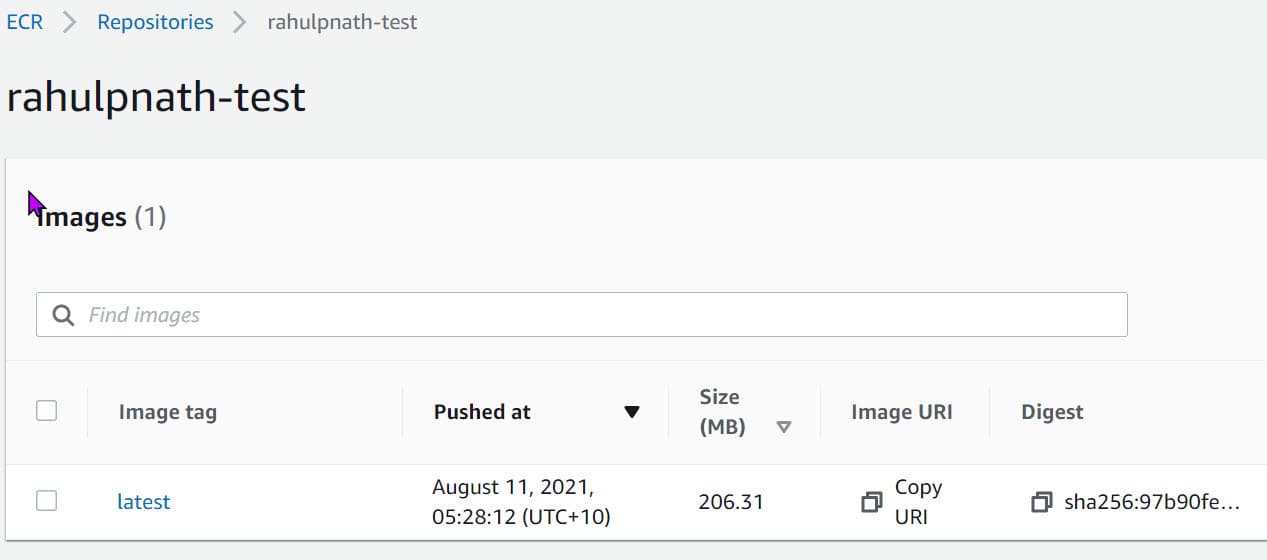
Once all the above steps are done, you can see there is a new image in the repository that we just created.
Publish To Lambda
Finally, let's publish the Lambda.
Under the AWS Lambda section in the web console, click the Create Function and choose the 'Container Image' option.
Give the function a name and select the Container image using the 'Browse Images' button. For now, let's leave all the other options as default and click 'Create function'.

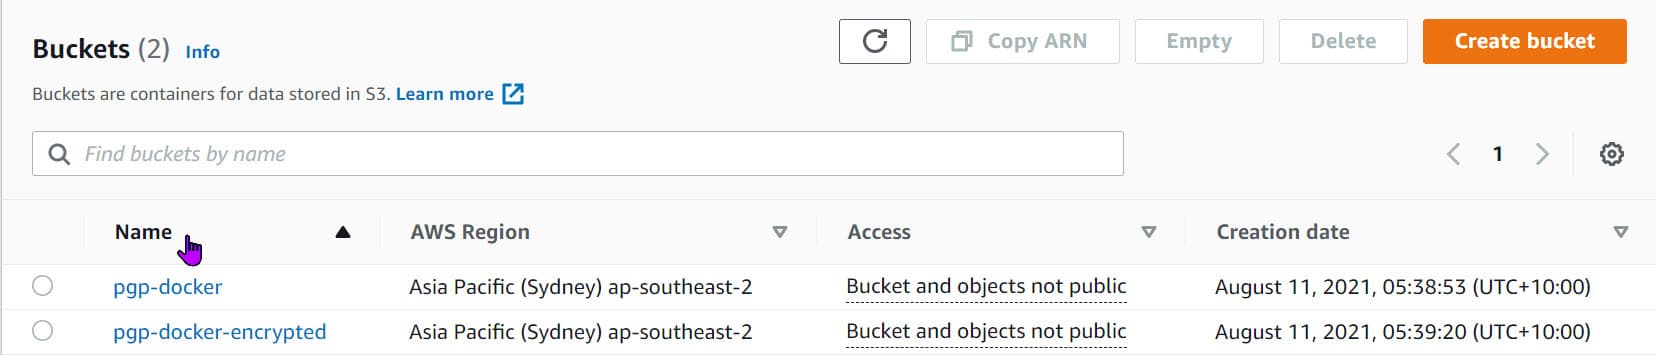
We need two S3 buckets, that we can create the S3 section under the same account/region. The bucket name follows the convention (one ends with '-encrypted') and has all the default options set.
Setup IAM Permissions and Lambda Trigger
We need to give the AWS Lambda access to read from the S3 buckets and set a trigger to run the lambda function any time a new file is uploaded to the PGP-docker S3 bucket.
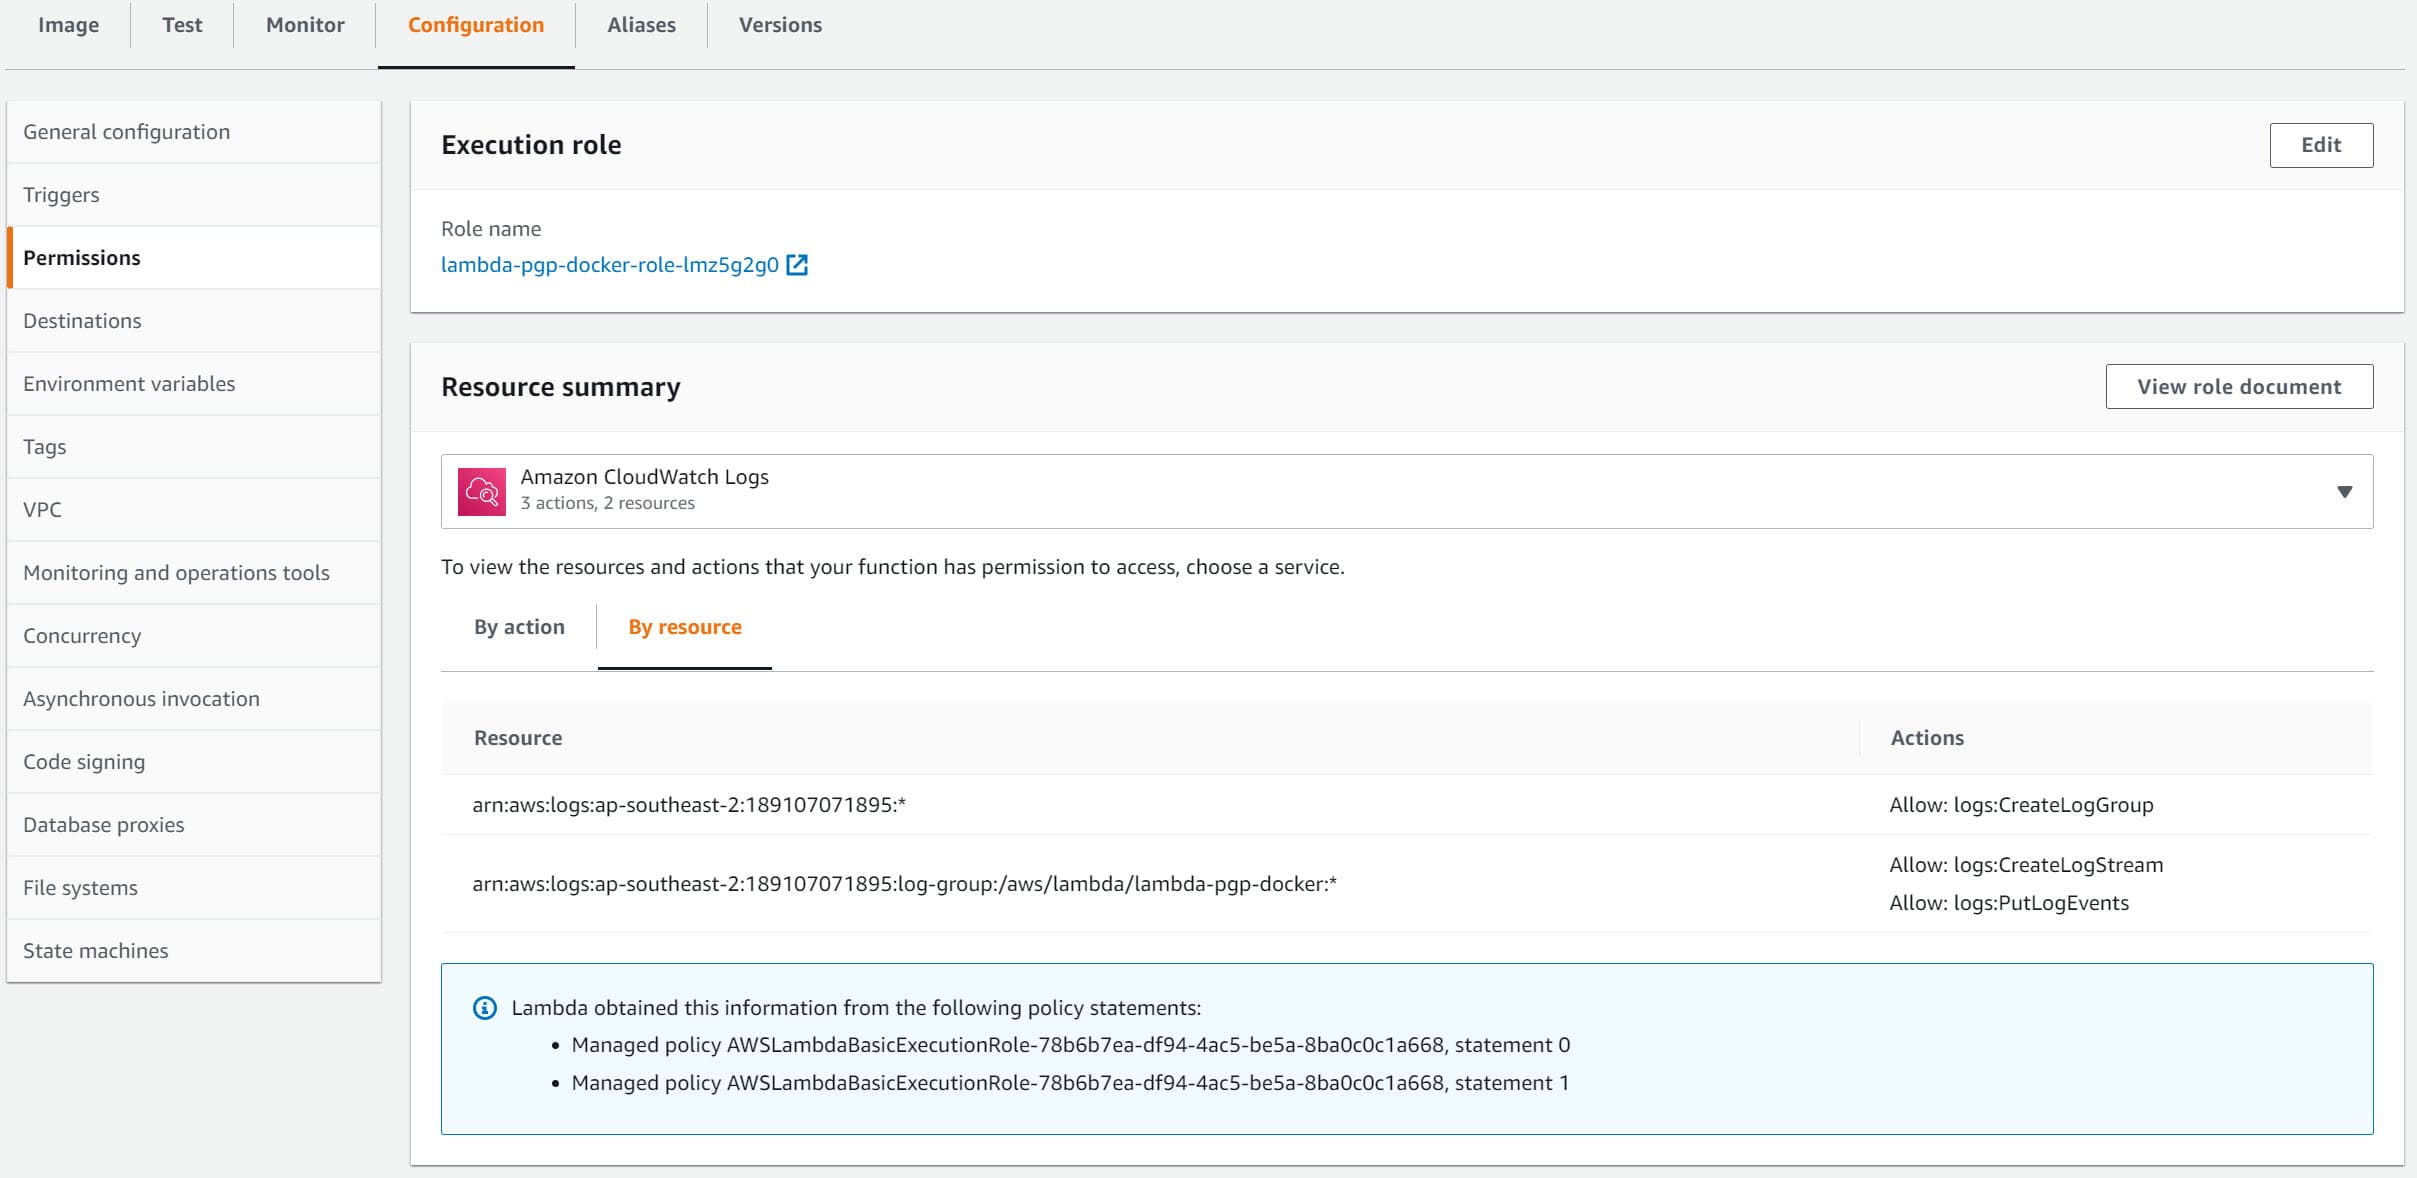
Under 'Configuration → Permissions', we can update the IAM Execution role to give the relevant permissions to read and update S3 buckets.
Clicking the role name (lambda-PGP-docker-role-lmz5g2g0 link in the below example), takes you to the IAM Management Console, where these can be modified.
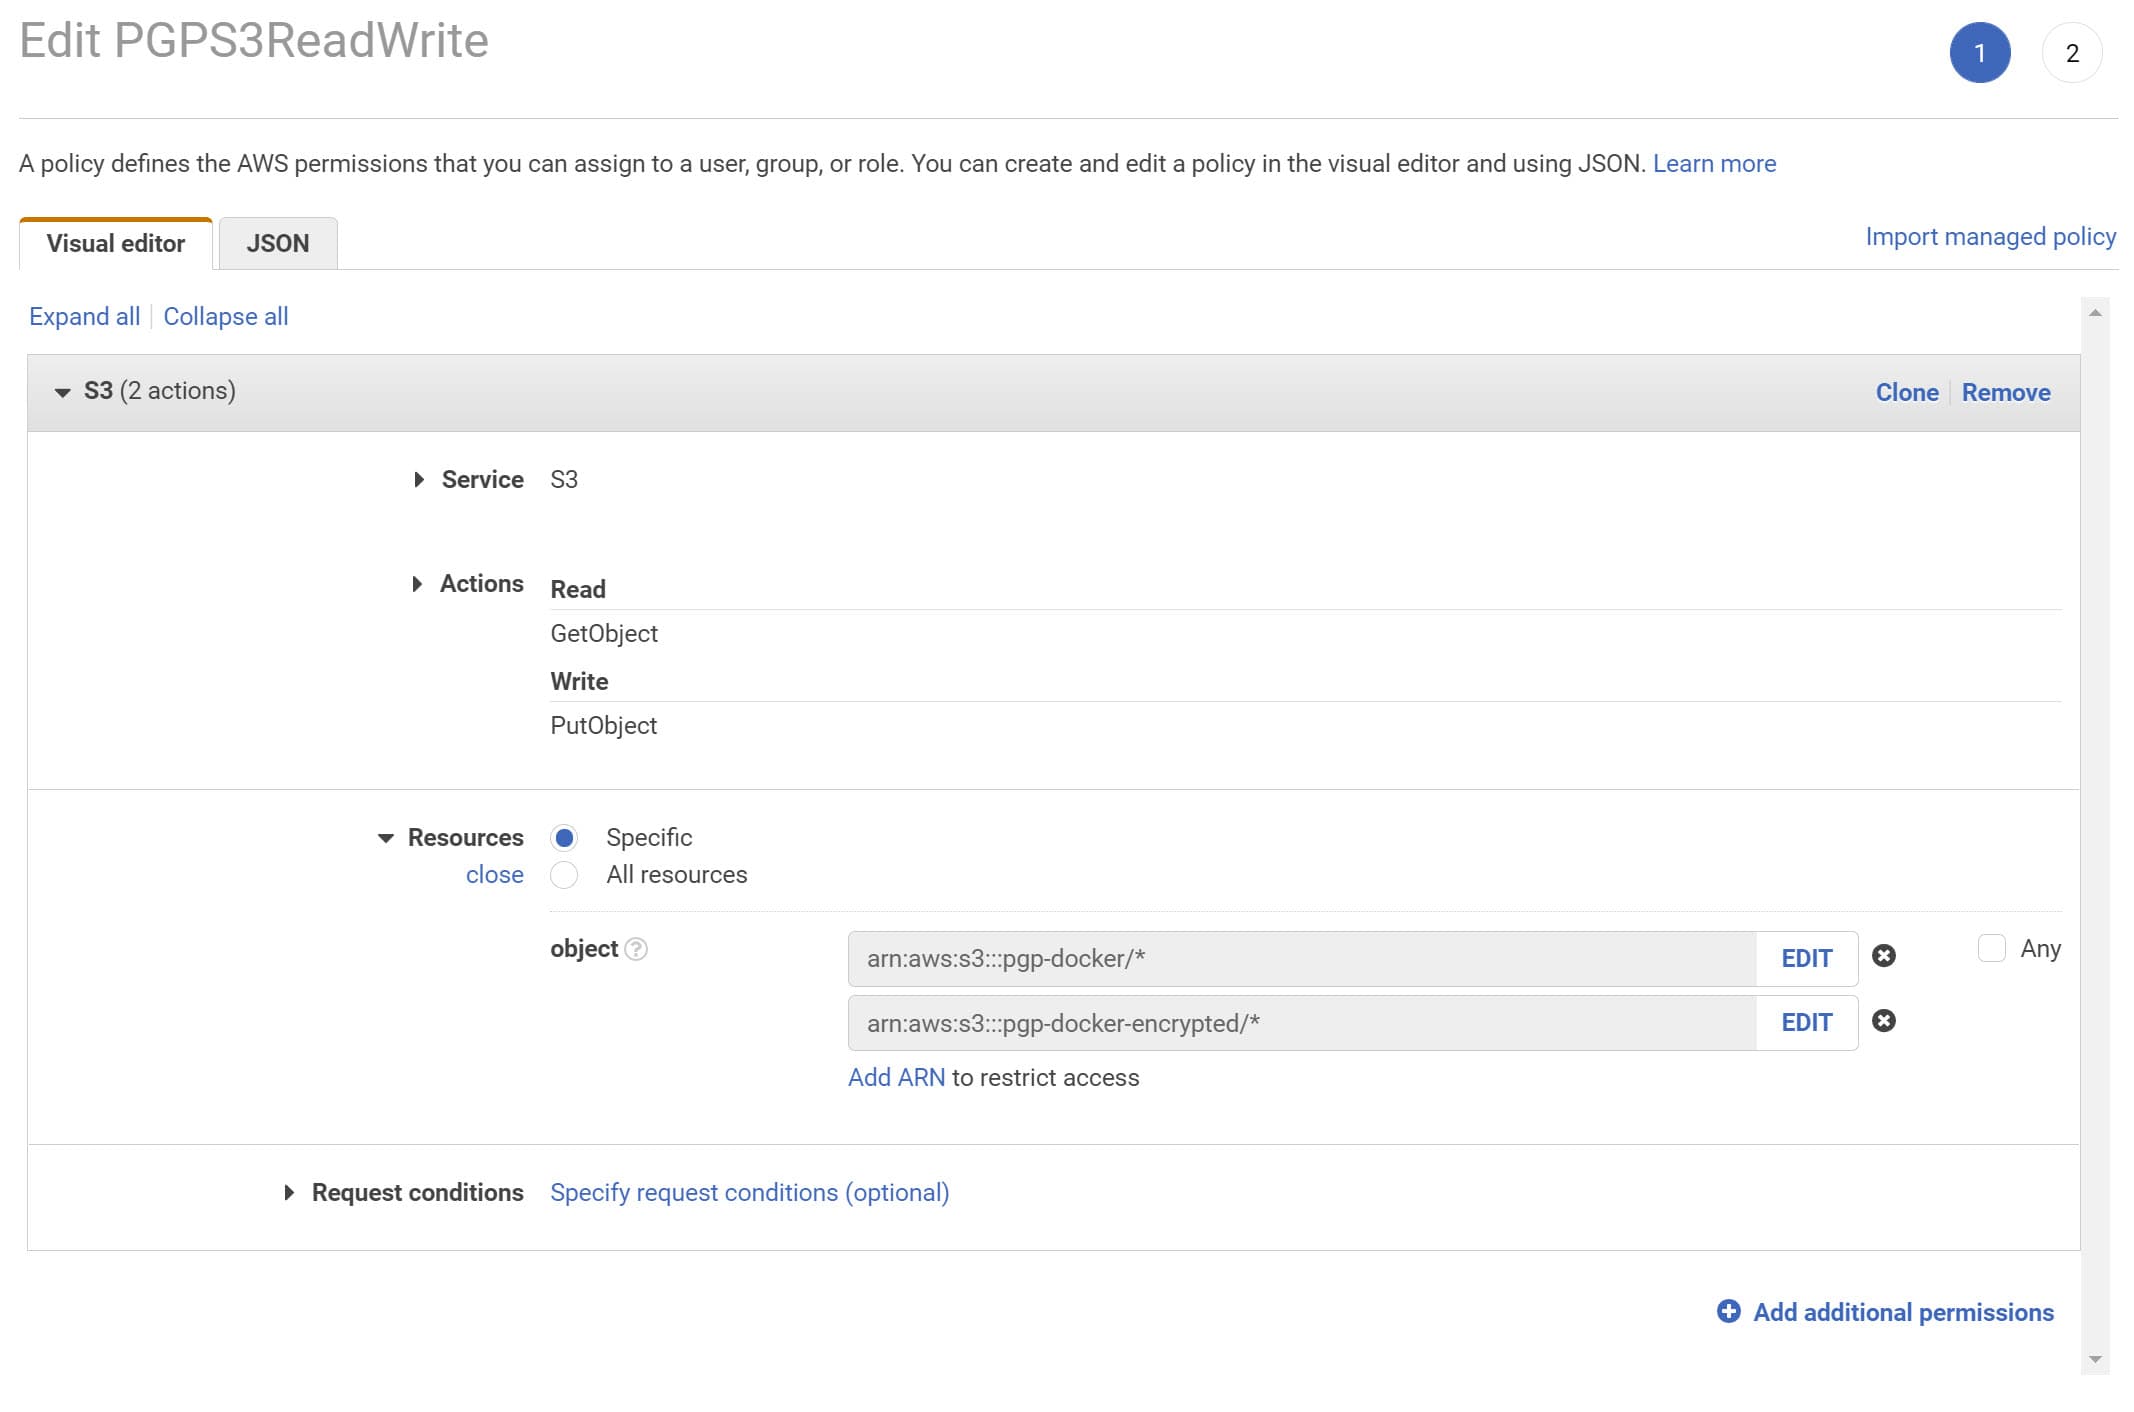
We will 'Add Inline Policy', using the button under the permissions tab in IAM Console for this example. It brings up the below page, where we can select the S3 service and specify the permissions required.
In our example, we need to Get and Put a file from S3, so I have added GetObject and PutObject permissions. I have also explicitly restricted the access to the specific 2 S3 resources and all objects inside it (arn:aws:s3:::pgp-docker/* and *arn:aws:s3:::pgp-docker-encrypted/**)
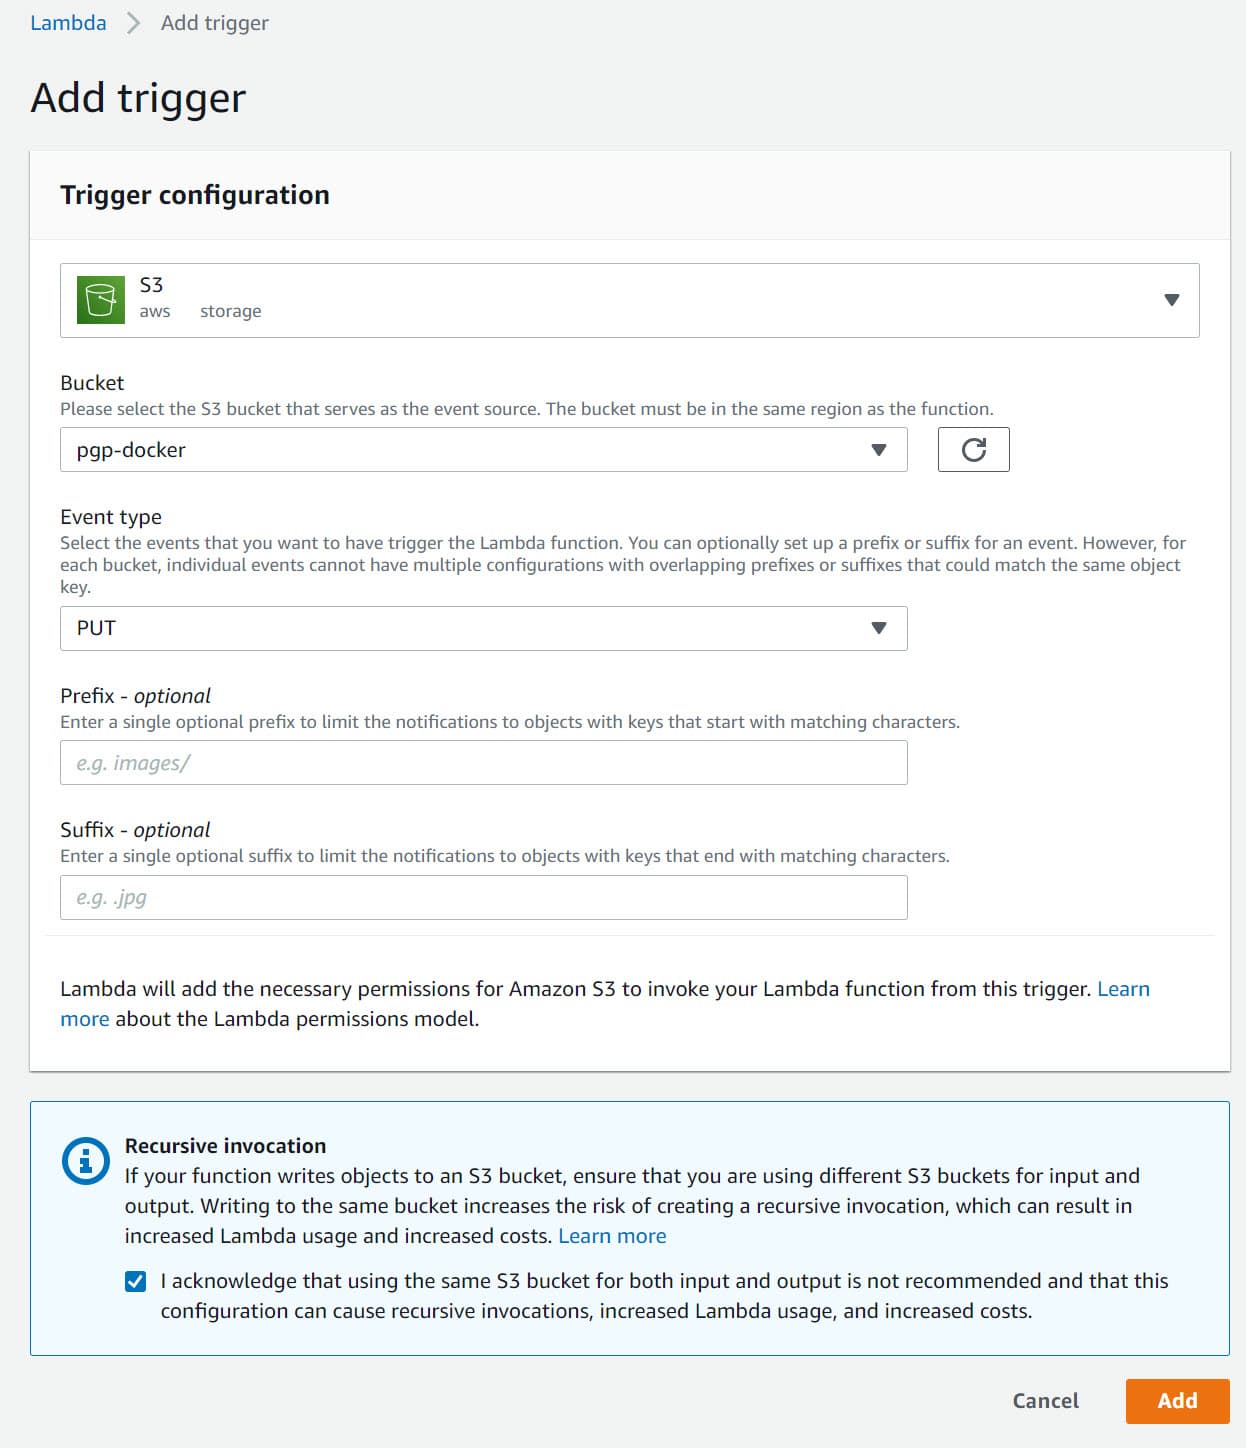
To trigger the lambda function any time a file is uploaded in the PGP-docker S3 , 'Add Trigger' from the lambda page Configuration → Triggers option.
It gives the below options to again select a trigger source (in this case, S3) and specific the bucket details and type of events that must trigger the lambda function.
Since we want to encrypt the file any time a new one is added to the bucket, I have registered for the PUT event type.
Lambda Timeout
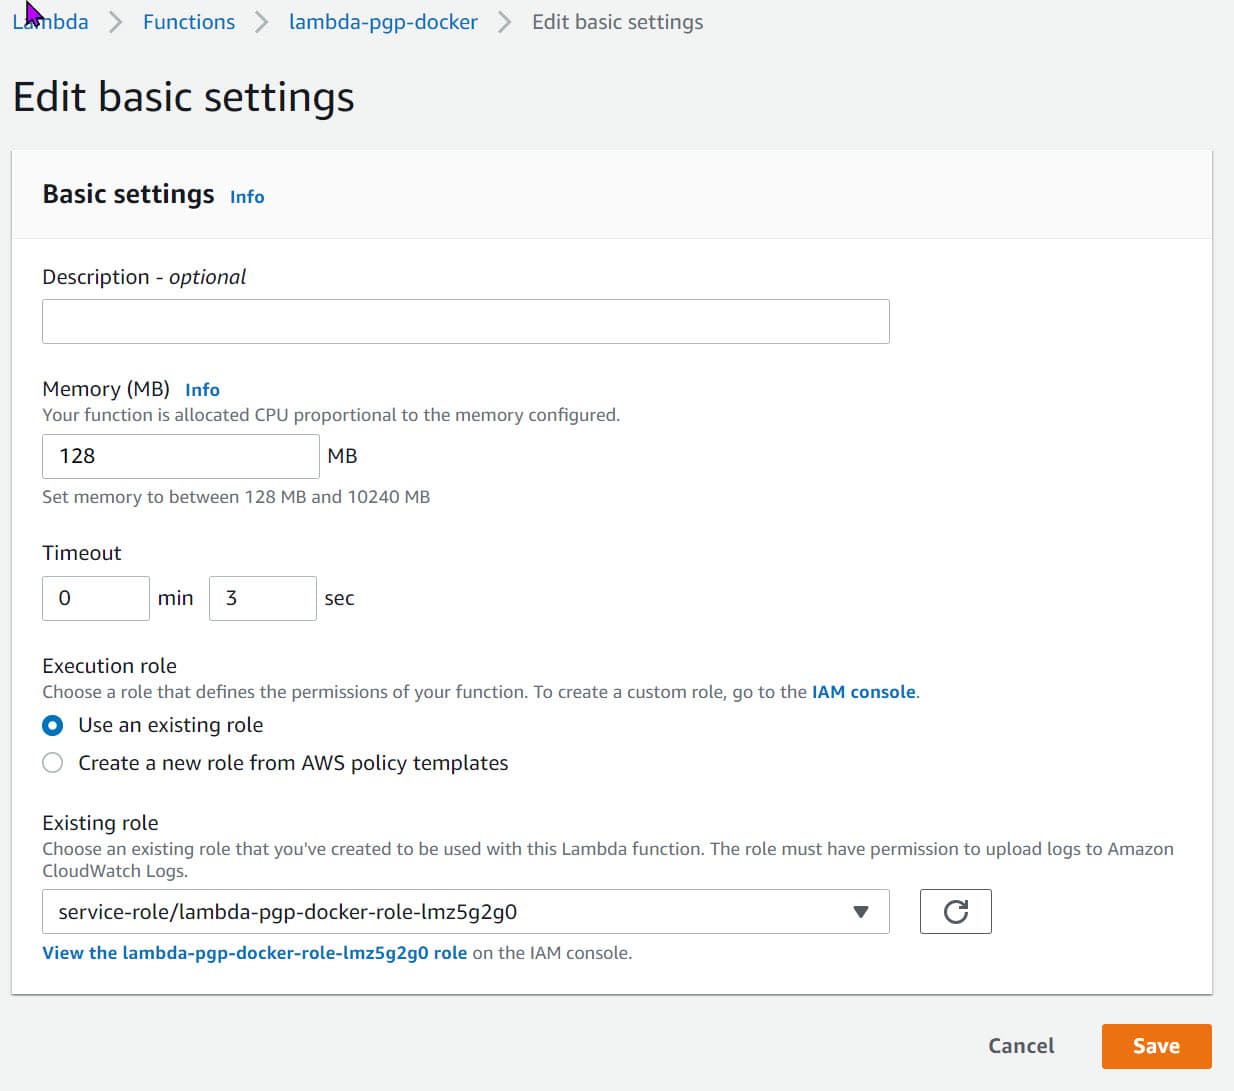
While putting this post together, I wasted over 2 hours because of this one tiny setting.
By default, a new lambda created has a timeout of 3 seconds. This is small, and most likely, our lambda function here will timeout. I did not notice the timeout message in the CloudWatch logs and spent hours debugging the issue.
So make sure to update this to a larger value so that we have enough time to read, PGP encrypts and uploads back the file to S3.
We can update the timeout under Configuration → General Configuration
Packaging & Publishing - Visual Studio
With AWS Toolkit installed, you can skip most of the above steps and directly publish from Visual Studio. Right-click on the Lambda function project and choose the 'Publish to AWS Lambda...' option.
Choose Package Type to 'Image' to indicate Lambda function is to be deployed a Docker Image.
Provide the details from the ECR Repository and image tag.
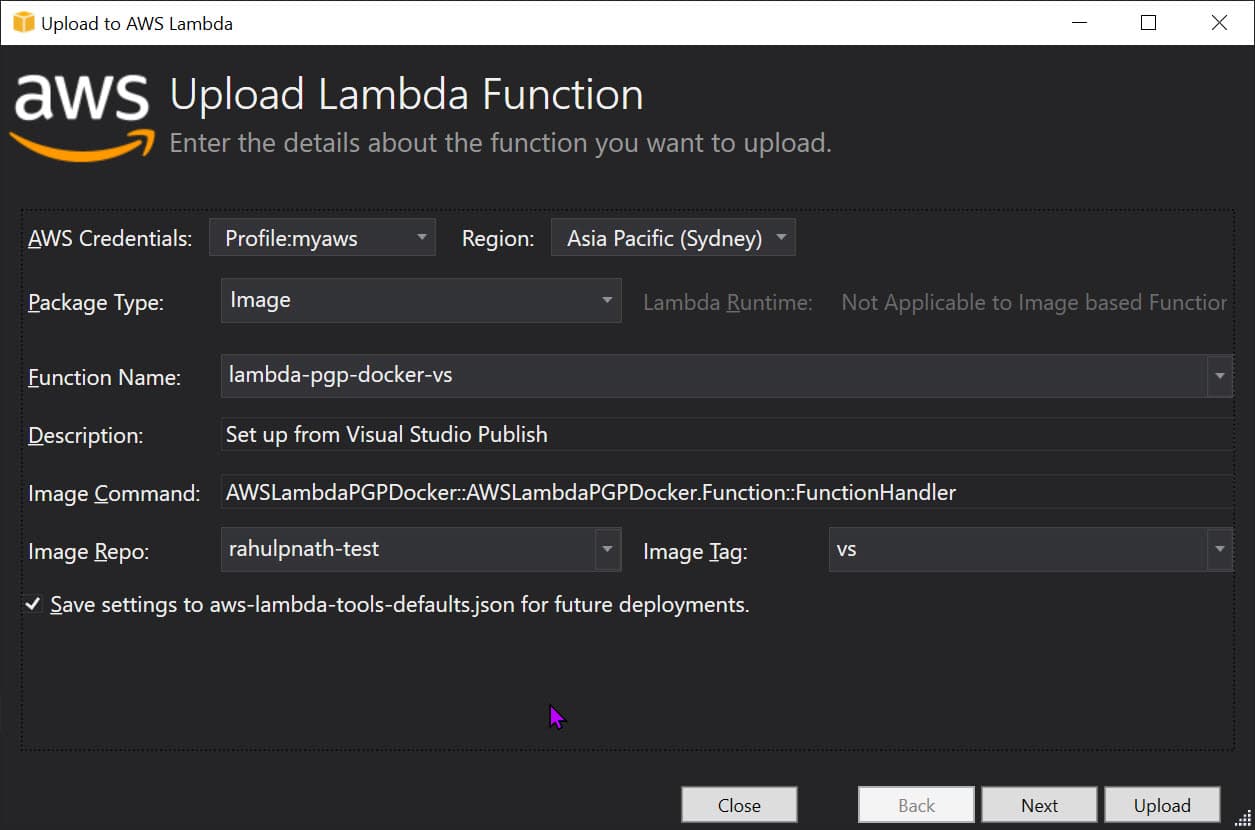
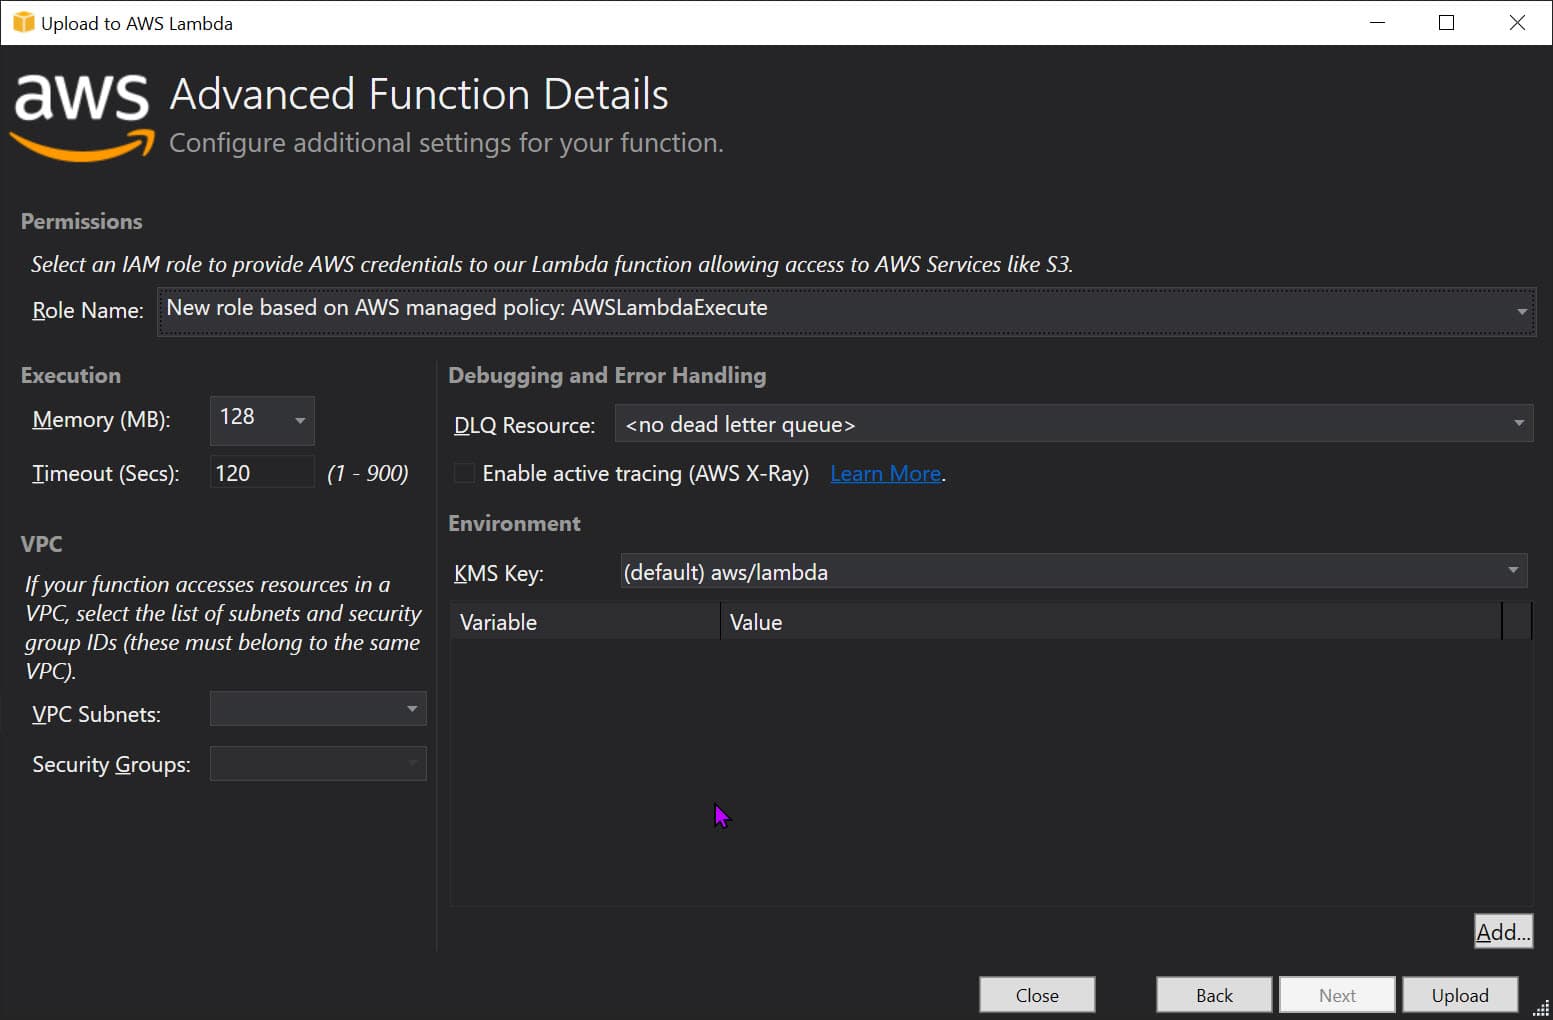
In the following dialog, select the appropriate IAM Role (below I have selected AWSLambdaExecute, which gives access to read/write from S3 buckets). Note the timeout, in this case, is automatically set to 120 seconds.
Hitting Upload will trigger a docker build (using the Dockerfile in the repository), push it up to ECR, and use the new image to set up the lambda function. All of this is done by Visual Studio for us.
Once done, we need to set up the right triggers for the function (as we did in the manual step).
In a real-world application, I would set up a build-deploy pipeline instead of Manual or deploy from VS. But that is a topic for another blog post.
With all that setup, it's time to upload our first file to the S3 bucket. Since the Lambda is set to trigger on a PUT, it will automatically invoke our lambda function, run using the docker image from ECR and upload the file to the second S3 bucket.
Any changes made to the docker image must be built and pushed to the ECR as a new image. You can then Deploy new image from **the lambda function.
I hope this helps you set up PGP encryption of a file from an S3 bucket using Lambda and a Docker image.
You can find the full source code here.
References:
Photo by Ian Taylor on Unsplash

Rahul Nath Newsletter
Join the newsletter to receive the latest updates in your inbox.