
Amazon SQS For the .NET Developer: How to Easily Get Started
Learn how to get started with Amazon SQS and use it from a .NET Application. We will learn how to send and receive messages, important properties,and concepts that you need to know when using SQS.
Table of Contents
This article is sponsored by AWS and is part of my AWS Series.
Amazon Simple Queue Service (SQS) is a fully managed message queuing service that decouples applications and helps build distributed software systems.
Using SQS, you can send, store, and receive messages between different applications without losing them or requiring other services to be available/online.
In this post, let’s learn how to get started with Amazon SQS and use it from a .NET Application. We will learn how to send and receive messages, properties, and concepts that you need to know when using SQS.
Create SQS
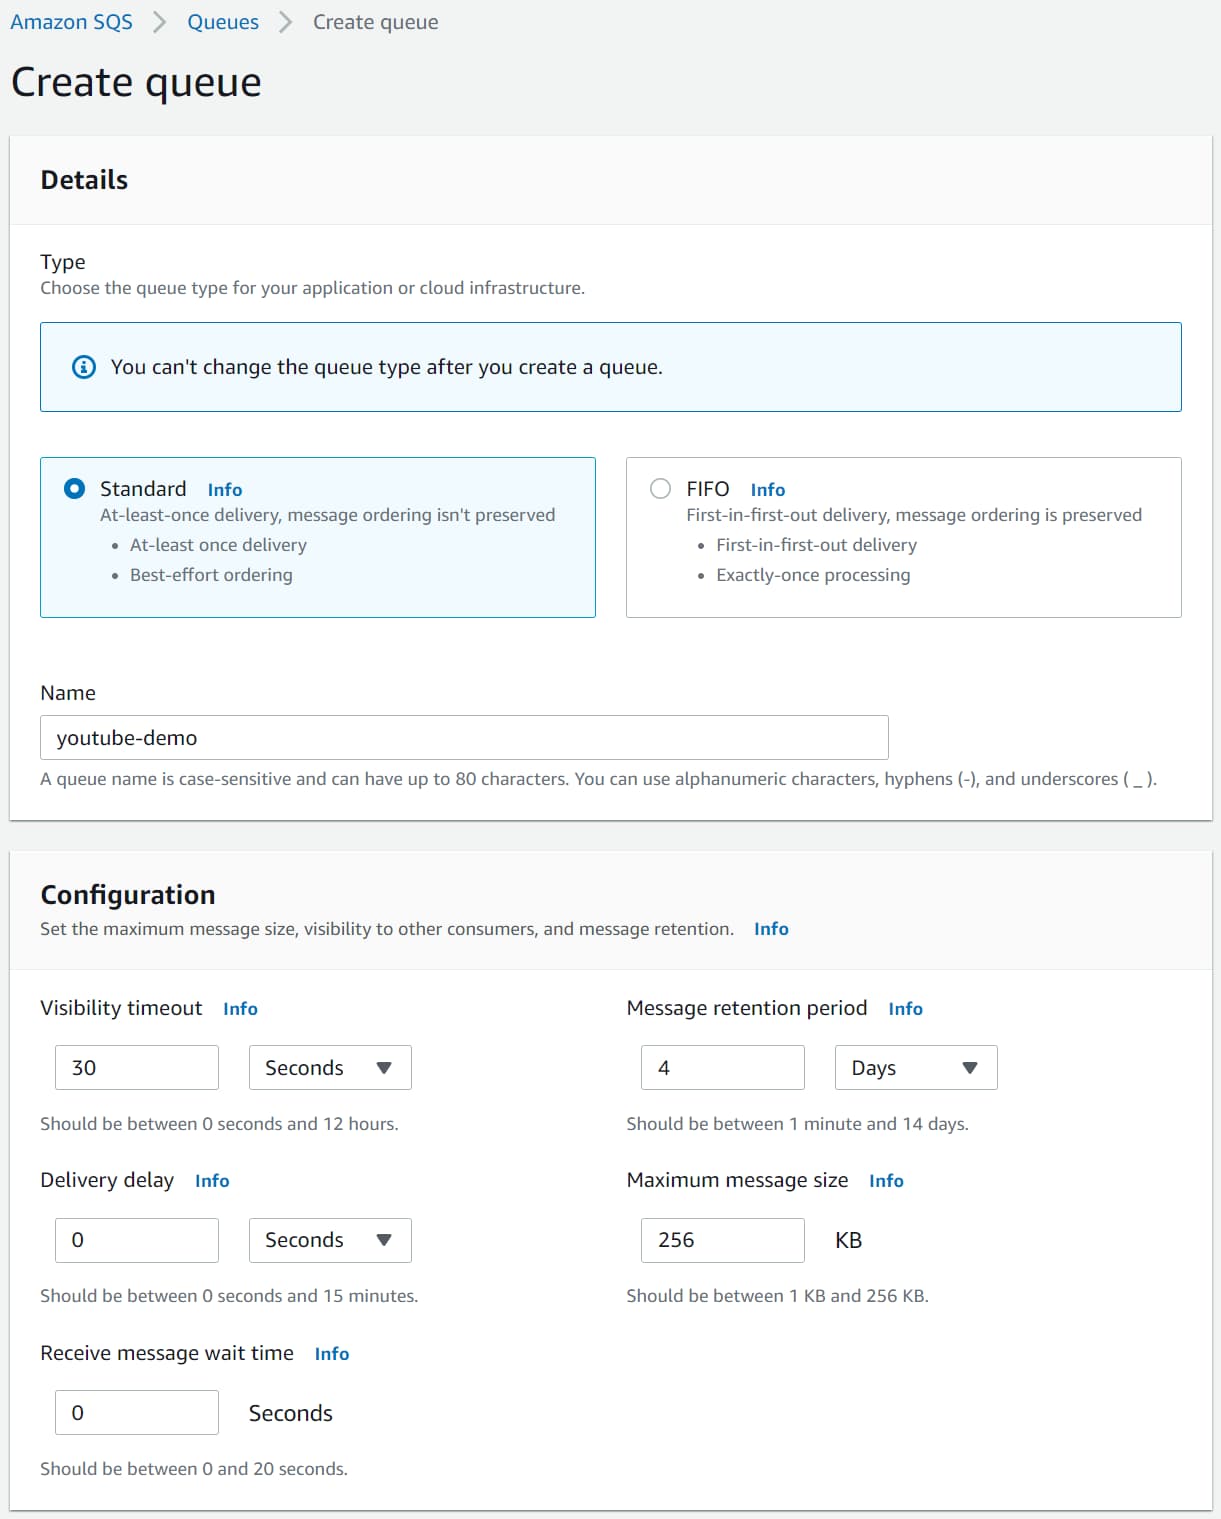
The straightforward way to create an Amazon SQS is from the AWS Console.
SQS supports two types of queues.
- Standard Queue → Provides unlimited throughput, at-least-once delivery, and best-effort ordering
- FIFO Queue → Provides high throughput, exactly-once processing, and first-in-first-out delivery (when strict ordering is required)
You can find the details comparison between the two here and the price comparison here.
Create a new queue by specifying the queue name and selecting the queue type. Let’s leave all other settings as default and explore the important ones later in this post.
SQS & .NET
We will use the ASP NET Core default Web API template as our sample application. The application has a GET method to return WeatherForecast data by default.
The source code used in this blog post is available here.
The AWSSDK.SQS NuGet package provides the AmazonSQSClient to interact with AWS SQS.
You can connect by passing the credentials explicitly or setting up the credentials for your environment.
Send Message
We want to add new weather data to our application and assume that it requires some processing before storing the data in our database.
In these cases, it’s good to decouple the endpoint from the actual processing to avoid long HTTP wait times.
A Queue comes in handy for these scenarios. We can accept an incoming request and offload that as a message to the Queue for background processing.
[HttpPost]
public async Task Post(WeatherForecast data)
{
    var client = new AmazonSQSClient();
    var request = new SendMessageRequest()
    {
        MessageBody = JsonSerializer.Serialize(data),
        QueueUrl = "https://sqs.ap-southeast-2.amazonaws.com/189107071895/youtube-demo"
    };

    var result = await client.SendMessageAsync(request);
}
The POST method takes in WeatherForecast data and uses the AmazonSQSClient to drop it into the Queue.
We need to specify the MessageBody and the Queue URL that we are sending the message. I serialize the data as a JSON string to send the message in the example.
Run the application and use the Swagger UI to the POST endpoint.
View Message In AWS Console
The AWS Console provides a UI to send and receive messages. It also supports viewing messages already in the Queue.
The message is still available to be processed for other consumers even if you view it.
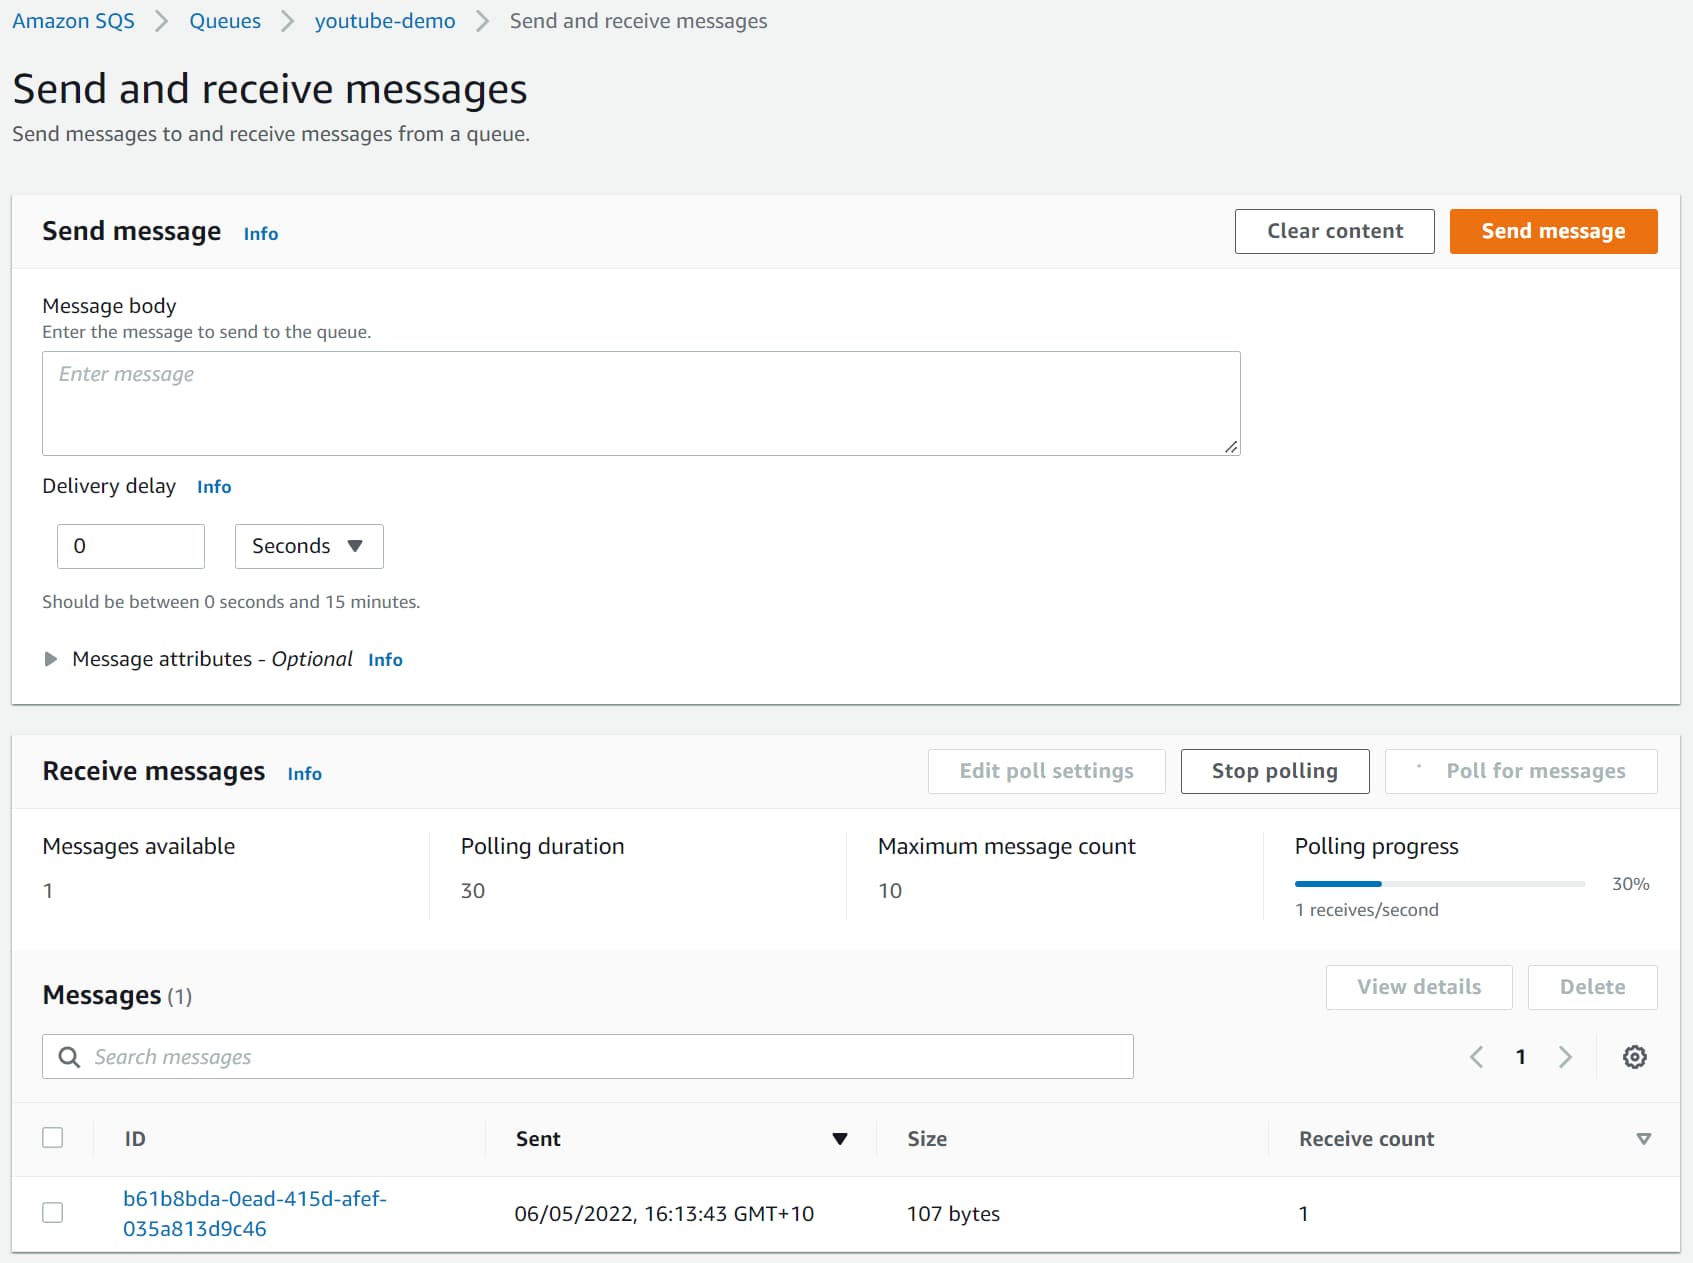
You can send and receive messages too from the AWS console.
Delay Message
When sending messages, they appear in the Queue immediately and are available for processing. However, there might be business scenarios where we might have to delay the message processing.
E.g., let’s say we want to send an email or a notification after 5 minutes, or we want to trigger another process after a specific time, etc.
We can use the DelaySeconds property on the Message object in these cases. It is the length of time, in seconds (0-900 seconds), to delay the specific message.
var request = new SendMessageRequest()
{
    QueueUrl = "https://sqs.ap-southeast-2.amazonaws.com/189107071895/youtube-demo",
    MessageBody = JsonSerializer.Serialize(data),
    DelaySeconds = 10
};
Messages with a DelaySecond specified are available for processing in the Queue only after the delay period.
Alternatively, you can also set a Delay period at the Queue level. It is set as the Delivery Delay property and is the default when DelaySecond is not specified at the message level.
Receive Message
You want these messages to be processed in the background as you queue them up in SQS.
There are different ways to process the messages coming to an SQS Queue. Let’s see two different ways here.
Receive Message in Background Tasks
Background Tasks in ASP NET Core allow to run tasks in the background. For scenarios where you want a simple queue processing service, you can use a Background Task.
You are limited with scaling these services, so keep that in mind when picking a Background Job to process a queue message.
public class WeatherForecastProcessor : BackgroundService
{
    protected override async Task ExecuteAsync(CancellationToken stoppingToken)
    {
        Console.WriteLine("Starting Weather Forecast Processor");
        var client = new AmazonSQSClient();

        while (!stoppingToken.IsCancellationRequested)
        {
            var request = new ReceiveMessageRequest()
            {
                QueueUrl = "https://sqs.ap-southeast-2.amazonaws.com/189107071895/youtube-demo",
            };
            var response = await client.ReceiveMessageAsync(request);
            foreach(var message in response.Messages)
            {
                Console.WriteLine("New message received");
                Console.WriteLine(message.Body);
            }
        }
    }
}
The WeatherForecastProcessor is a simple Background Task that polls the Queue using the same AmazonSQSClient for messages. It uses the ReceiveMessageAsync method to retrieve messages from the queue.
You can perform your business processing on the message read. In this case, it simply logs the message to the console.
When reading messages from the Queue, a few properties are essential to understand.
MaxNumberOfMessages
The MaxNumberOfMessages property specifies the maximum number of messages to be returned in a request made to the Queue. It takes a value between 1 and 10 with the default of 1.
var request = new ReceiveMessageRequest()
{
    QueueUrl = "https://sqs.ap-southeast-2.amazonaws.com/189107071895/youtube-demo",
    MaxNumberOfMessages = 5,
};
Amazon SQS does not return messages more than the count specified, hence the name MaxNumberOfMessages. It can return fewer messages if there are not enough messages in the Queue.
WaitTimeSeconds
The above code polls the queue every second. We could add in an explicit delay to introduce await in the polling.
However, the Queue has a built-in wait mechanism, which can be specified using the WaitTimeSeconds property on the message request. It sets the duration (seconds) the request should wait before returning a response.
If it finds the required number of messages, it returns early. If there are no new messages during the wait time, it returns an empty response after the wait time expires.
var request = new ReceiveMessageRequest()
{
    QueueUrl = "https://sqs.ap-southeast-2.amazonaws.com/189107071895/youtube-demo",
    WaitTimeSeconds = 10,
};
WaitTimeSeconds can take a value between 0 and 20 seconds, and setting it enables the use of Short/Long Polling in SQS. By default the value is 0, and this is referred to as Short Polling. When the value is greater than 0, it’s called Long Polling.
The ‘Receive message wait time’ property can be set at the Queue level to apply this to all receive requests to the Queue.
VisibilityTimeout
When a message is read from the queue for processing, it is only temporarily hidden. The VisibilityTimeout property specifies the time for which it’s hidden. It takes a value (in seconds) between 0 and 12 hours.
var request = new ReceiveMessageRequest()
{
    QueueUrl = "https://sqs.ap-southeast-2.amazonaws.com/189107071895/youtube-demo",
    VisibilityTimeout = 20,
};
By default, this is 30 seconds, which means when a message is read from the Queue by one consumer, it will be hidden for 30 seconds from other consumers. If the consumer fails to process the message and delete the message (which will see later), the message will be made available in the Queue again after 30 seconds.
Receive Message in Lambda
In cases where you expect a high load of messages and have to process them quickly, Background Tasks might not be a perfect choice. While there are other options, AWS Lambda is an excellent choice.

AWS Lambda is a serverless, event-driven compute service that lets you run code for virtually any type of application or backend service without provisioning or managing servers
AWS Lambda has built-in triggers to integrate with Amazon SQS, makes it easy to trigger to Lambda function every time a message is dropped in the Queue.
Check out my video on CloudFormation, where I show you how to set up an SQS Trigger for an AWS Lambda Function using Infrastructure as code and how it all works together.
Delete Message
When a message is read from Queue, it is only temporarily hidden and made available for processing again after the VisibilityTimeout. However, if we have one consumer (an instance of Background Task or Lambda Function) successfully process the message, we no longer want the message to be processed again.
To remove the message from the Queue, we need to delete the message from the queue explicitly. We can use the DeleteMessageAsync method and specify the QueeuUrl and the messageReceiptHandle to delete a message from the Queue.
The ReceiptHandle is a unique identifier associated with receiving a message. Each time you receive a message (even if the same queue message is received again), the ReceiptHandle will be different.
await client.DeleteMessageAsync(
    "https://sqs.ap-southeast-2.amazonaws.com/189107071895/youtube-demo",
    message.ReceiptHandle);
Once deleted, the message is removed from the SQS Queue and is no longer available for processing.
Dead-letter Queue
Dead-letter queues (DLQ) are used to store messages that fail to be processed successfully in the source queues.
Dead-letter queue, by default, is disabled and can be enabled explicitly by designating a Queue ARN.
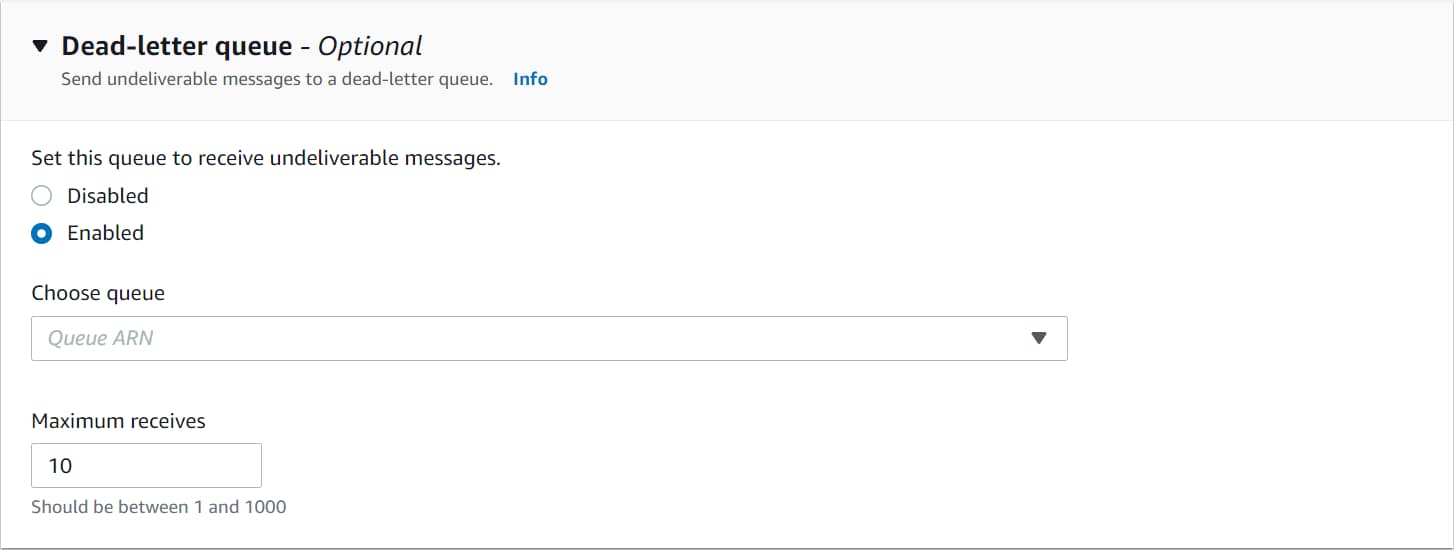
Each time a message is received for processing, it increments the ReceiveCount property on the message. The message is automatically moved to the Dead-letter queue when this count is greater than the ‘Maximum receives’ property. It acts as the maximum retry count for a message in Amazon SQS.
A message can arrive in the DLQ if it crosses the Message retention period set at the Queue level. It is maximum time a message will be in the Queue before it’s considered invalid and moved to DLQ.
I hope this gives you a good introduction to Amazon SQS and how to use them from a .NET Application.
Much of these concepts are the same across all Queues like the Azure Storage Queue, Azure Service Bus Queues, etc. Once you understand the basic concepts and how they work, you can easily apply them across different Cloud Providers or Queueing systems.
Photo by Levi Jones on Unsplash

Rahul Nath Newsletter
Join the newsletter to receive the latest updates in your inbox.