How To Log Correctly To AWS CloudWatch From a .NET Application
Learn how to use Amazon CloudWatch when building .NET applications. We will learn how to write logs into CloudWatch, filter the logs, some good practices when logging, learn about Log Analytics, and see how we can filter and view logs across multiple applications.
Table of Contents
This article is sponsored by AWS and is part of my AWS Series.
Logging is an essential aspect of application development.
When building applications on AWS, CloudWatch provides a centralized, highly scalable service that your applications can read and write logs.
CloudWatch allows to view, search, filter, or archive logs easily.
In this article, let’s learn how to use Amazon CloudWatch when building .NET applications. We will learn how to write logs into CloudWatch, filter the logs, some good practices when logging, learn about Log Analytics, and see how we can filter and view logs across multiple applications.
Key Concepts of
The main concepts that you’ll keep coming across when using CloudWatch Logs are Log events, Log streams, and Log groups.
- Log events → record of some activity recorded by the app or resource being monitored. Simply put, the log statements you write
- Log streams → sequence of log events that share the same source.
- Log groups → group of log streams that share retention, monitoring, and access control settings. A log stream belongs to one log group.
.NET & AWS CloudWatch Logs
There are different ways to integrate with the CloudWatch service from a .NET application. Let’s go through them one by one.
I prefer using Serilog for easy integration and out-of-the-box structured logging support.
Using Amazon CloudWatchLogsClient
The AWSSDK.CloudWatchLogs NuGet package provides the AmazonCloudWatchLogsClient to interact with CloudWatch logs. It provides capabilities to create log groups, log streams, and log events.
The below code creates a log group if it does not already exist and adds a log stream to it. The log events are written into that log stream, log group combination.
var logClient = new AmazonCloudWatchLogsClient();
var logGroupName = "/aws/weather-forecast-app";
var logStreamName = DateTime.UtcNow.ToString("yyyyMMddHHmmssfff");
var existing = await logClient
    .DescribeLogGroupsAsync(new DescribeLogGroupsRequest()
        {LogGroupNamePrefix = logGroupName});
var logGroupExists = existing.LogGroups.Any(l => l.LogGroupName == logGroupName);
if (!logGroupExists)
    await logClient.CreateLogGroupAsync(new CreateLogGroupRequest(logGroupName));
await logClient.CreateLogStreamAsync(new CreateLogStreamRequest(logGroupName, logStreamName));
await logClient.PutLogEventsAsync(new PutLogEventsRequest()
{
    LogGroupName = logGroupName,
    LogStreamName = logStreamName,
    LogEvents = new List<InputLogEvent>()
    {
        new()
        {
            Message = $"Get Weather Forecast called for city {cityName}",
            Timestamp = DateTime.UtcNow
        }
    }
});
As you can see, the above code is verbose and not something preferable to write every time we need to log.
We could abstract this into a different class and expose more specific functions to take in just the message and log. But this is already done for you. So don’t repeat it yourself 😀
Using .NET Logging Providers with AWS
The AWS Logging .NET repository contains plugins for popular .NET logging frameworks to integrate with CloudWatch.
To integrate with the out of the box .NET Core Logging capability install the AWS.Logger.AspNetCore NuGet package.
Adding Amazon CloudWatch as a logging provider is easily done by calling the AddAWSProvider extension method of the ILoggingBuilder as shown below.
builder.Logging.AddAWSProvider();
The extension method adds an AWSLoggerProvider to the logging builder. The new provider also uses the AmazonCloudWatchLogsClient that we used earlier. It abstracts all the complexity and mechanics of talking to CloudWatch.
You can use ILogger from the application code and use that to write log events.
public WeatherForecastController(
    ILogger<WeatherForecastController> logger)
{
    _logger = logger;
}

[HttpGet(Name = "GetWeatherForecast")]
public async Task<IEnumerable<WeatherForecast>> Get(string cityName)
{
    _logger.LogInformation("Get Weather Forecast called for {city}", cityName);
}
You can either use configuration or code to set up the log group name. You can also specify other configuration settings and the log level configurations like below.
"Logging": {
  "Region": "us-east-1",
  "LogGroup": "AspNetCore.WebSample",
  "IncludeLogLevel": true,
  "IncludeCategory": true,
  "IncludeNewline": true,
  "IncludeException": true,
  "IncludeEventId": false,
  "IncludeScopes": false,
  "LogLevel": {
    "Default": "Debug",
    "System": "Information",
    "Microsoft": "Information"
  }
}
Using Serilog and AWS CloudWatch
The AWS Logging .NET repository also contains a plugin to integrate with Serilog. Serilog is a popular .NET Logging library built with robust structured event data from the ground up.
Structured logging formats are essential to perform advanced queries on your logs. We will see more about this in the next section.
To setup Serilog, you need to install a few NuGet packages →Serilog, Serilog.AspNetCore(if it’s an ASP NET application),AWS.Logger.SeriLog(to integrate with CloudWatch) andSerilog.Settings.Configuration (for config file support)
Once installed, setting up the integration is only a few lines of code. However note the use of RenderedCompactJsonFormatter, which writes the log in JSON format allowing for richer querying capabilities (covered under the Structured Logging section)
builder.Host.UseSerilog((ctx, lc) =>
{
    lc
        .ReadFrom.Configuration(ctx.Configuration)
        .WriteTo.AWSSeriLog(
            configuration: ctx.Configuration,
            textFormatter: new RenderedCompactJsonFormatter());
});
The log group and other log levels can be configured via code or the config file. The library looks for the Serilog section for the required configuration by default.
"Serilog": {
    "LogGroup": "/aws/weather-forecast-app",
    "MinimumLevel": {
      "Default": "Information",
      "Override": {
        "Microsoft": "Warning",
        "System": "Warning"
      }
    }
  }
The application code can inject the ILogger interface from the Serilog library or continue using the same ILogger<T> as in the previous example.
Filtering Logs
Writing logs is only one part of the story. What’s more critical is searching and filtering the relevant logs when there is an issue or debugging application behavior.
The CloudWatch logs provide rich querying and filtering capabilities, making it easier to get to the correct logs quickly.
Text-Based Filtering
Using the Text-Based filtering patterns, you can use different filtering capabilities to match words, phrases, or numeric values.
- Match Single Term → Brisbane (logs which have Brisbane)
- Match Multiple Terms
- → Brisbane 9 (logs having Brisbane and number 9, not necessarily consecutive)
- → “count of 9” (matches the entire phrase)
- → -Brisbane 9 (logs without Brisbane but has 9)
- → ?Brisbane 9 (logs with 9, but Brisbane is optional)

Text-based filtering has its limitations. All filtering and querying are limited to text-based comparisons. As soon as you want to write more complex filters and criteria, you will need a richer data model.
Structured Logging in AWS
Structured Logs are powerful because the properties in the events are first class.
The Serilog integration with CloudWatch uses the JSON formatter (provided out of the box with Serilog) and offers full structured logging support.
 _logger.LogInformation(
  "Received new weather data for city {City} with request {RequestId}",
  requestData.CityName, requestData.Id);
Don’t use string interpolation while writing log messages. Pass the values as parameters to the log methods.
Here’s the difference between using string interpolation which generates the log as a simple text instead of passing values, and logging as structured logs.

When using structured logging and passing the values as parameters to the log methods, these are available as first-class properties to query in CloudWatch.
To query JSON log events, a special syntax is to be used:
{ PropertySelector Operator String }
- PropertySelector → starts with $. and the property name. also supports array indexing using []
- Operator - equality or numeric operators based on property value
- String - Value to compare against and can be enclosed in double quotes
eg. {$.count > 10 && $.cityName = “Brisbane”} → selects all log events that have a count property greater than 10 with the cityName property as Brisbane.

AWS CLoudWatch Log Insights
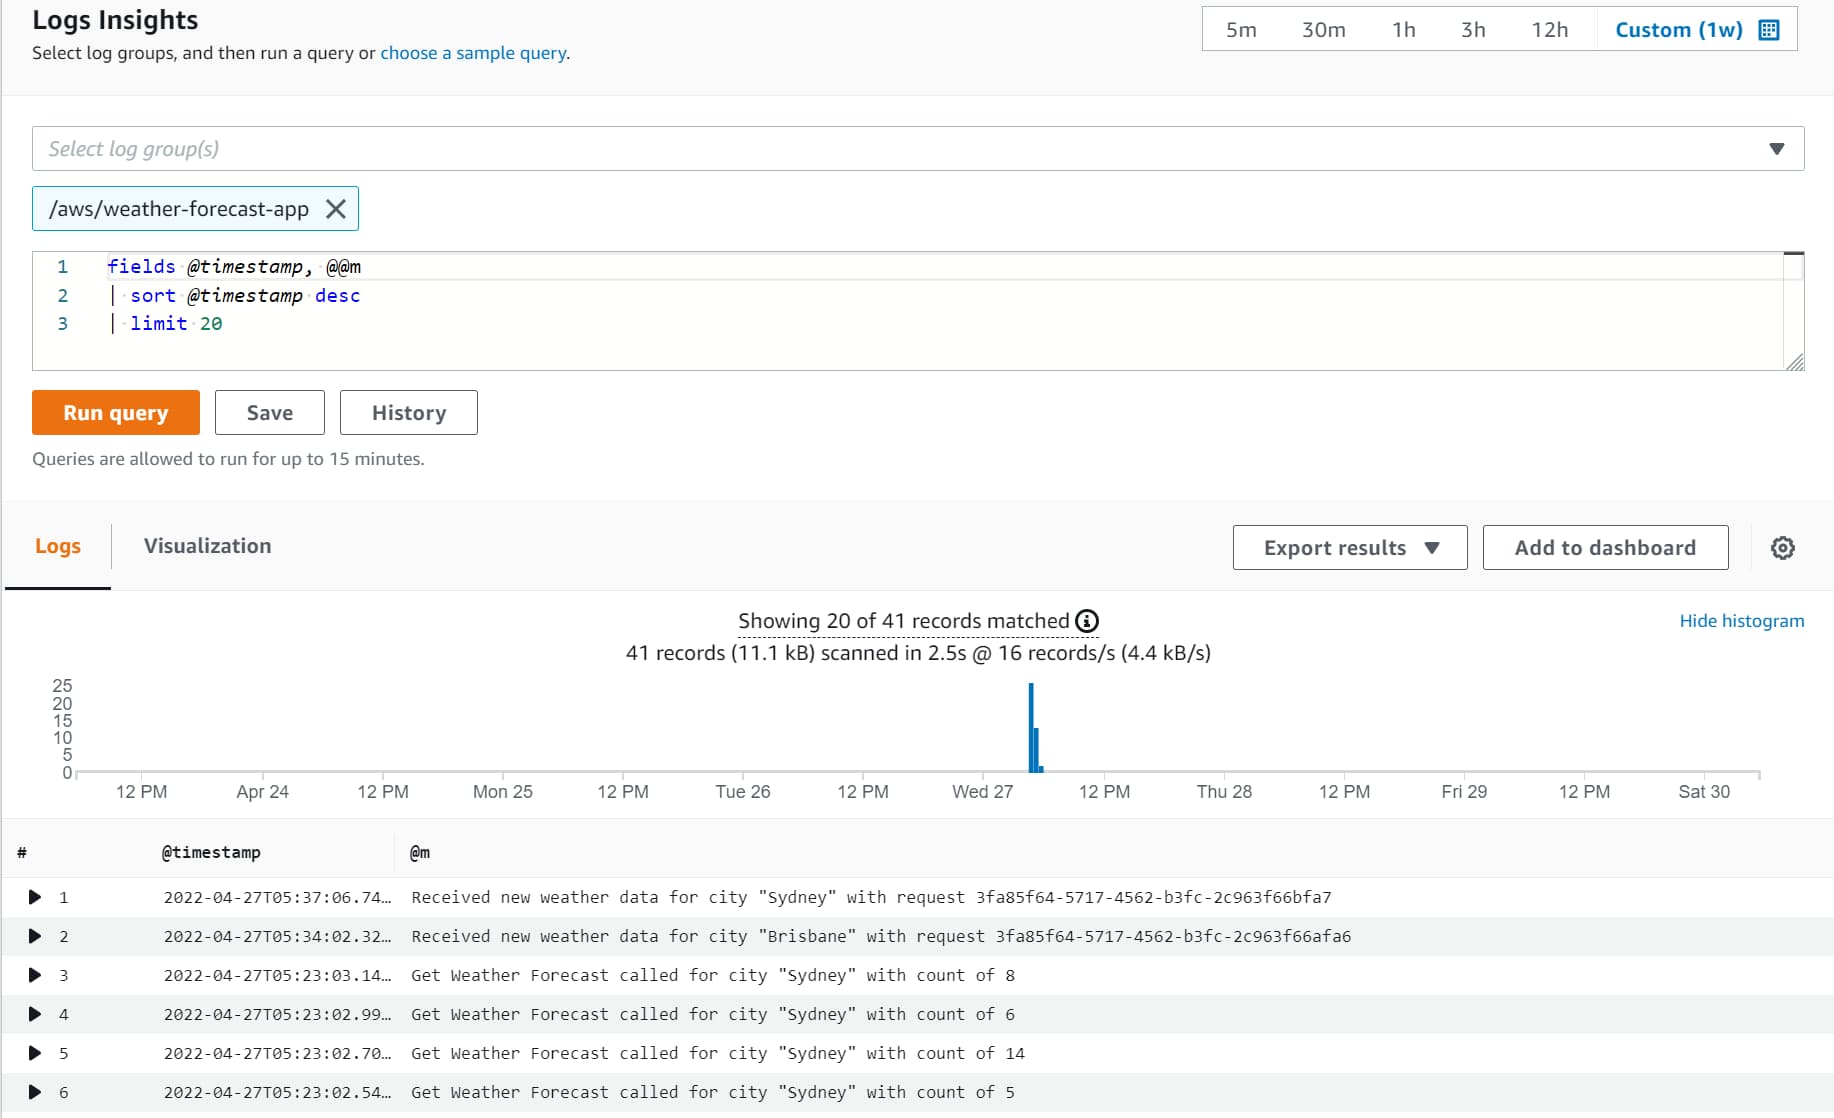
CloudWatch Log Insights provides richer capabilities to interact with log events. It allows to interactively search and analyze log data and supports a custom query language.
The query syntax supports custom functions and operations and is not limited to arithmetic or regex expressions.
There can be a delay between events showing up in Log Groups and their appearing in CloudWatch Log Insights.
It also supports formatting the queried log events in custom formats. You can set it to show just the properties that are important to you in the collapsed view.
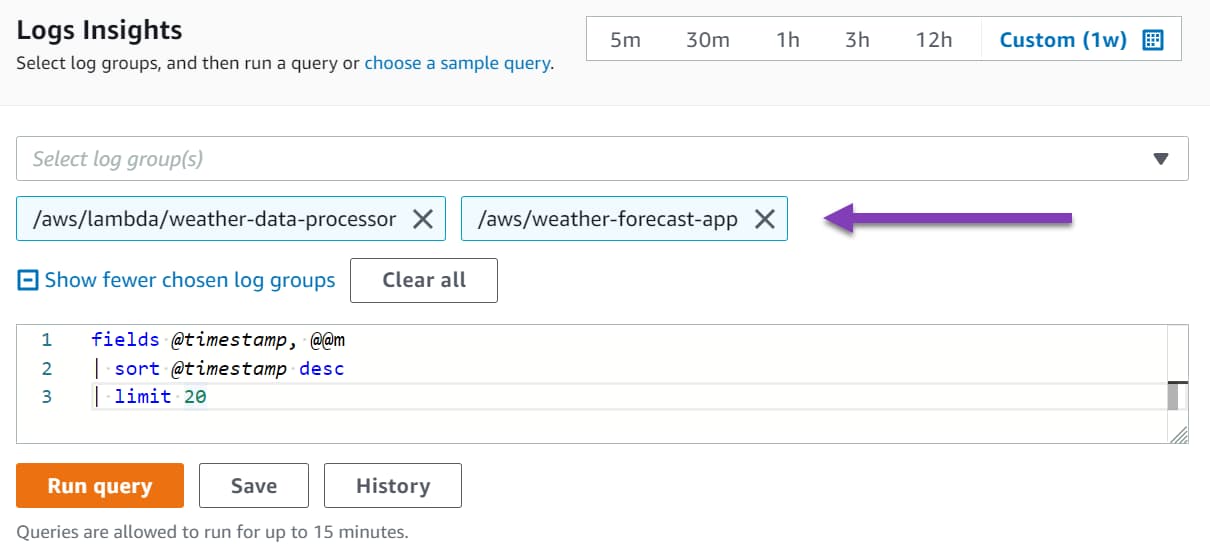
Query Logs Across Applications
Log Insights also supports querying across multiple log groups. It is handy in distributed applications where multiple applications are responsible for handling a business use case.
Given a correlation id or a unique id passed across applications, you can filter the data across multiple applications and see the end-to-end flow of events.
Saved Queries
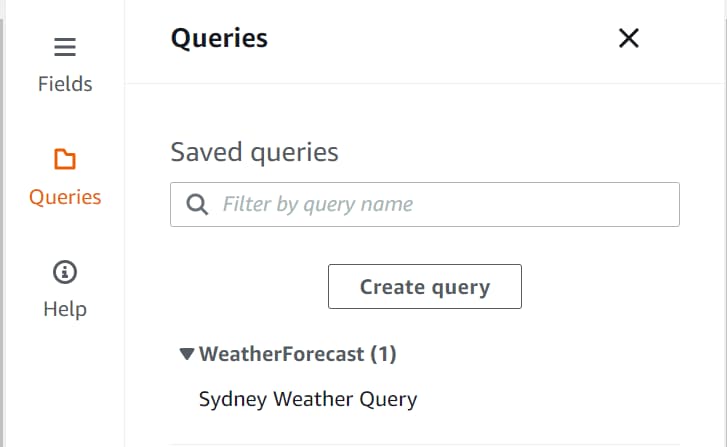
CloudWatch Insights also enables the saving of Queries for later use. These queries can be grouped in folders based on your application needs and are visible to anyone who has access to the CloudWatch in AWS Console.
Summary
CloudWatch Logs provides rich features and capabilities to manage logs when building applications on AWS Infrastructure. Since it allows for a centralized location, it makes setting up and using the infrastructure from various application types easy.
CloudWatch Log Insights capabilities allow custom formatting, richer query models, and searching across multiple applications. It is beneficial in message-based architectures and distributed systems.
I hope this helped you get started with using CloudWatch Logs from .NET applications.
Rahul Nath Newsletter
Join the newsletter to receive the latest updates in your inbox.
