Amazon API Gateway - Introduction To Building REST APIs
Learn how to build REST API using API Gateway. We will learn the different building blocks of REST APIs, how they connect with each other, and how you can build and configure an API in the AWS Console.
Table of Contents
This article is sponsored by AWS and is part of my AWS Series.
Amazon API Gateway is an AWS service for managing APIs at any scale.
REST APIs and HTTP APIs are both RESTful API products offered by API Gateway. While HTTP APIs are designed with minimal features and are cost-effective, REST APIs provide more advanced features such as API keys, per-client throttling, request validation, private API endpoints, etc.
In this blog post, let’s learn the core concepts and terminologies you’ll come across when building REST API.
We will learn
- the different building blocks of REST APIs and how they connect
- Build and configure an API in the AWS Console.
- Stages and Stage Variables when deploying APIs
I will be using Mock integration to show the different concepts. Understanding these basic building blocks is necessary to build real-world backend integrations.
Both REST APIs and HTTP APIs help us build RESTful APIs. The REST word in REST APIs is purely a naming thing that is not confused with RESTful services.
Develop A REST API
From the AWS Console, under API Gateway, select ‘REST API’ to start building one.
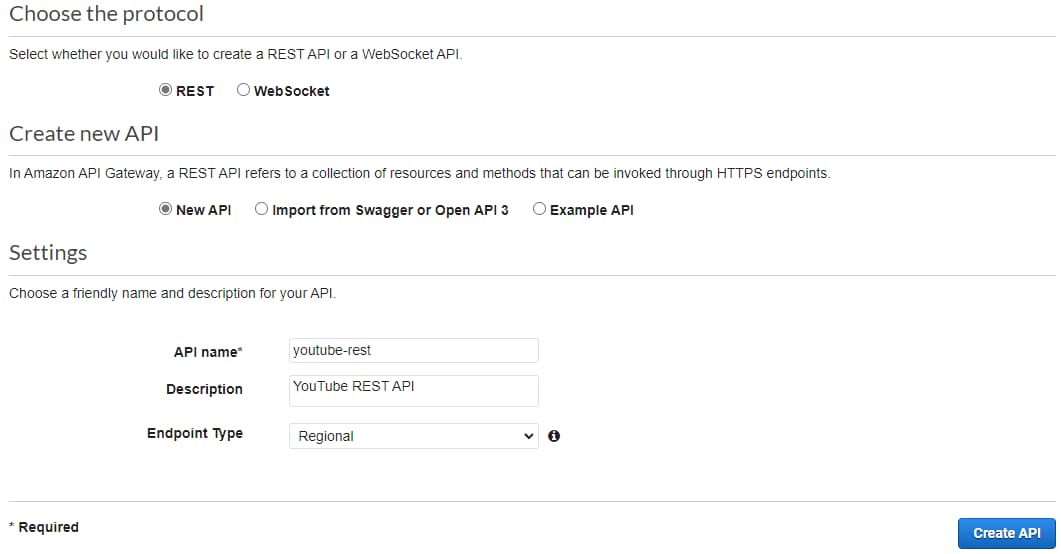
It prompts you to provide an API Name, description, and Endpoint Type. Endpoint type can be regional, edge-optimized or private. Choose an appropriate option based on where most of your API traffic originates.
- Regional → Best for clients in the same region
- Edge Optimized → Best for geographically distributed clients
- Private → Best for access only from within Amazon Virtual Private Cloud (VPC)
Once you create REST API, you can add resources and methods to it.
Resources
Resources are the fundamental concept in a RESTful API.
A resource is an object with a type, associated data, relationships to other resources, and a set of methods that operate on it.
Building REST APIs in API Gateway also starts with creating a resource. To create a new resource, use the Actions drop-down button against the Resources sections in the API Gateway.
Based on the selected Resource in the list below, the actions you choose affect that Resource.
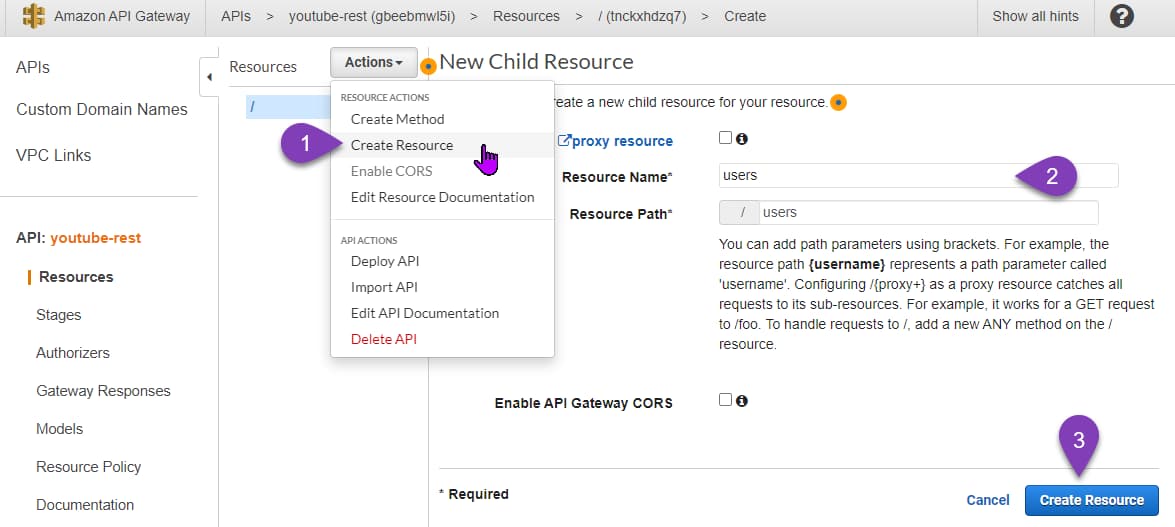
Resources have a name and are uniquely identified by a path. Above, I have added a Users Resource, identified by the path ‘/users'. This Resource is at the root of the API Gateway.
You can also add child Resources. Select the Users node in the Resources list before selecting the ‘Create Resource’ option from the Action menu.
For performing actions on Resources, we need to create Methods.
Methods
Methods help us perform actions in the Resource via their URL. The allowed method names are the standard HTTP verbs - GET, PUT, POST, PATCH, ANY, OPTIONS, HEAD, and DELETE.
To add an Action, use the ‘Create Action’ option from the Action’s drop-down button menu. This prompts us to select a method (HTTP Verb) for which you need to create an associated action.
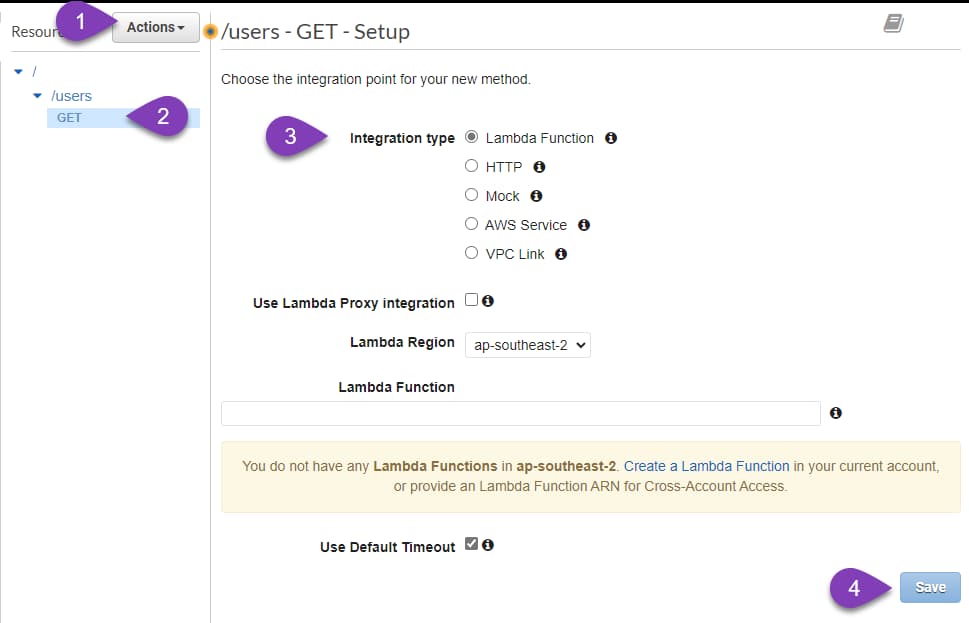
To complete the creation of a Method, you must choose and set up an Integration point.
Integrations
Integrations are what power your API methods.
They can be of different types - Lambda Function, HTTP, Mock, AWS Service, or VPC Link. Based on the kind of integration you choose, it requires a different configuration to set up. Any time a method is called on the resource endpoint, it passes the request to the backend integration and returns the response to the calling client.
Integrations can be of two types:
- Proxy Integration → With Proxy integration, the request is passed on to the integration as is, which means the backend service will need to interact with the HTTP requests and response objects.
- Non-Proxy Integration → With Non-proxy integrations, we can specify mapping templates to transform the HTTP request into the backend-specific format. For example, if we have a lambda function to add a user, we can specify a mapping template to pass only the user details and not any of the HTTP Request details.
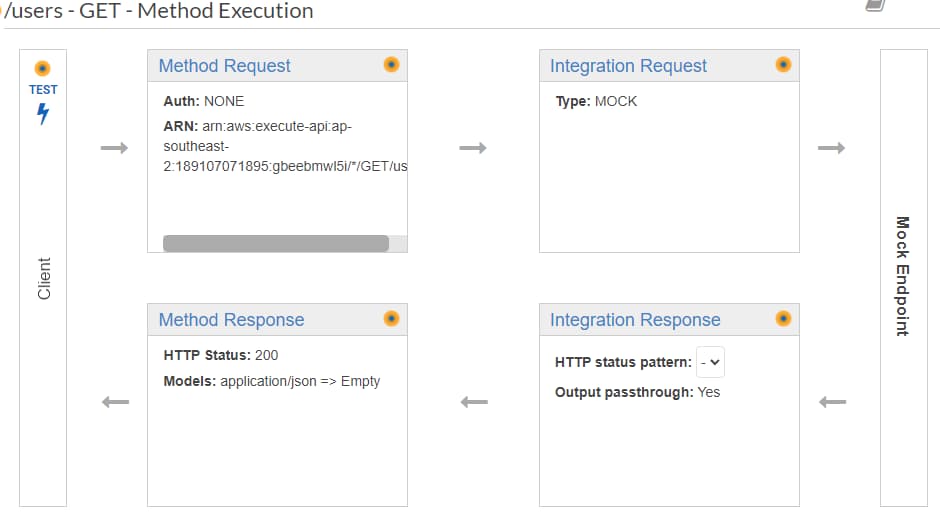
For this post, I will use a Mock integration and explore how to set up different Method and Integration options.
Setting up Method Request/Response
An API Method consists of a Method Request and a Method Response.
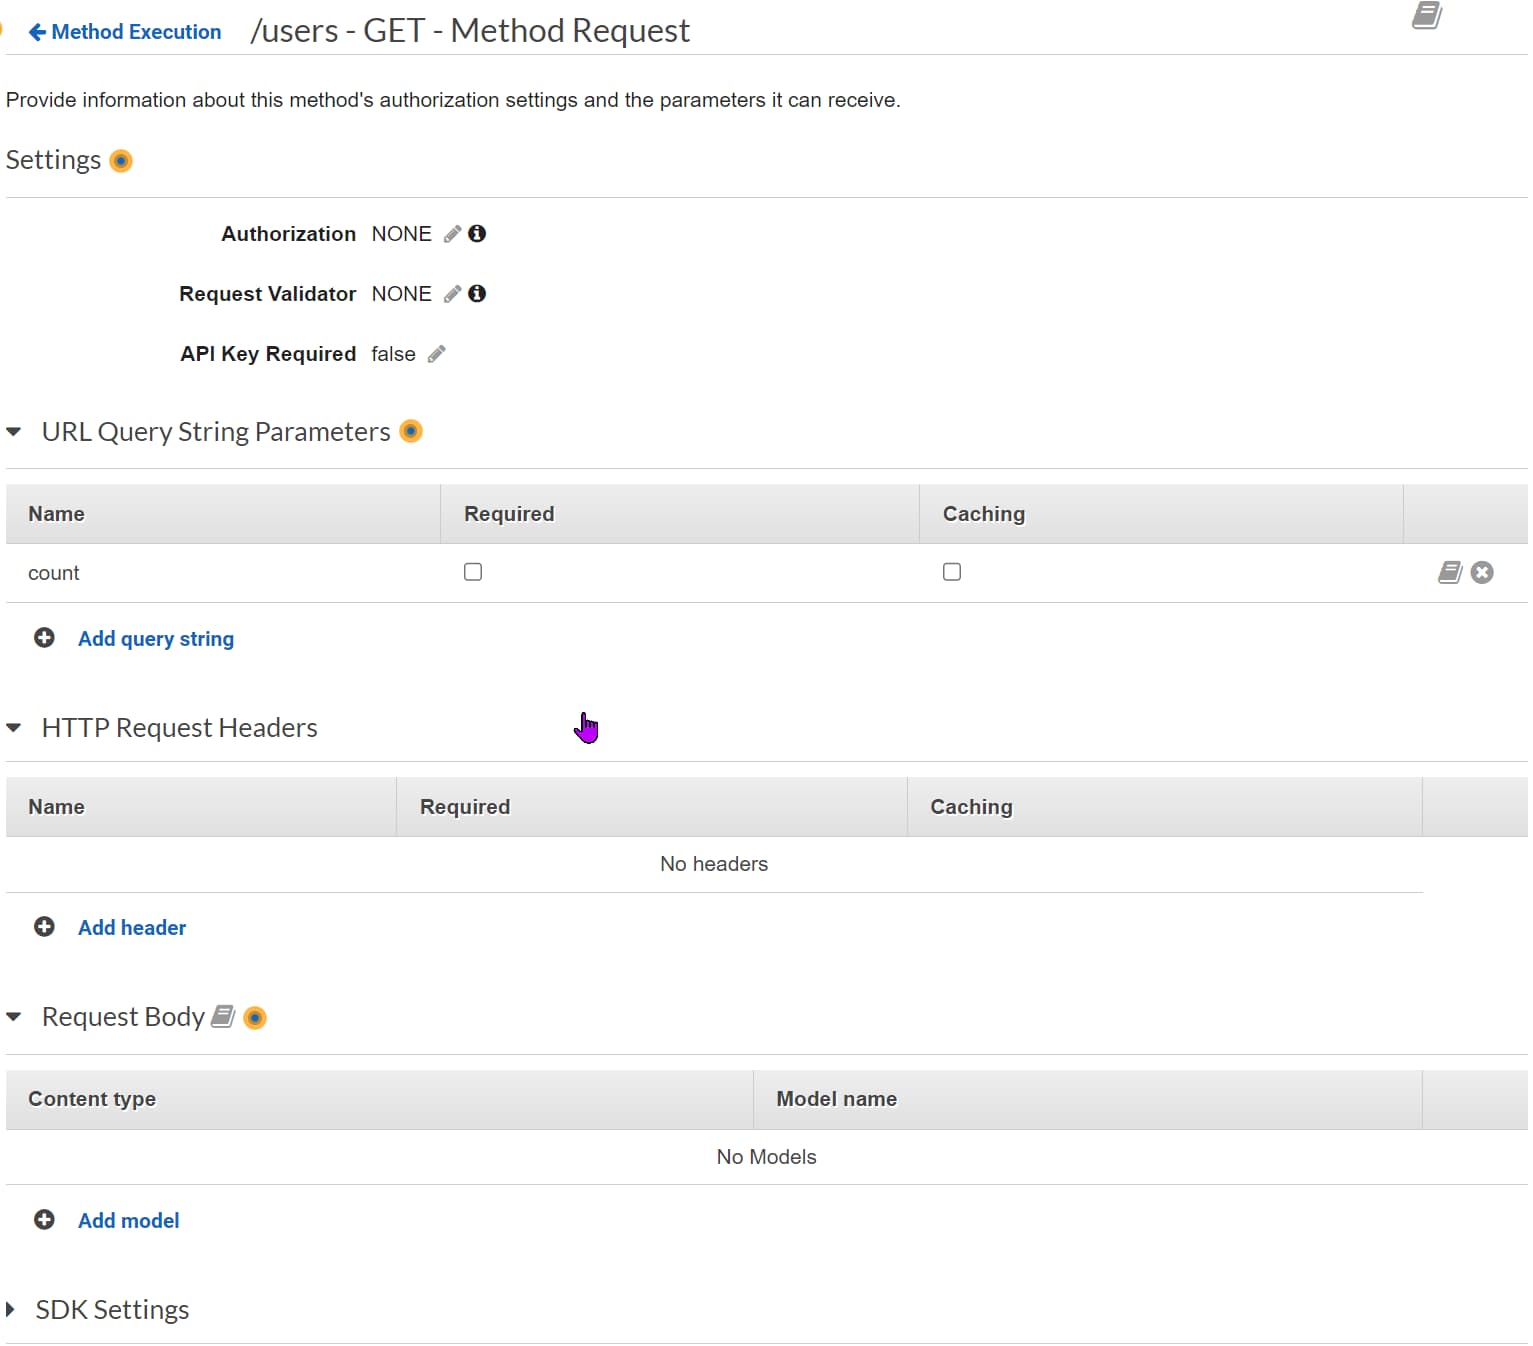
An API Method Request represents the HTTP request that the client makes to the API endpoint. You can configure the different headers, query string parameters, authorization, validators, etc., on the incoming request.
Below I have set up the Method Request to expect an optional query string parameter count on the incoming GET request on Users resource.
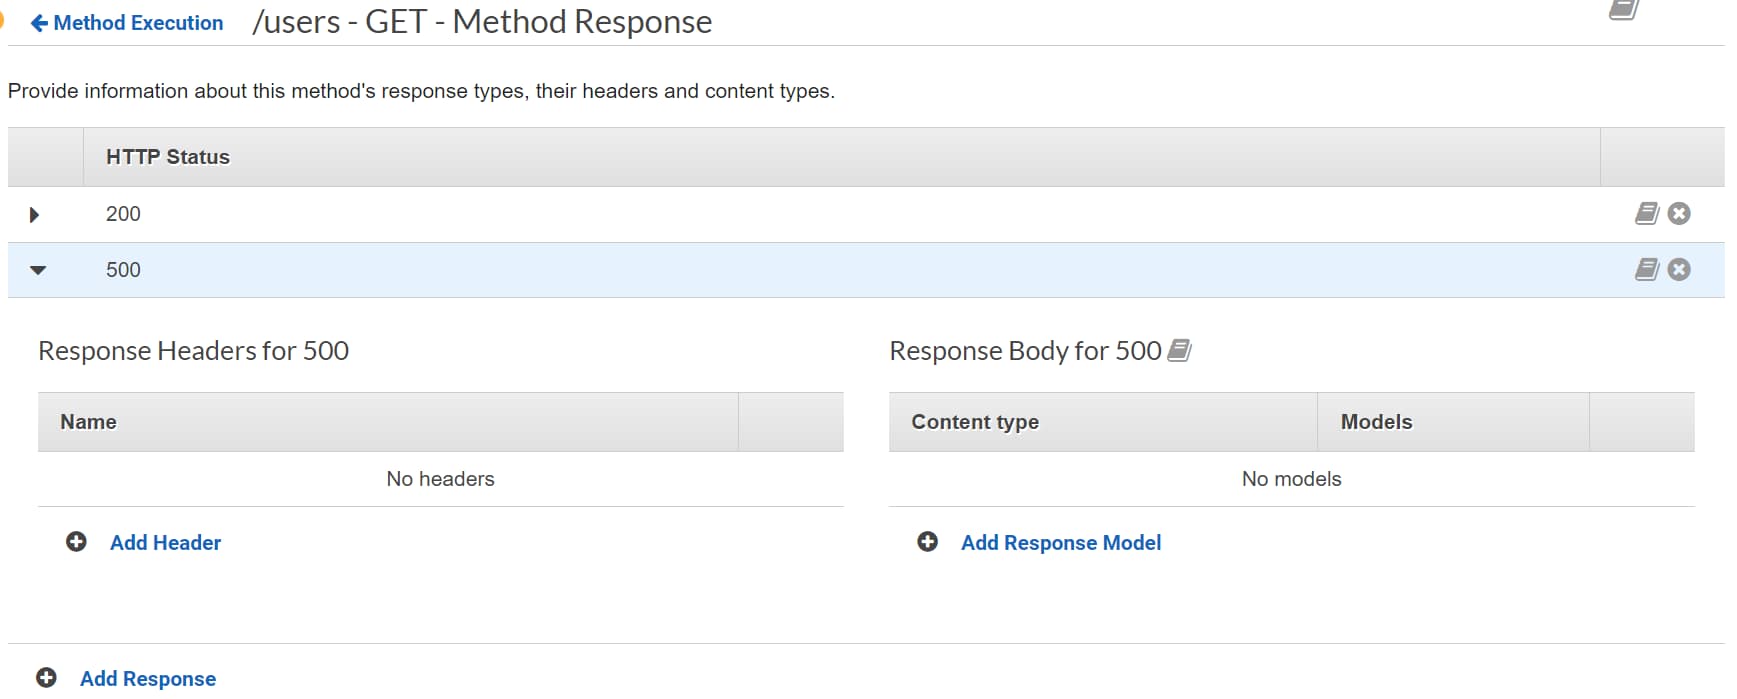
The Method Response is an HTTP response with a given status code.
By default, the 200 Status code is set up to return a success anytime the API endpoint is called. You can configure multiple return status codes based on your API and application needs.
Below I have added a 500 status code to indicate error scenarios. You can choose to have a specific status code corresponding to what gets returned from your integration backend, or you can group integration status codes to a single response code in the API Gateway.
For Proxy integration mode, you would mostly be relaying back the status code as returned from the integration endpoint.
Setting up Integration Request/Response
Similar to Method, Integration also has an Integration Request and Integration Response.
An Integration Request is a request that API Gateway submits to the backend, passing the client’s request data. If the request payload for the integration differs from the Method Request, you can use mapping templates to transform the payload.
A mapping template is a script written in Velocity Template Language (VTL), and is applied inside of API Gateway.
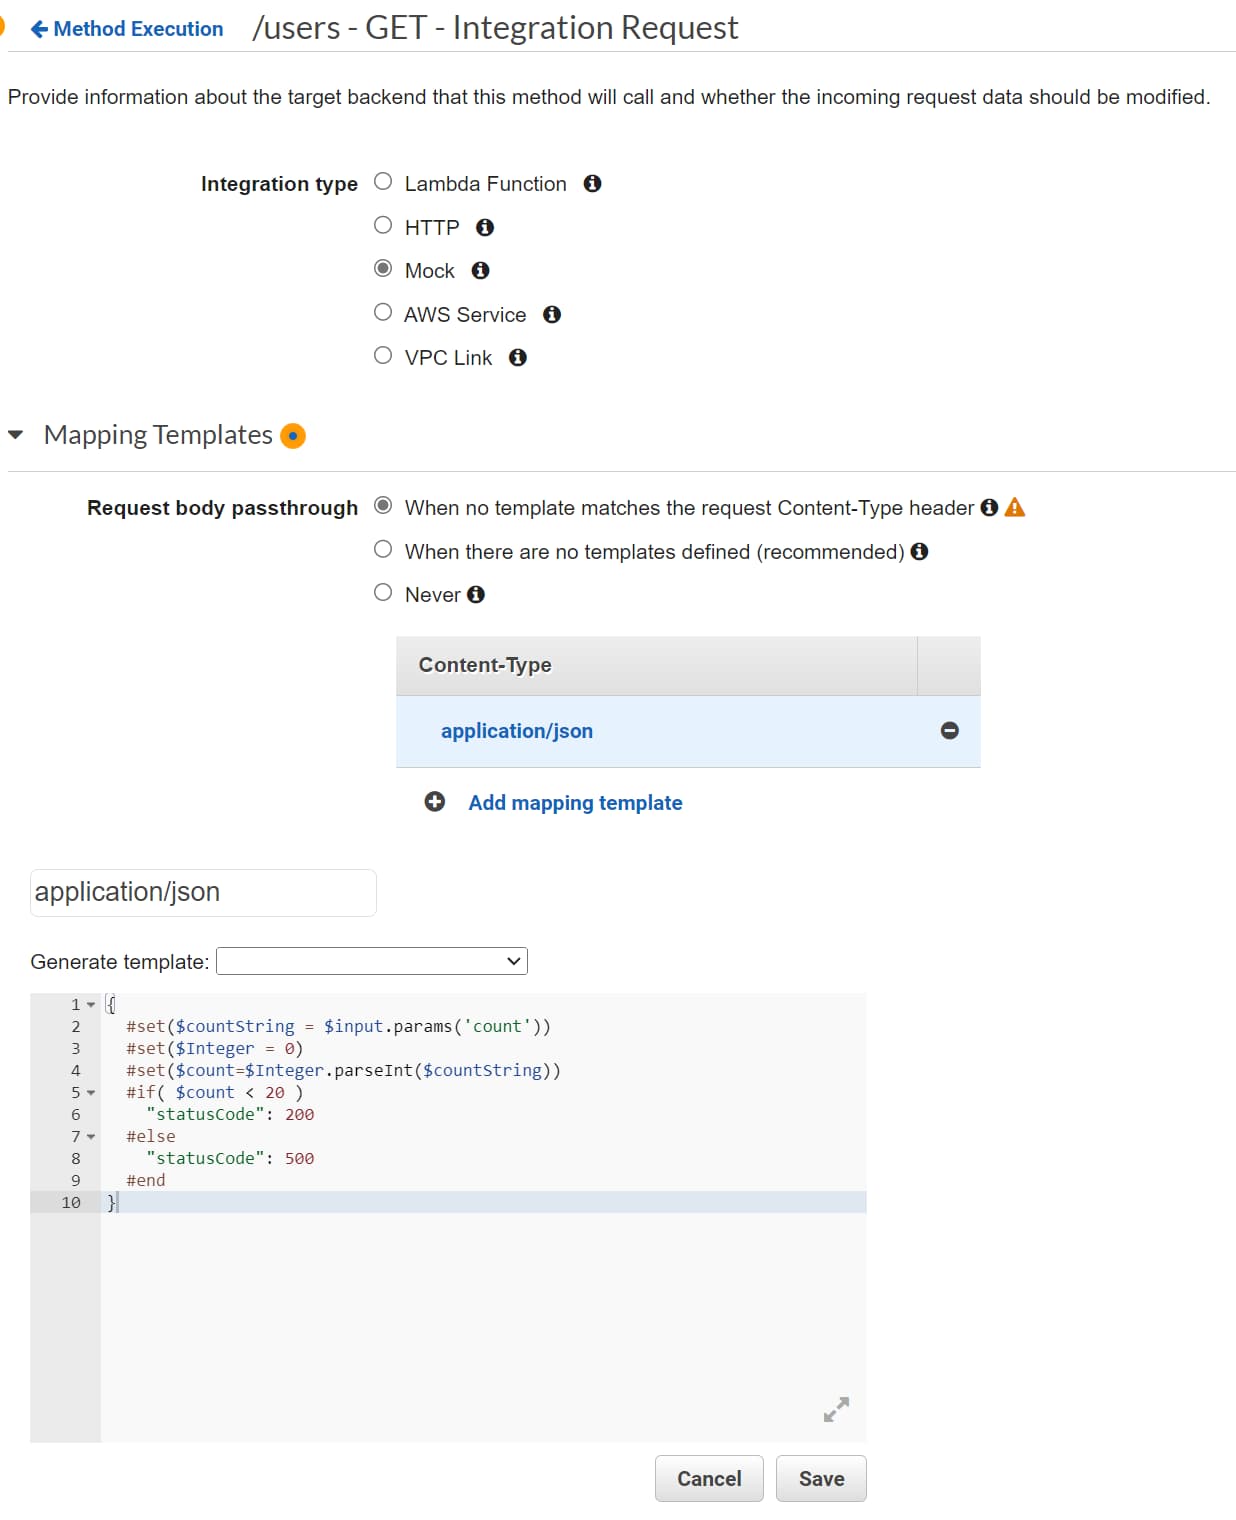
The Mapping template below uses the count property from the query string to set the statusCode property on the Integration Request.
{
  #set($countString = $input.params('count'))
  #set($Integer = 0)
  #set($count=$Integer.parseInt($countString))
  #if( $count < 20 )
    "statusCode": 200
  #else
    "statusCode": 500
  #end
}
With Non-Proxy Integrations, you can also set up the Integration passthrough behaviors. API Gateway supports different options to decide whether to pass through requests coming into the API Gateway to the integration backend.
With Proxy integrations, all requests are passed to the integration, and you don’t have the option to configure the Passthrough behaviors.
For a Non-Proxy integration, you must set up at least one Integration Response and a default response so that the requesting client gets a response back. For Proxy integrations, the response from the integration is passed as is to the client, and this option will be disabled.
The Integration Response is where we map the response from the backend (i.e., the integration) to the Method Response. When creating a new Integration Response, it prompts selecting the Method Response status it maps to. E.g., if you want the API to return a 400 status code, you need first to add a Method Response status code of 400 and then add an Integration Response and set up a mapping.
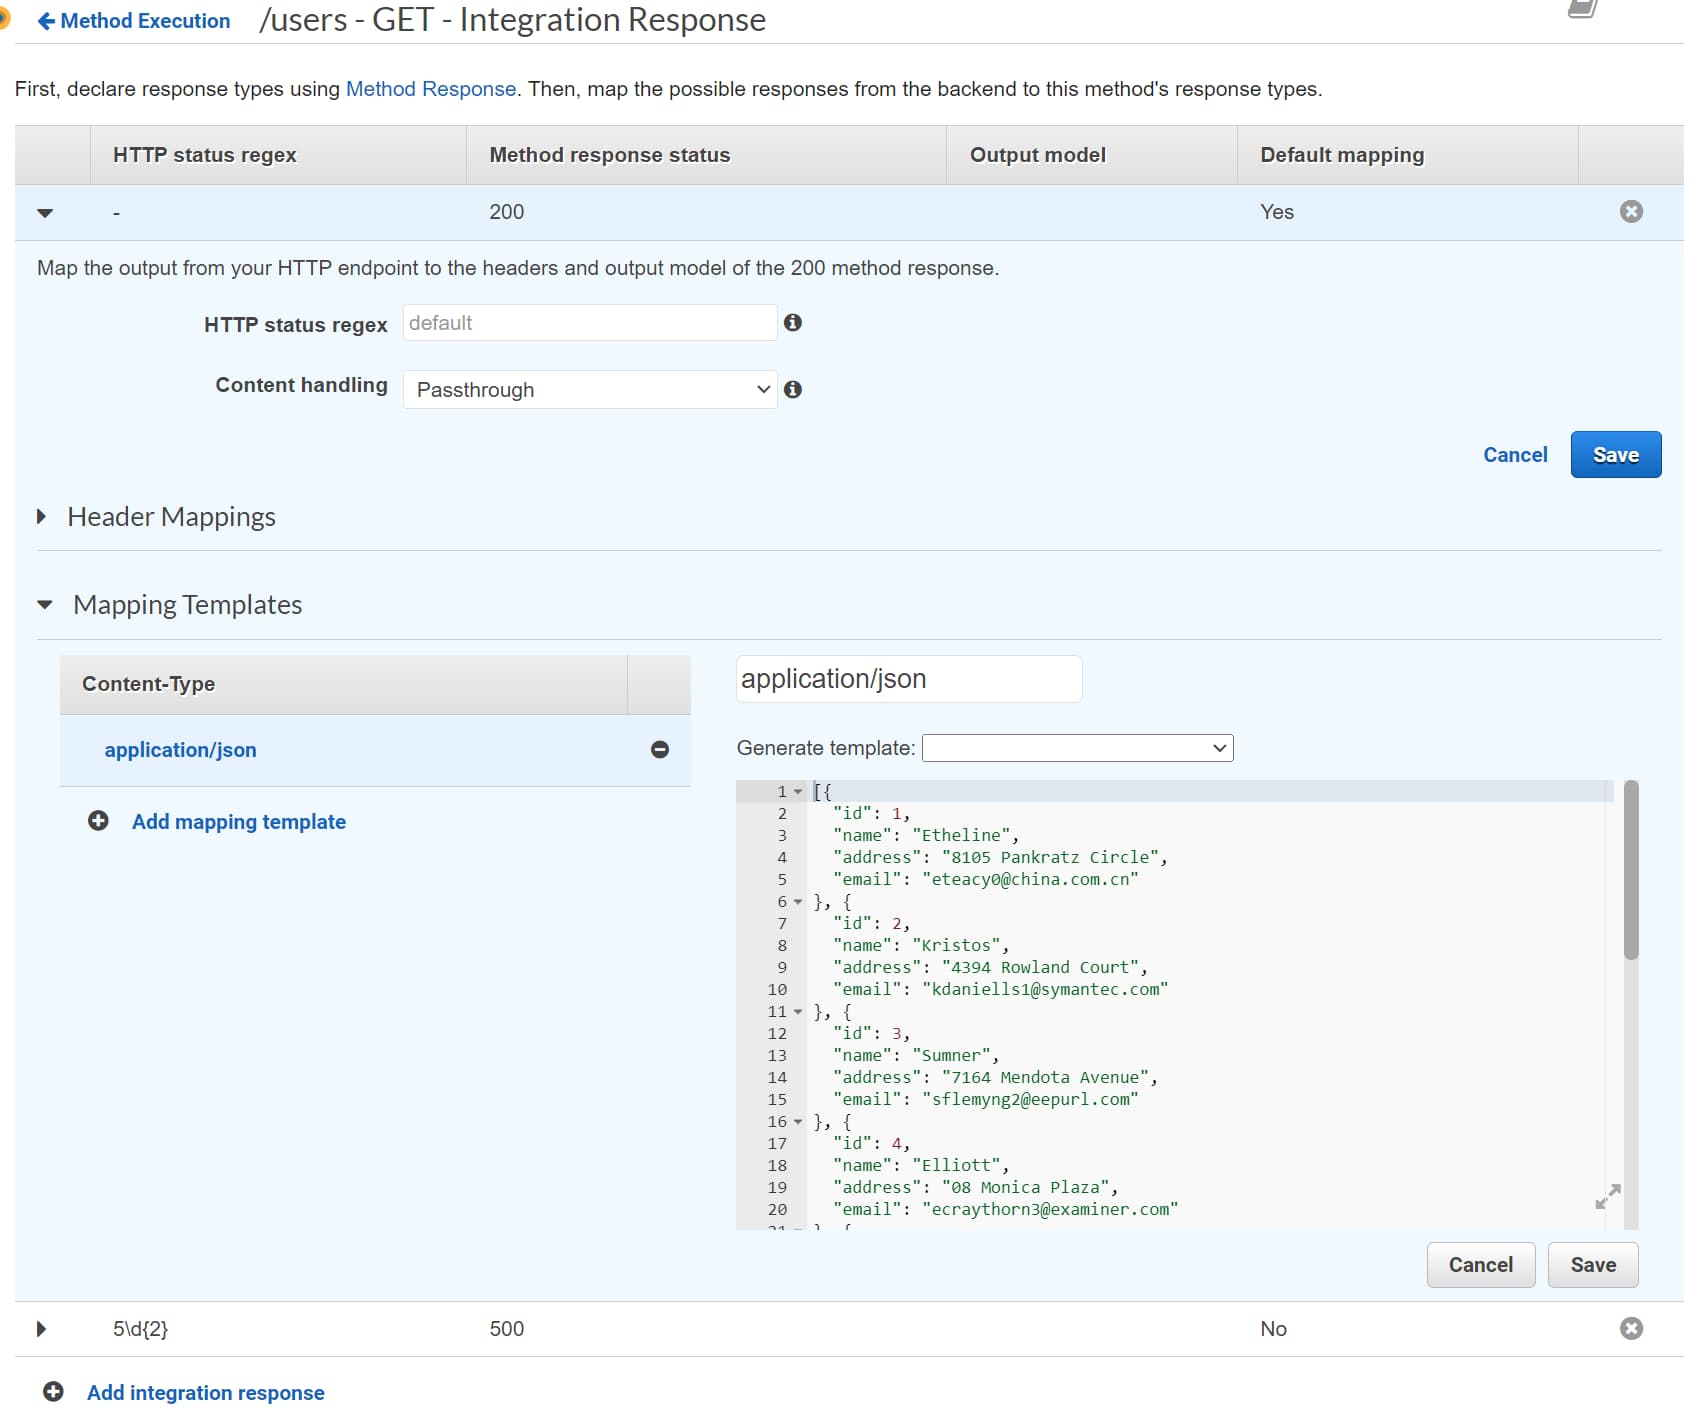
Above, I have set the response to send back a mocked list of Users in JSON format for the 200 status code response.
You can also use Mapping Templates when setting up Integration Response to map the response from the integration to what the client expects. This mapping is per Content-Type that your API supports.
Until now, all our work was under the Resources section of the API Gateway. Any changes to this section are like making changes to your ‘source code’ when building applications.
Deploy REST API
To interact and make the API callable for your users, you need to Deploy the API to a Stage.
A stage is a logical reference to a lifecycle state of your API (for example,dev,prod,beta,v2).
API stages are identified by the API Id and name.
To deploy an API, under the Resources from the Actions drop-down button, choose the Deploy API option.
It prompts you to select an existing stage or create a new Stage to deploy the API.
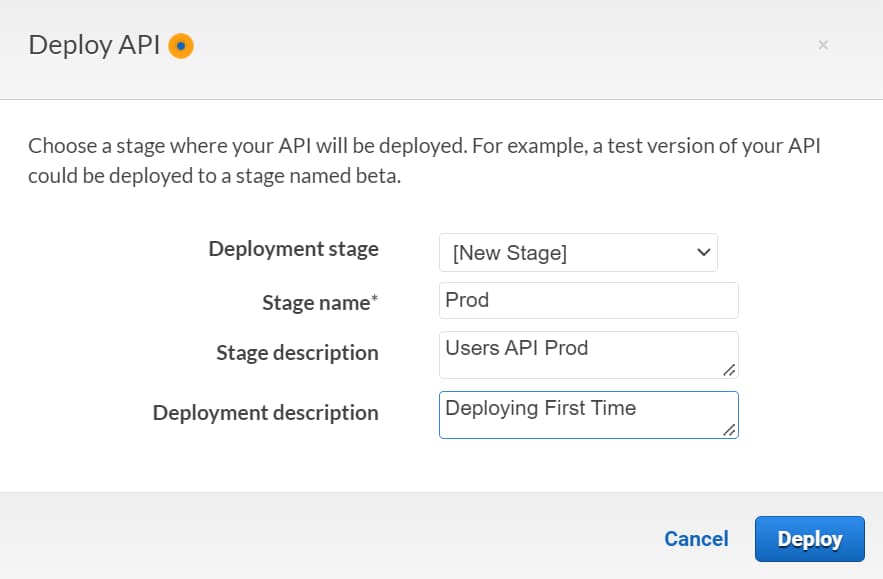
Once deployed, the API is accessible via the unique URL for that API + Stage combination. The Stage URL has the stage name appended to the end.
The Invoke URL shown under the Stage is the base URL for your API. You can use this to invoke the different Methods on the Resources for that API.
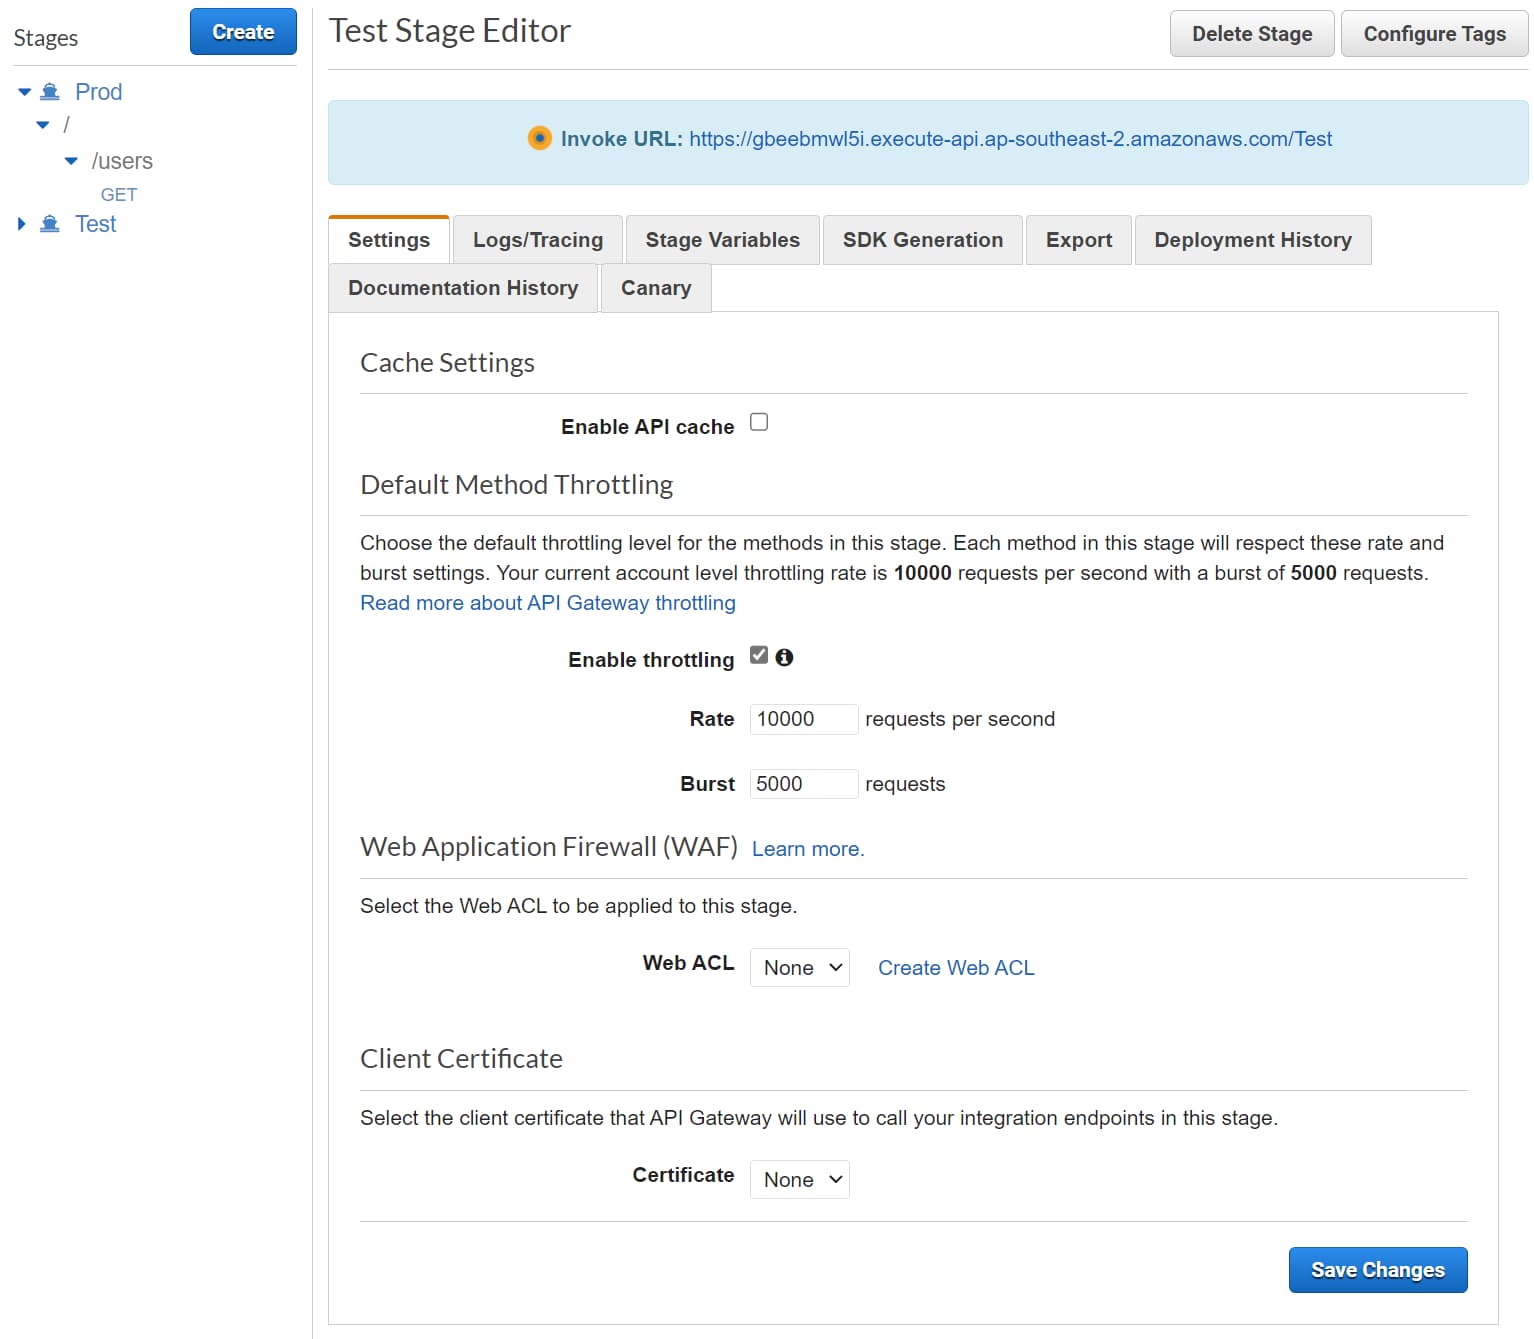
Since we have a User resource in this API, we can invoke it using the /users path on the Base URL. This will return the response from the API.
Stages support adding Stage-specific variables. When building real-world APIs, these can be used to configure the API to integrate with different backend services or integrations. E.g., when running in a Test stage, we can use this to connect to a test database and a production database when running in the Prod Stage.
In future posts, we will see how to set up real-world integrations and build an API that connects to a real backend service.
Have a great day👋
Rahul Nath Newsletter
Join the newsletter to receive the latest updates in your inbox.
