Add to Apple Wallet from Your .NET Application: A Step-by-Step Guide
The iOS Wallet app allows users to manage payment cards, boarding passes, tickets, gift cards, and other passes. Let's learn how to set up, build, and distribute Apple Wallet passes from a .NET application.
Table of Contents
I recently worked on the 'Add to Apple Wallet' functionality at work, allowing the addition of Event tickets to Apple Wallet.
The iOS Wallet app allows users to manage payment cards, boarding passes, tickets, gift cards, and other passes.
The Wallet Pass is time and location enabled, so passes can be configured to display on the user’s device at the appropriate moment. Passes can also be updated with push notifications making it easy to notify users if details change.
In this blog post, let's learn how you can set up, build, and distribute Apple Wallet passes using .NET application.
I will use an AWS Lambda Function to host the API endpoint for distributing the pass files. However, you can use your existing application hosting mechanism for this.
This article is sponsored by AWS and is part of my AWS Series.
Apple Wallet Passes
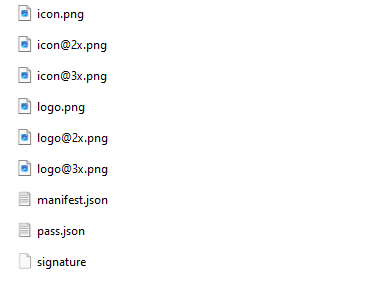
Apple Wallet Passes are created as a package/bundle, containing a pass.json file that defines the pass, and image assets such as the logo and the icon.
The pass.json file contains the information that identifies the pass, the text information, and details shown on the pass in the Wallet app.
The below image shows the files inside a sample pass file. It has the pass.json, logo and icon images, the manifest file, and also the signature file to avoid tampering with the pass file once it's generated.
Generating Wallet Passes Using .NET
To generate Apple Wallet Pass files from .NET applications, you can use the dotnet-passbook NuGet package.
The NuGet package makes it very easy and straightforward to create Wallet Pass files. The NuGet package provides a PassGenerator class that takes in one or more instances of PassGeneratorRequest.
The PassGenerator converts these requests into a byte array, which represents the pass bundle that contains one or more pass files.
public async Task<APIGatewayHttpApiV2ProxyResponse> GetAppleWalletPasses()
{
    var eventId = Guid.NewGuid();
    var eventName = "YouTube Demo Event";
    var venueName = "YouTube Online";
    var eventDate = DateTime.Now.AddDays(55);

    var icon = await _appleWalletConfiguration.GetIcon();
    var logo = await _appleWalletConfiguration.GetLogo();

    var request = GeneratePassRequest(Guid.NewGuid().ToString(), eventId, icon, logo, eventName, eventDate, venueName, "Subscriber");

    var generator = new PassGenerator();
    var requests = new List<PassGeneratorRequest>() { request };
    var pass = generator.Generate(requests);
}
The PassGeneratorRequest identifies one pass that will be added to the Apple Wallet. If you have multiple passes to be added in the same bundle, create multiple PassGeneratorRequest.
The below code shows a sample PassGeneratorRequest that adds a pass with a EventTicket style. It sets the relevant properties to be shown on the Apple Wallet Pass.
var request = new PassGeneratorRequest
{
    Style = PassStyle.EventTicket,
    PassTypeIdentifier = _appleWalletConfiguration.PassTypeIdentifier,
    SerialNumber = serialNumber,
    GroupingIdentifier = eventId.ToString(),
    BackgroundColor = "#823EB7",
    LabelColor = "#000000",
    ForegroundColor = "#ffffff",
    Images =
    {
        {PassbookImage.Icon, icon},
        {PassbookImage.Icon2X, icon},
        {PassbookImage.Icon3X, icon},
        {PassbookImage.Logo, logo},
        {PassbookImage.Logo2X, logo},
        {PassbookImage.Logo3X, logo},
    },
    Description = eventName,
    OrganizationName = "Rahul",
    RelevantDate = eventDate,
    ExpirationDate = eventDate.AddDays(1),
    AppleWWDRCACertificate = _appleWalletConfiguration.AppleWWDRCACertificate(),
    PassbookCertificate = _appleWalletConfiguration.PassbookCertificate()
};
request.AddHeaderField(new StandardField("time", eventDate.ToShortTimeString(),
    eventDate.ToShortDateString()));
request.AddPrimaryField(new StandardField("name", null, eventName));
request.AddSecondaryField(new StandardField("venue", "Venue", venueName));
request.AddAuxiliaryField(new StandardField("ticketType", "Ticket Type", ticketType));
request.AddBackField(new StandardField("ticketHolderName-back", "Ticket holder", "Rahul Nath"));
request.AddBackField(new StandardField("ticketType-back", "Ticket Type", ticketType));
For information on the different fields, the pass styles available, and what each property represents check out the Wallet Guidelines and the documentation.
Setting Up Apple Certificates
To generate Apple Wallet Passes, you need to register with the Apple Developer Portal and have the appropriate certificates ready to sign the Wallet passes.
You need two certificates
- Your application/company Passbook certificate along with its password
- Apple WWDR (WorldWide Developer Relations) certificate
You can find the full instructions to generate the certificates in the dotnet-passbook NuGet package documentation here.
You can store these certificates and other related configurations for generating the Wallet as part of the application configuration - appsettings.json file.
I chose to store the certificate files as base64 encoded string which can be converted to a X509Certificate2 in .NET code as shown below.
public class AppleWalletConfiguration
{
    public string WWDRCertificateBase64 { get; set; }
    public string PassTypeIdentifier { get; set; }
    public string PassbookCertificateBase64 { get; set; }
    public string PassbookPassword { get; set; }
    public string IconUrl { get; set; }
    public string LogoUrl { get; set; }

    public X509Certificate2 AppleWWDRCACertificate() =>
        new(Convert.FromBase64String(WWDRCertificateBase64));

    public X509Certificate2 PassbookCertificate() =>
        new(Convert.FromBase64String(PassbookCertificateBase64), PassbookPassword);

    public async Task<byte[]> GetLogo() => await LogoUrl.GetBytesAsync();

    public async Task<byte[]> GetIcon() => await IconUrl.GetBytesAsync();
}
Distributing Wallet Pass Files Using .NET
To distribute the Wallet Pass Files generated, you can host this in an API endpoint and share the link via email, a button on a web page, or an app.
You can host this along with your other application code on the Cloud or your own servers.
For this post, I'll host this AWS Lambda, as it's a quick and easy way to host such kind of API endpoints. Using the latest Lambda Annotations Framework makes it even easier to create and host API endpoints.
All we need to do is add the Lambda Annotation Framework NuGet package and wrap our Pass Generation function with the LambdaFunction attribute. Since this is going to be exposed as an API will also add the HttpApi attribute and specify the route and the method Get.
[LambdaFunction(Policies = "AWSLambdaBasicExecutionRole")]
[HttpApi(LambdaHttpMethod.Get, "/apple-wallet")]
public async Task<APIGatewayHttpApiV2ProxyResponse> GetAppleWalletPasses()
{
    var eventId = Guid.NewGuid();
    var eventName = "YouTube Demo Event";
    ...
    var generator = new PassGenerator();
    var requests = new List<PassGeneratorRequest>() { request };
    var pass = generator.Generate(requests);

    return new APIGatewayHttpApiV2ProxyResponse()
    {
        Body = Convert.ToBase64String(pass),
        IsBase64Encoded = true,
        StatusCode = 200,
        Headers = new Dictionary<string, string>
        {
            { "Content-Type", "application/vnd.apple.pkpasses" },
            { "Content-Disposition", "attachment; filename=tickets.pkpasses.zip; filename*=UTF-8''tickets.pkpasses.zip" }
        }
    };
}
The HttpApi attribute allows us to expose the Lambda Function over a Lambda Function URL or an HTTP API Gateway endpoint.
Both of these mechanisms expect binary content to be encoded as base64 string, with the appropriate HTTP headers set. To achieve this we can use the APIGatewayHttpApiV2ProxyResponse object as shown above.
Once deployed, you can navigate the API Gateway URL endpoint or expose a Lambda Function URL, and navigate to the URL from an iPhone Safari browser, to add it to Apple Wallet.
Below is the screenshot of the pass generated using the above code, with the appropriate information we passed to create the pass.

For debugging pass files you can use the PKPassValidator service, where you can upload a pass file and it will show any issues with the file generated.
The Apple Wallet pass generated above is static and does not update itself.
However most of the time you would need to deliver live updates to these passes in case any information changes for example date changes, venue changes, status updates, etc. For this, we can configure the WebServiceUrl, on the pass that it will poll for pass updates
We will learn how to configure and set up the CallbackUrl in a future blog post. Until then, happy coding! 👋

Rahul Nath Newsletter
Join the newsletter to receive the latest updates in your inbox.