
Getting Started with ASP.NET Web Api
Table of Contents
A web api is to expose your application’s programming interface over the web,using the HTTP interface.This makes the api accessible from any device that can make HTTP calls.With the wide range of devices that’s available nowadays,Web Api would be the best way to reach out to all of them.Web Api helps you to open up your application to other developers and encourage them to build device specific application.
Since Web Api uses HTTP,this can be accessed from any device that supports HTTP.A brief glance through the HTTP spec would be good for a better understanding on the capabilities of HTTP.The web was mostly used for human-to-machine conversations and we never felt the need of these API’s.But increasingly with different devices and applications talking with each other,machine-to-machine conversations is on the rise,making the web programmable.
We will be building a web api for a Cafeteria(over many blog posts) that is looking out to have a web presence,so that they can reach out easily to their customers on various devices.The cafeteria has lots of food items and beverages and they are looking for a solution where there customers can see all these items from their mobile/laptops and order these items and collect them from the counter.In this blog post we would be concentrating only on viewing/managing the food dishes/beverages and we would be building on the solution in later posts Let’s get started building our Web API.!!
Fire up your Visual Studio.Get the ASP.NET MVC4 installed before that.I am having VS2012 which has it by default.
Create a New Project: File –> New Project –> ASP.NET MVC4 Web Application.Enter your path and solution name and pressing Ok will give you another screen where you can select what kind of template you want to use.For this we would be using Web Api template.
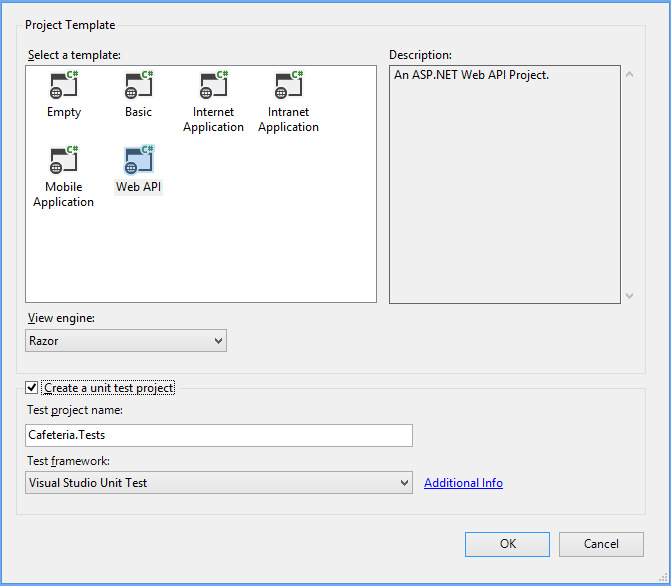
On pressing Ok Visual Studio will create you a set of default controllers and views to start with.Build and run to verify that we have all set up correctly.You should be seeing a nice welcome screen if everything is fine.
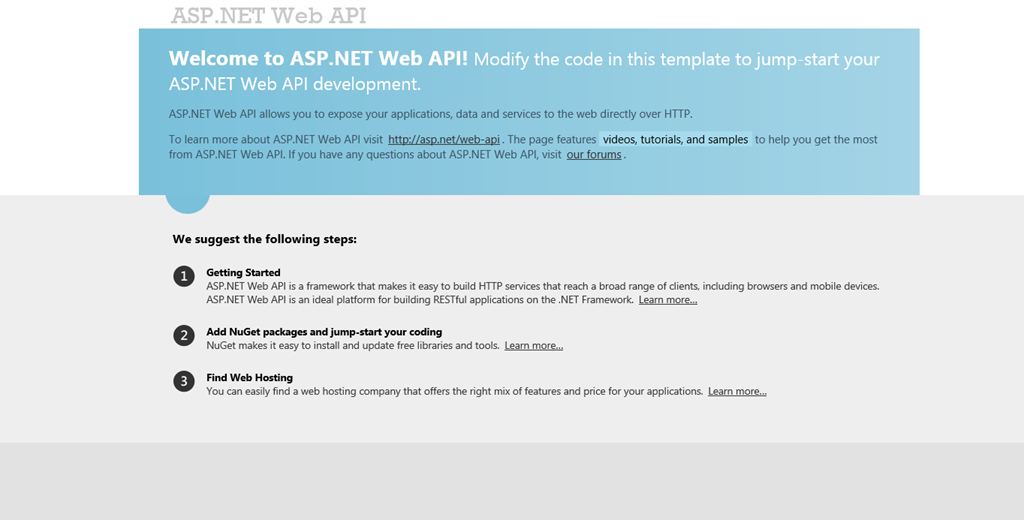
If you see in the solution explorer in Visual Studio,you notice that you already have 2 Controllers that are created by the default template.A ‘HomeController’ that derives from Controller which is your default MVC controller that just rendered out the beautiful page that you just saw above and a ‘ValuesController’ that derives from _ApiController _which is actually our web api controller.
Web Api also uses routes to map URI’s to controller actions.But the difference with MVC route is that,here we have no actions specified in the route value.The HTTP method becomes the action.So your controller would have functions with the same names as the HTTP verbs(GET,PUT,POST,DELETE).If you don’t like these function names then there are attributes too that you can use to mark your own function names.We will see all this in our code.
The default route that is created for Web Api can be found in the _App_Start/WebApiConfig _
config.Routes.MapHttpRoute(
    name: "DefaultApi",
    routeTemplate: "api/{controller}/{id}",
    defaults: new { id = RouteParameter.Optional }
);
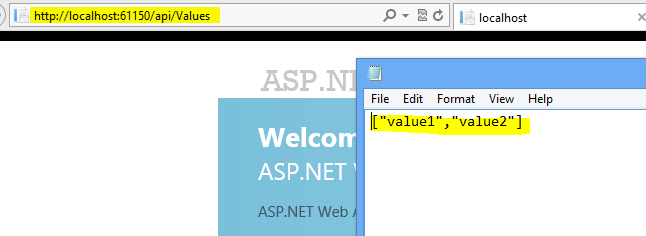
Now that you have seen the API route,lets try invoking the ValuesController _that got created automatically.Following the route that is specified above we need to prefix the controller with an _api/._This is just to keep a distinction between the normal MVC controllers and the API controllers.So for the _ValuesController we would need to invoke it with ‘api/values’. To issue a GET on the controller,issue the request using the web browser as shown below.It should return you the values(‘value1’ & ‘value2’ as returned in the GET of the ValuesController) in json format,as that is the default formatter that is used.
To check the remaining of HTTP actions we would need to write the implementations for those functions as the _ValuesController _does not have that implemented.
So lets get back to the Cafeteria business.We will create a model to represent the FoodDishes that the cafeteria has to offer.For now we will just have a id,name and description field in the model.
public class FoodDish
{
    public int FoodDishId { get; set; }
    [Required]
    public string FoodDishName { get; set; }
    public string Description { get; set; }
}
Note the ‘[Required]’ attribute on the property FoodDishName.This ensures that a value is always present for that property.This is similar to the validation in MVC.A list of supported attributes can be found hereVisual Studio will do most of the job in creating out the controllers and the data context’s for us,with just a couple of clicks.To group the WEB API controllers together lets create a folder under the Controllers folder named ‘api’. This is just for a convention and is not mandatory.Right Click on the newly created ‘_api’ _folder and say Add –> Controller
Give the controller name as ‘FoodDishesController’.From the template drop down select the ‘API Controller with read/write actions,using Entity Framework’ option.This is what is automatically going to put out the all the code that we would required.Select the ModelClass that we created,FoodDish.(If you don't see the class in the models, build the solution before adding new controller).For the DataContext select ‘<New Data Context…>’ and enter _FoodDishesContext._Refer the image below.
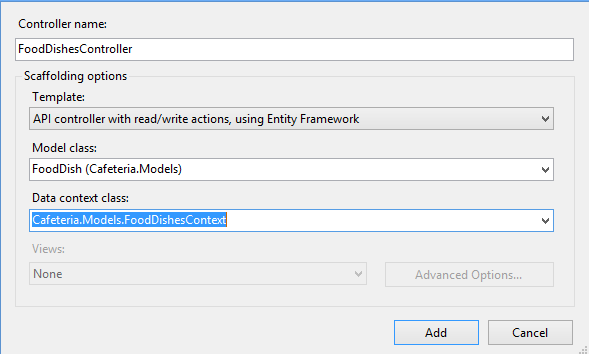
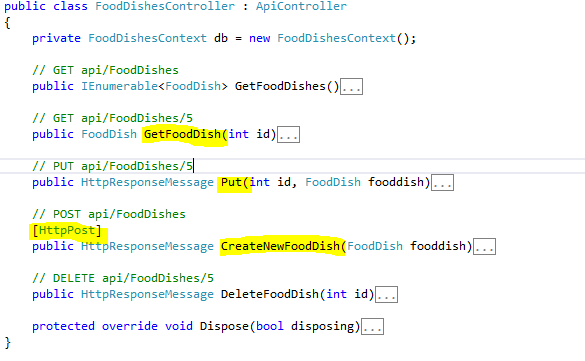
On clicking Add,the controller gets created successfully and also the database connections are setup automatically using EF Code First approach.Let’s take a deeper look into the Controller that has got created. You notice that all the methods in the controller has one of the HTTP verb prefixed.ASP.NET WEB API is intelligent enough to understand this naming convention too.So if you don’t like just the http verbs as function name you can use this approach too.Below image shows the possible combinations of function naming.You can use anyone that suites you.
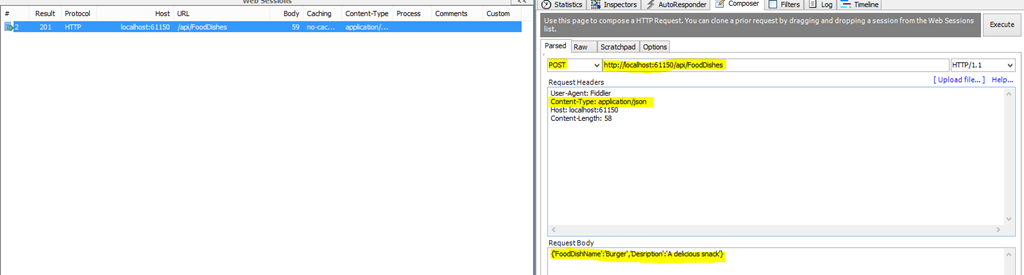
The WEB API is all set to be tested.To issues a GET,same as we did before,from the browser hit the ‘/api/FoodDishes’.The first request might take up some time to return as Entity Framework needs to set up the database.But in sometime you should get back the json result.But this time it would be a blank one as are yet to add any food dishes to the database.For that we need to do a POST to the FoodDishes _controller.For this we will be using _Fiddler_,_which is an excellent tool for web debugging.You should be getting to download it for free from here. In Fiddler select the Composer tab and enter in the details that is required.Make the HTTP action as POST,enter the ValuesController URI,specify the _Content-Type_ as ‘application/json’_ _and also provide the sample data as shown in the image below.
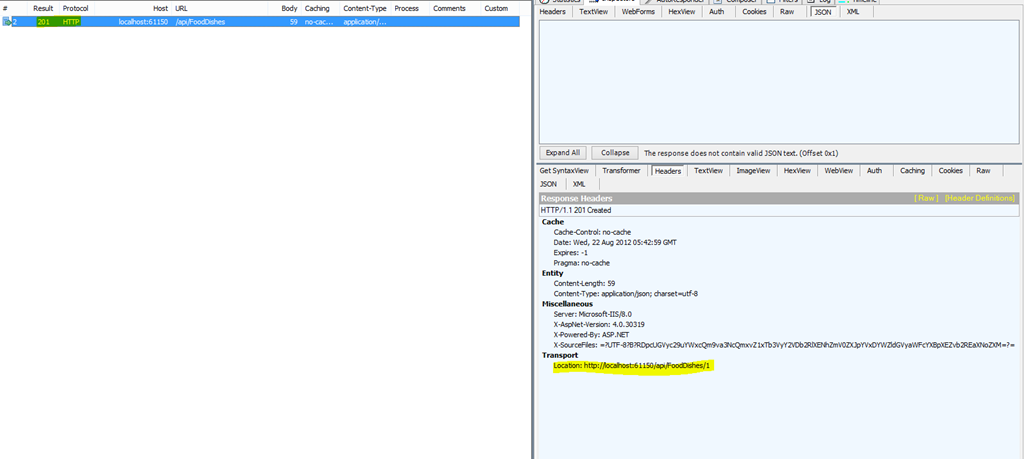
On clicking execute you should be seeing an entry in fiddler with HTTP status code 201,indicating that the entry has been successfully created.In the response you can see the location of this newly created food dish and how to reach that.For me it is at ‘http://localhost:61150/api/FoodDishes/1'.So we have successfully created a new fooddish.
Now to see the newly created dish you can either use a GET on ‘/api/FoodDishes’ to get all the food dishes or GET on /api/FoodDishes/1’ to get the specific Food dish. Now this can be accessed from any device that supports issuing HTTP calls and you have your first WEB API ready,which just does a CRUD over your FoodDishes.
Lets take a deeper look in the controller,to see how all this is happening.Will look into the GET and POST here in this post as DELETE and PUT would be then easy to follow. The GET method that visual studio scaffolded for us,just returns the requested fooddish from the database.If the food item does not exists it returns a ‘NotFound’/404 error.Notice that here we are using HTTP’s error code’s so that client can easily understand the error.
public FoodDish GetFoodDish(int id)
{
    FoodDish fooddish = db.FoodDishes.Find(id);
    if (fooddish == null)
        throw new HttpResponseException(Request.CreateResponse(HttpStatusCode.NotFound));

    return fooddish;
}
The POST method,checks if the new fooddish entered is valid.In our case we have FoodDishName as a required attribute,so as long as that property is present the ModelState.IsValid would be true.If you have additional validation attributes those would be checked too.If the state is valid then the item is inserted into the database and in the response we write the Location where this new fooddish can be accessed from.This location is what we saw above in the fiddler response.If the ModelState is not valid we sent a BadRequest,so that client can recheck the data send.We can send customized error messages too back to the client,so that the client understands where exactly the issue is.I will be covering validation,authentication and error reporting in a separate post,as that calls for a deeper explanation
[HttpPost]
public HttpResponseMessage CreateNewFoodDish(FoodDish fooddish)
{
    if (ModelState.IsValid)
    {
        db.FoodDishes.Add(fooddish);
        db.SaveChanges();

        HttpResponseMessage response = Request.CreateResponse(HttpStatusCode.Created, fooddish);
        response.Headers.Location = new Uri(Url.Link("DefaultApi", new { id = fooddish.FoodDishId }));
        return response;
    }
    else
    {
        return Request.CreateResponse(HttpStatusCode.BadRequest);
    }
}
DELETE and PUT is very similar and should be easy to understand.
So we have our first WEB API exposed and accessible to everyone from a wide range of devices or different technology.This can be consumed for a website or a mobile or slate etc.To put it simple from any device that supports HTTP. This should help you get started on with ASP.NET web api.There are a lot more features in ASP.Net Web api like Formatters,Odata support,hosting etc. I would be covering these too in other blog posts.There are a lot of design considerations that need to be taken on while developing API’s.There are a lot of good resource that can help you with tackling down it.I have mentioned a few below in the resources section.
Happy Coding !
**Resources: **None of them are specific to ASP.NET Web Api,but they should help you to get the bigger picture and also help you in designing good Web API.

Rahul Nath Newsletter
Join the newsletter to receive the latest updates in your inbox.