How to Trigger AWS Step Functions from Your .NET Application: Sync, Async, and API Gateway
Learn how to invoke AWS Step Functions programmatically from your ASP.NET applications. We'll explore synchronous execution for quick workflows, asynchronous execution for long-running processes, and how to expose workflows through API Gateway without writing any code.
In the previous posts on AWS Step Functions, we've been manually triggering workflows from the AWS Console.
That works for testing, but in real applications, you need to start workflows programmatically — from your code, APIs, or external systems.
In this post, let's explore three ways to trigger Step Functions workflows:
- Synchronous execution from an ASP.NET Web API (waits for the result)
- Asynchronous execution from an ASP.NET Web API (returns immediately)
- Amazon API Gateway integration without writing any code
Thanks to AWS for sponsoring this article in my Step Functions Series.
Setting Up The ASP NET API Application
I have a simple ASP.NET Web API application that we'll use to trigger our Step Functions workflows.
The workflow we'll be invoking is the user onboarding workflow from previous videos — it saves user data to DynamoDB, invokes a Lambda function, and sends a message to SQS.
AWS Step Functions and AWS Service Integrations
Let's start by adding the necessary NuGet packages to our solution.
- AWSSDK.StepFunctions - Provides the Step Functions client
- AWSSDK.Extensions.NETCore.Setup - Simplifies dependency injection setup
If you're not familiar with the AWS Extensions package, it makes configuring AWS services in .NET much easier through the options pattern.
The Right Way to Register AWS SDK Clients in .NET Dependency Injection
Once the packages are installed, register the Step Functions client in Program.cs:
builder.Services.AddAWSService<IAmazonStepFunctions>();
This registers the IAmazonStepFunctions interface in the dependency injection container, which we'll inject into our endpoints.
Synchronous Execution of Step Functions from .NET
Let's start with synchronous execution, where your API waits for the entire workflow to complete before returning a response.
Synchronous execution only works with Express workflows, and not Standard workflows.
Standard workflows can run for up to one year, which makes them unsuitable for synchronous calls. Express workflows must complete within 5 minutes.
For this demo, I've created an Express version of the user onboarding workflow which we have been seeing so far in this series. You can see the workflow type when viewing it in the AWS Console:
Add the following endpoint to your ASP NET API
var camelCaseOptions = new JsonSerializerOptions{PropertyNamingPolicy = JsonNamingPolicy.CamelCase};app.MapPost("/process-user-onboarding-sync", async ([FromBody] UserOnboardingRequest requestBody,IAmazonStepFunctions stepFunctions,IOptions<StepFunctionsOptions> stepOptions) =>{if (!requestBody.IsValid())return Results.BadRequest(new { message = "Missing required user onboarding fields." });var input = JsonSerializer.Serialize(requestBody, camelCaseOptions);var request = new StartSyncExecutionRequest{StateMachineArn = stepOptions.Value.WorkflowArnExpress,Input = input};var response = await stepFunctions.StartSyncExecutionAsync(request);return response.Status == SyncExecutionStatus.SUCCEEDED? Results.Ok(): Results.BadRequest(new { response.Error });});
Let's break down what's happening:
- Validation: We check that the request body contains valid user data
- Serialization: We serialize the request to JSON with camel case naming (important!)
- Create Request: We create a
StartSyncExecutionRequestwith the state machine ARN and input - Execute: We call
StartSyncExecutionAsyncwhich waits for the workflow to complete - Return Result: We return success or failure based on the workflow status
Notice we're using camelCaseOptions when serializing. This is critical because our Step Functions workflow expects camel-cased property names.
Define this once and reuse it throughout your application:
Store your Step Functions ARNs in appsettings.json:
{"StepFunctions": {"WorkflowArn": "arn:aws:states:ap-southeast-2:189107071895:stateMachine:user-onboarding","WorkflowArnExpress": "arn:aws:states:ap-southeast-2:189107071895:stateMachine:user-onboarding-express"}}
And bind them using the options pattern:
builder.Services.Configure<StepFunctionsOptions>(builder.Configuration.GetSection("StepFunctions"));
Run the application and navigate to the Swagger UI. You'll see the new endpoint.
The API returns 200 OK on success (after processing through DynamoDB save, Lambda invocation, and SQS message) or 400 Bad Request with error details on failure.
While synchronous execution guarantees you get the result, it creates a poor user experience.
Your API consumer has to wait for the entire workflow to complete. If the workflow takes 30 seconds, they're waiting 30 seconds for a response.
This is where asynchronous execution becomes valuable.
Asynchronous Execution of Step Functions From .NET
With asynchronous execution, you start the workflow and immediately return a response. Your application can then poll for status updates separately.
We'll create two endpoints:
- One to start the workflow (returns immediately)
- One to check the workflow status
app.MapPost("/process-user-onboarding", async ([FromBody] UserOnboardingRequest requestBody,IAmazonStepFunctions stepFunctions,IOptions<StepFunctionsOptions> stepOptions) =>{if (!requestBody.IsValid())return Results.BadRequest(new { message = "Missing required user onboarding fields." });var input = JsonSerializer.Serialize(requestBody, camelCaseOptions);var request = new StartExecutionRequest{StateMachineArn = stepOptions.Value.WorkflowArn,Input = input,Name = $"user-onboarding-{requestBody.User.UserId}-{Guid.NewGuid()}"};var response = await stepFunctions.StartExecutionAsync(request);return Results.Accepted(null, new{Message = "User onboarding started",ExecutionArn = response.ExecutionArn,TrackingId = requestBody.User.UserId});});
Notice the key differences:
- Uses
StartExecutionRequest(notStartSyncExecutionRequest) - Uses
StartExecutionAsync(notStartSyncExecutionAsync) - Uses the Standard workflow ARN (can run longer than 5 minutes)
- Returns
202 Acceptedimmediately and provides anExecutionArnfor status tracking
Checking Workflow Status
Create a second endpoint to check status:
app.MapGet("/onboarding-status/{executionArn}", async (string executionArn,IAmazonStepFunctions stepFunctions) =>{var request = new DescribeExecutionRequest{ExecutionArn = executionArn};var response = await stepFunctions.DescribeExecutionAsync(request);return Results.Ok(new{status = response.Status.Value,output = response.Output});});
Test the async endpoint by posting a user object, which returns an execution ARN immediately; use that ARN to poll the status endpoint until it shows "SUCCEEDED" with the workflow output.
Amazon API Gateway Integration with Step Functions
So far we've written .NET code to trigger workflows.
But what if you just want a simple HTTP endpoint without maintaining application code?
AWS API Gateway can invoke Step Functions directly — no code required.
Creating Amazon Gateway HTTP API Endpoint
Navigate to API Gateway in the AWS Console and create a new HTTP API:
Click Create API, choose HTTP API → Build, name it user-onboarding-api, and click through Next and Create.
Navigate to Routes → Create, set method to POST and path to /new-user, then click Create.
Amazon API Gateway for the .NET Developer - How To Build HTTP APIs

Click Attach integration, select integration type AWS services, choose Step Functions, set action to StartExecution, and paste your workflow ARN.
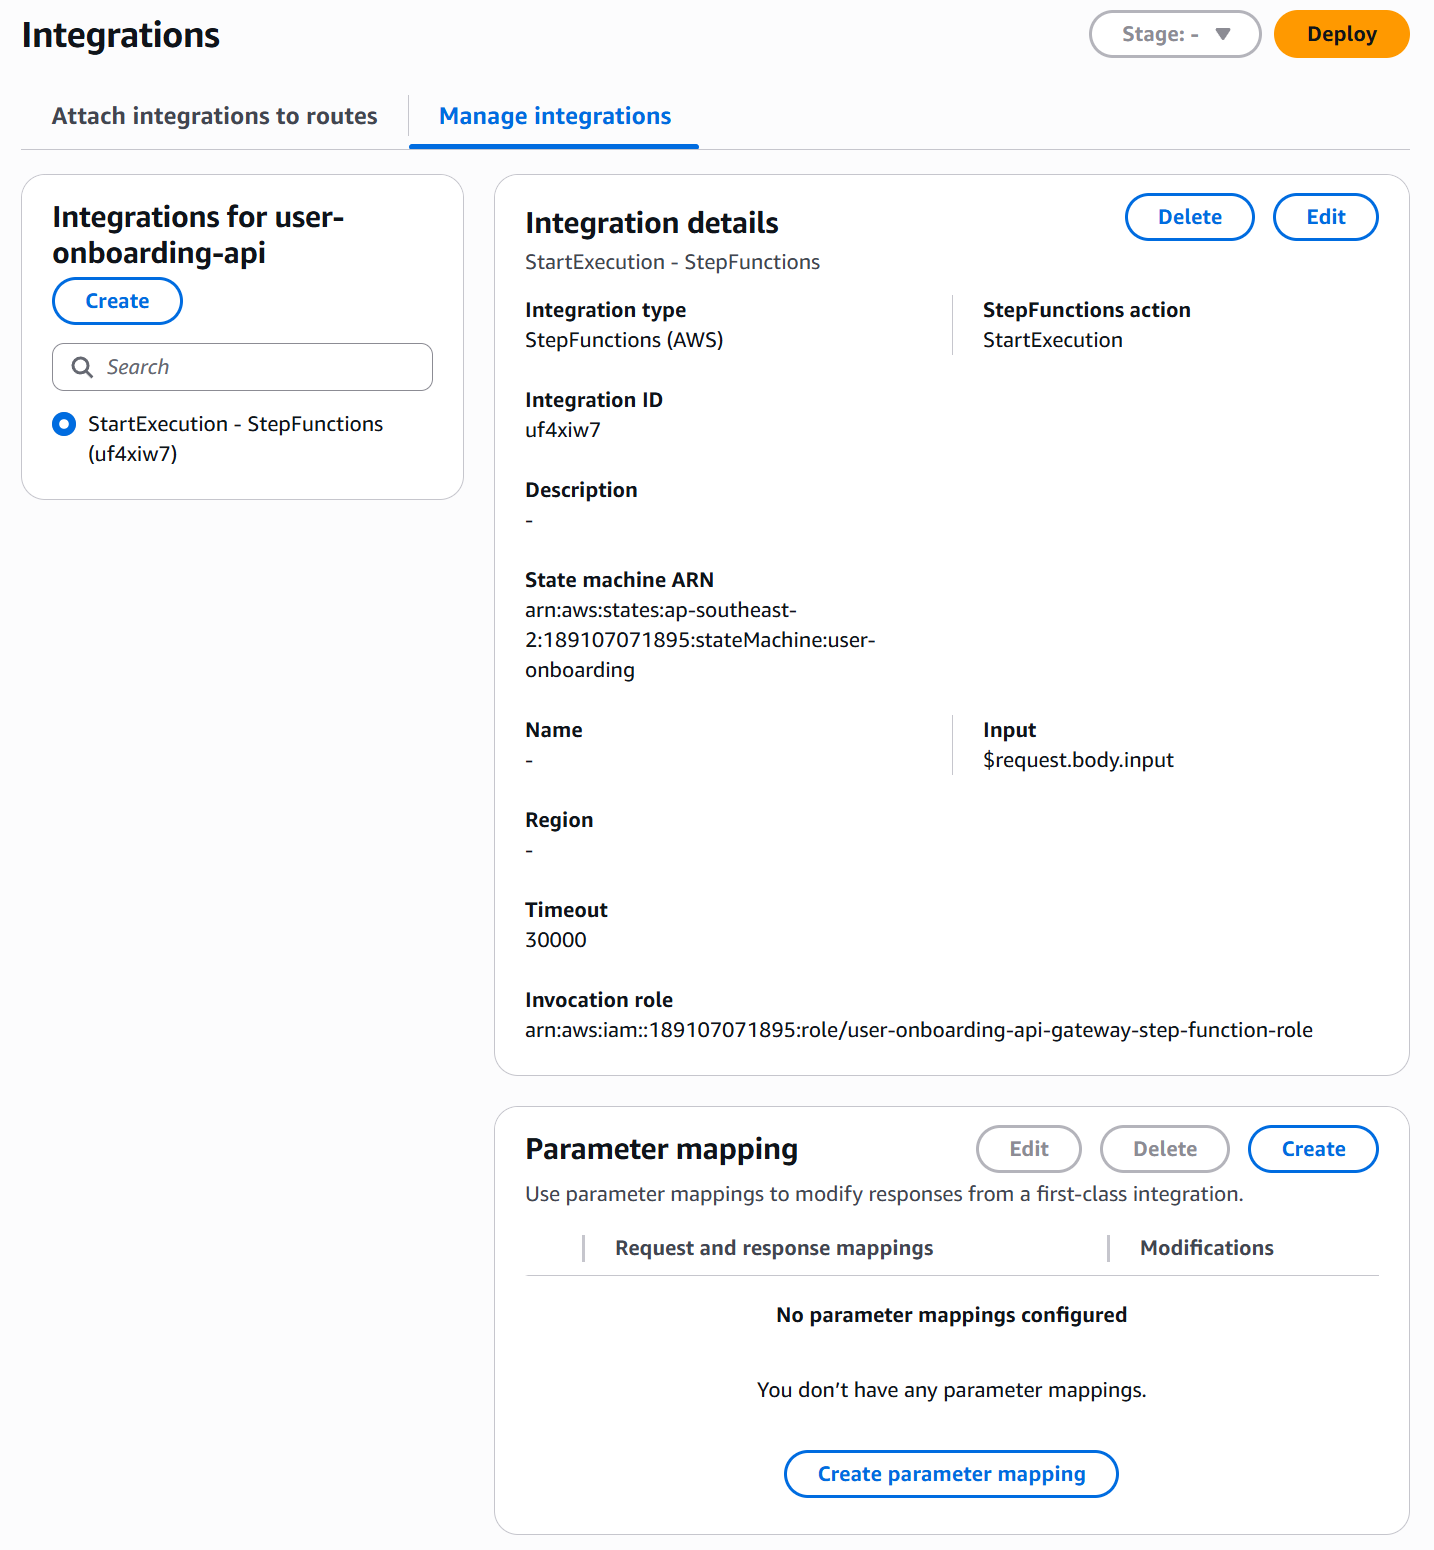
IAM Role for API Gateway
API Gateway needs permission to invoke Step Functions. Create an IAM role named user-onboarding-api-gateway-stepfunctions-role with API Gateway as the trusted service (this automatically includes CloudWatch Logs permissions).
Add an inline policy named InvokeUserOnboardingWorkflow that grants StartExecution and StartSyncExecution actions on your specific state machine ARN.
Back in API Gateway, complete the integration setup:
- Paste the role ARN you just created
- Request transformation: Map the HTTP request body to the workflow input
Use this mapping:
$request.body.input
This tells API Gateway to extract the input property from the request body and pass it to Step Functions.
Click Create.
API Gateway automatically deploys your API. Navigate to Stages to get the invoke URL:
You can use Postman to test it with a POST request.
{"input": {"user": {"userId": "user-88888","email": "api-gateway@example.com","name": "API Gateway User","signupDate": "2025-11-10T10:30:00Z","source": "web","metadata": {"referralCode": "FRIEND2025","country": "US"}}}}
Notice the
inputwrapper. This matches the$request.body.inputmapping we configured.
Check the Step Functions console — you'll see the new execution running!
You've just exposed your Step Functions workflow as an HTTP API without writing any code.