Deploying .NET Applications to EC2 Using AWS CodeDeploy
Learn how to use AWS CodeDeploy to automate deployments of .NET applications to EC2 instances, eliminating manual deployment scripts and supporting multiple instances without code duplication.
AWS CodeDeploy is a deployment service that automates application deployments to Amazon EC2 instances, serverless Lambda functions, or Amazon ECS services.
It scales with your infrastructure, making it easy to deploy to one instance or thousands.
In this post, let's explore AWS CodeDeploy - what it is, how it works, and how to set it up to deploy a .NET API to EC2 instances.
Thanks to AWS for sponsoring this article in my .NET on AWS Series.
The Problem with Manual Deployments
In the previous post, we set up a GitHub Actions workflow to deploy an ASP.NET API directly to EC2 instances.
While this worked, it had a significant limitation: we had to duplicate the deployment steps for each EC2 instance.
Step-by-Step: Setting Up GitHub Actions to Build and Deploy .NET to EC2
The workflow had separate sections for EC2 Instance 1 and EC2 Instance 2. Adding more instances would mean duplicating the code even more - a maintenance nightmare.
This is where AWS CodeDeploy comes into the picture.
What is AWS CodeDeploy?
AWS CodeDeploy automates application deployments to EC2 instances, Lambda functions, and ECS services.
CodeDeploy makes it easier to rapidly release new features, update AWS Lambda function versions, and avoid downtime during application deployment. It handles the complexity of updating your applications without the risks of manual, error-prone deployments.
You can use CodeDeploy to deploy to one instance or thousands of instances.
Key Benefits
- Targets a wide variety of services: EC2 instances, Lambda functions, and ECS
- Automates deployments: No more manual SSH and file copying
- Minimizes downtime: Control how traffic shifts during deployments
- Supports rollbacks: Easy to stop and roll back failed deployments
- Concurrent deployments: Faster deployments when targeting multiple instances
Understanding CodeDeploy Components
Before diving into the setup, let's understand the key concepts in CodeDeploy.
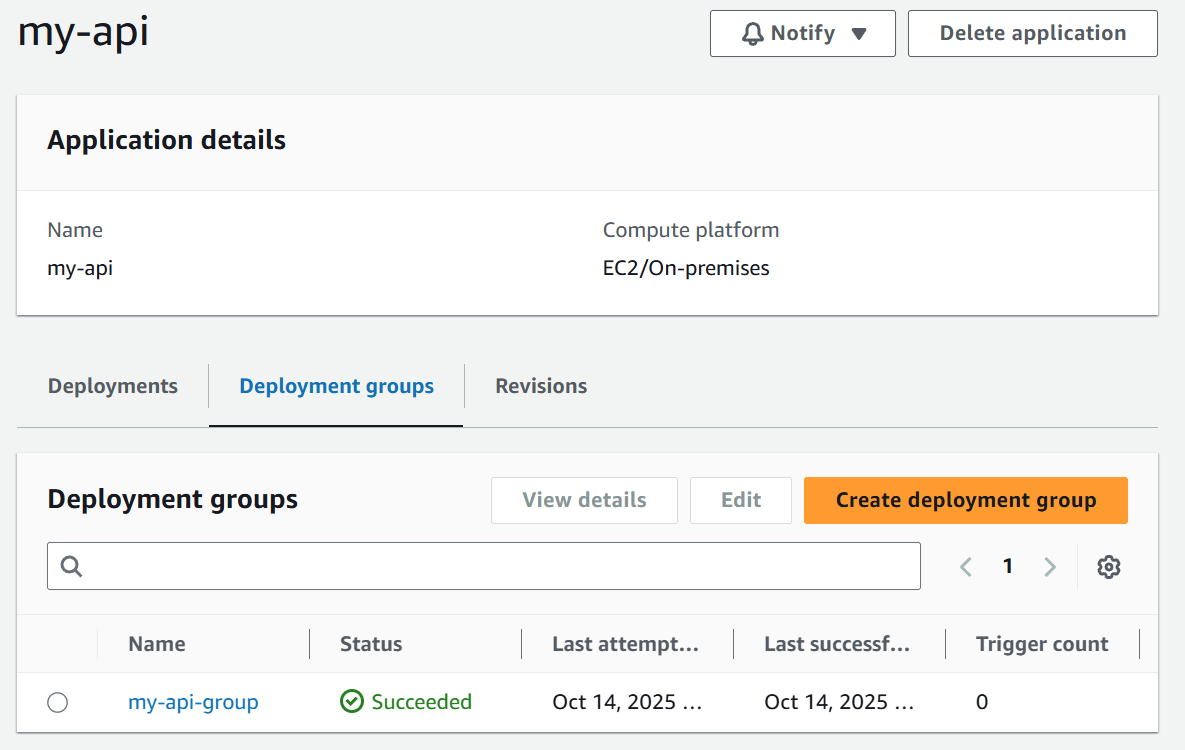
Application
An application in CodeDeploy uniquely identifies the application you want to deploy. In our case, this is the .NET API application.
Compute Platform
The compute platform is the target platform for your deployment. CodeDeploy supports three platforms: EC2/On-Premises, AWS Lambda and Amazon ECS. We'll be using EC2 instances in this post.
Deployment Configuration
The deployment configuration is a set of deployment rules and success/failure conditions used during a deployment.
For EC2 instances, you can specify how traffic is routed:
- Canary: Traffic shifts in two increments
- Linear: Traffic shifts in equal increments with equal time between each
- All at once: All traffic shifts at once
Deployment Group
The deployment group is the set of instances you're deploying to. If your application runs on one EC2 instance, the deployment group consists of one instance. If deploying to multiple instances, it contains all of them.
You can identify instances using tags, Auto Scaling groups, or manual selection.
Deployment Type
The deployment type is the method used to make the latest application available on instances:
- In-place deployment: The application on each instance is stopped, the latest version is installed, and then started again
- Blue/green deployment: Traffic is shifted from one set of instances to a new set running the updated application
We'll use in-place deployment in this post.
Creating the CodeDeploy Application
Let's walk through setting up CodeDeploy for our .NET API application.
Navigate to the AWS Console and search for CodeDeploy. From the left sidebar, go to Applications and click "Create application."
Provide an application name (I used my-api) and select the compute platform. Since we're deploying to EC2 instances, choose EC2/On-Premises.
Click "Create application" to create the CodeDeploy application.
Creating the Service Role
Before creating the deployment group, we need an IAM service role that gives CodeDeploy permissions to access our EC2 instances.
Navigate to IAM → Roles and click "Create role."
- Choose AWS service as the trusted entity type
- Select CodeDeploy from the service list
- Choose CodeDeploy - EC2 (the first option)
The required policy (AWSCodeDeployRole) is automatically attached. This policy grants CodeDeploy the necessary permissions to manage deployments to EC2 instances.
Give the role a name (I used my-api-codedeploy-role) and click "Create role."
Creating the Deployment Group
Back in the CodeDeploy application, create a deployment group.
Click "Create deployment group" and provide:
- Deployment group name:
my-api-group - Service role: Select the IAM role we just created (
my-api-codedeploy-role) - Deployment type: Choose In-place
- Environment configuration: Select Amazon EC2 instances

Select instances using Amazon EC2 Auto Scaling groups, tags, or manual selection.
Additional Configuration
For the deployment settings:
- Install CodeDeploy Agent: Select "Now and schedule updates" - this automatically installs and updates the CodeDeploy agent on your instances
- Deployment configuration: Choose CodeDeployDefault.AllAtOnce for now
- Load balancer: Disable for this demo (we'll cover this in a future post)
Click "Create deployment group" to finish the setup.
Understanding the CodeDeploy AppSpec File
The appspec.yml file is the heart of a CodeDeploy deployment. This YAML file tells CodeDeploy how to deploy your application.
For EC2 deployments, the appspec.yml file must be at the root of your deployment package.
Here's our appspec.yml:
version: 0.0os: linuxfiles:- source: /destination: /home/ec2-user/myapi- source: /myapi.servicedestination: /etc/systemd/system/hooks:BeforeInstall:- location: scripts/stop_service.shtimeout: 180AfterInstall:- location: scripts/set_permissions.shtimeout: 180ApplicationStart:- location: scripts/start_service.shtimeout: 180
Files Section
The files section defines what gets copied and where:
- The entire package (
source: /) goes to/home/ec2-user/myapi - The systemd service file goes to
/etc/systemd/system/
Hooks Section
Hooks are lifecycle events where you can run scripts. CodeDeploy supports many hooks including: ApplicationStop, BeforeInstall, AfterInstall, ApplicationStart, ValidateService.
We're using three hooks:
- BeforeInstall: Stops the existing service and clears the old files
- AfterInstall: Sets proper file permissions
- ApplicationStart: Starts the systemd service
AWS Code Deploy .NET application Deployment Scripts
Let's look at each script:
scripts/stop_service.sh:
#!/bin/bashsudo systemctl stop myapi || truerm -rf /home/ec2-user/myapi/*
Stops the running service and cleans up old files.
scripts/set_permissions.sh:
#!/bin/bashsudo chmod +x /home/ec2-user/myapi/MyApi
Makes the application executable.
scripts/start_service.sh:
#!/bin/bashsudo cp /home/ec2-user/myapi/myapi.service /etc/systemd/system/sudo systemctl daemon-reloadsudo systemctl enable myapisudo systemctl restart myapi
Copies the service file, reloads systemd, enables the service to start on boot, and restarts it.
Updating GitHub Actions Workflow
Now let's update our GitHub Actions workflow to use CodeDeploy instead of manual SSH deployments.
The updated workflow is significantly shorter and cleaner. Instead of duplicating SSH commands for each instance, we:
- Build and publish the .NET application
- Copy necessary files (appspec.yml, service file, scripts) to the publish folder
- Zip the entire package
- Upload the zip to S3
- Trigger a CodeDeploy deployment
Here's the updated deployment section:
- name: Publishworking-directory: srcrun: dotnet publish ${{ env.PROJECT_PATH }} --configuration Release --output ./publish --self-contained true -r linux-x64- name: Prepare deployment packageworking-directory: srcrun: |cp appspec.yml publish/cp MyApi/myapi.service publish/cp -r scripts publish/- name: Zip deployment packageworking-directory: src/publishrun: zip -r ../myapi-deploy.zip .- name: Upload to S3working-directory: srcrun: |aws s3 cp myapi-deploy.zip s3://${{ secrets.CODE_DEPLOY_BUCKET }}/myapi-deploy.zip- name: Create CodeDeploy deploymentrun: |aws deploy create-deployment \--application-name ${{ secrets.CODE_DEPLOY_APP_NAME }} \--deployment-group-name ${{ secrets.CODE_DEPLOY_DEPLOYMENT_GROUP }} \--s3-location bucket=${{ secrets.CODE_DEPLOY_BUCKET }},key=myapi-deploy.zip,bundleType=zip
With everything in place, let's trigger a deployment.
Commit and push your changes to GitHub. This will trigger the GitHub Actions workflow.
Navigate to CodeDeploy in the AWS Console. Under Deployments, you should see a deployment in progress.
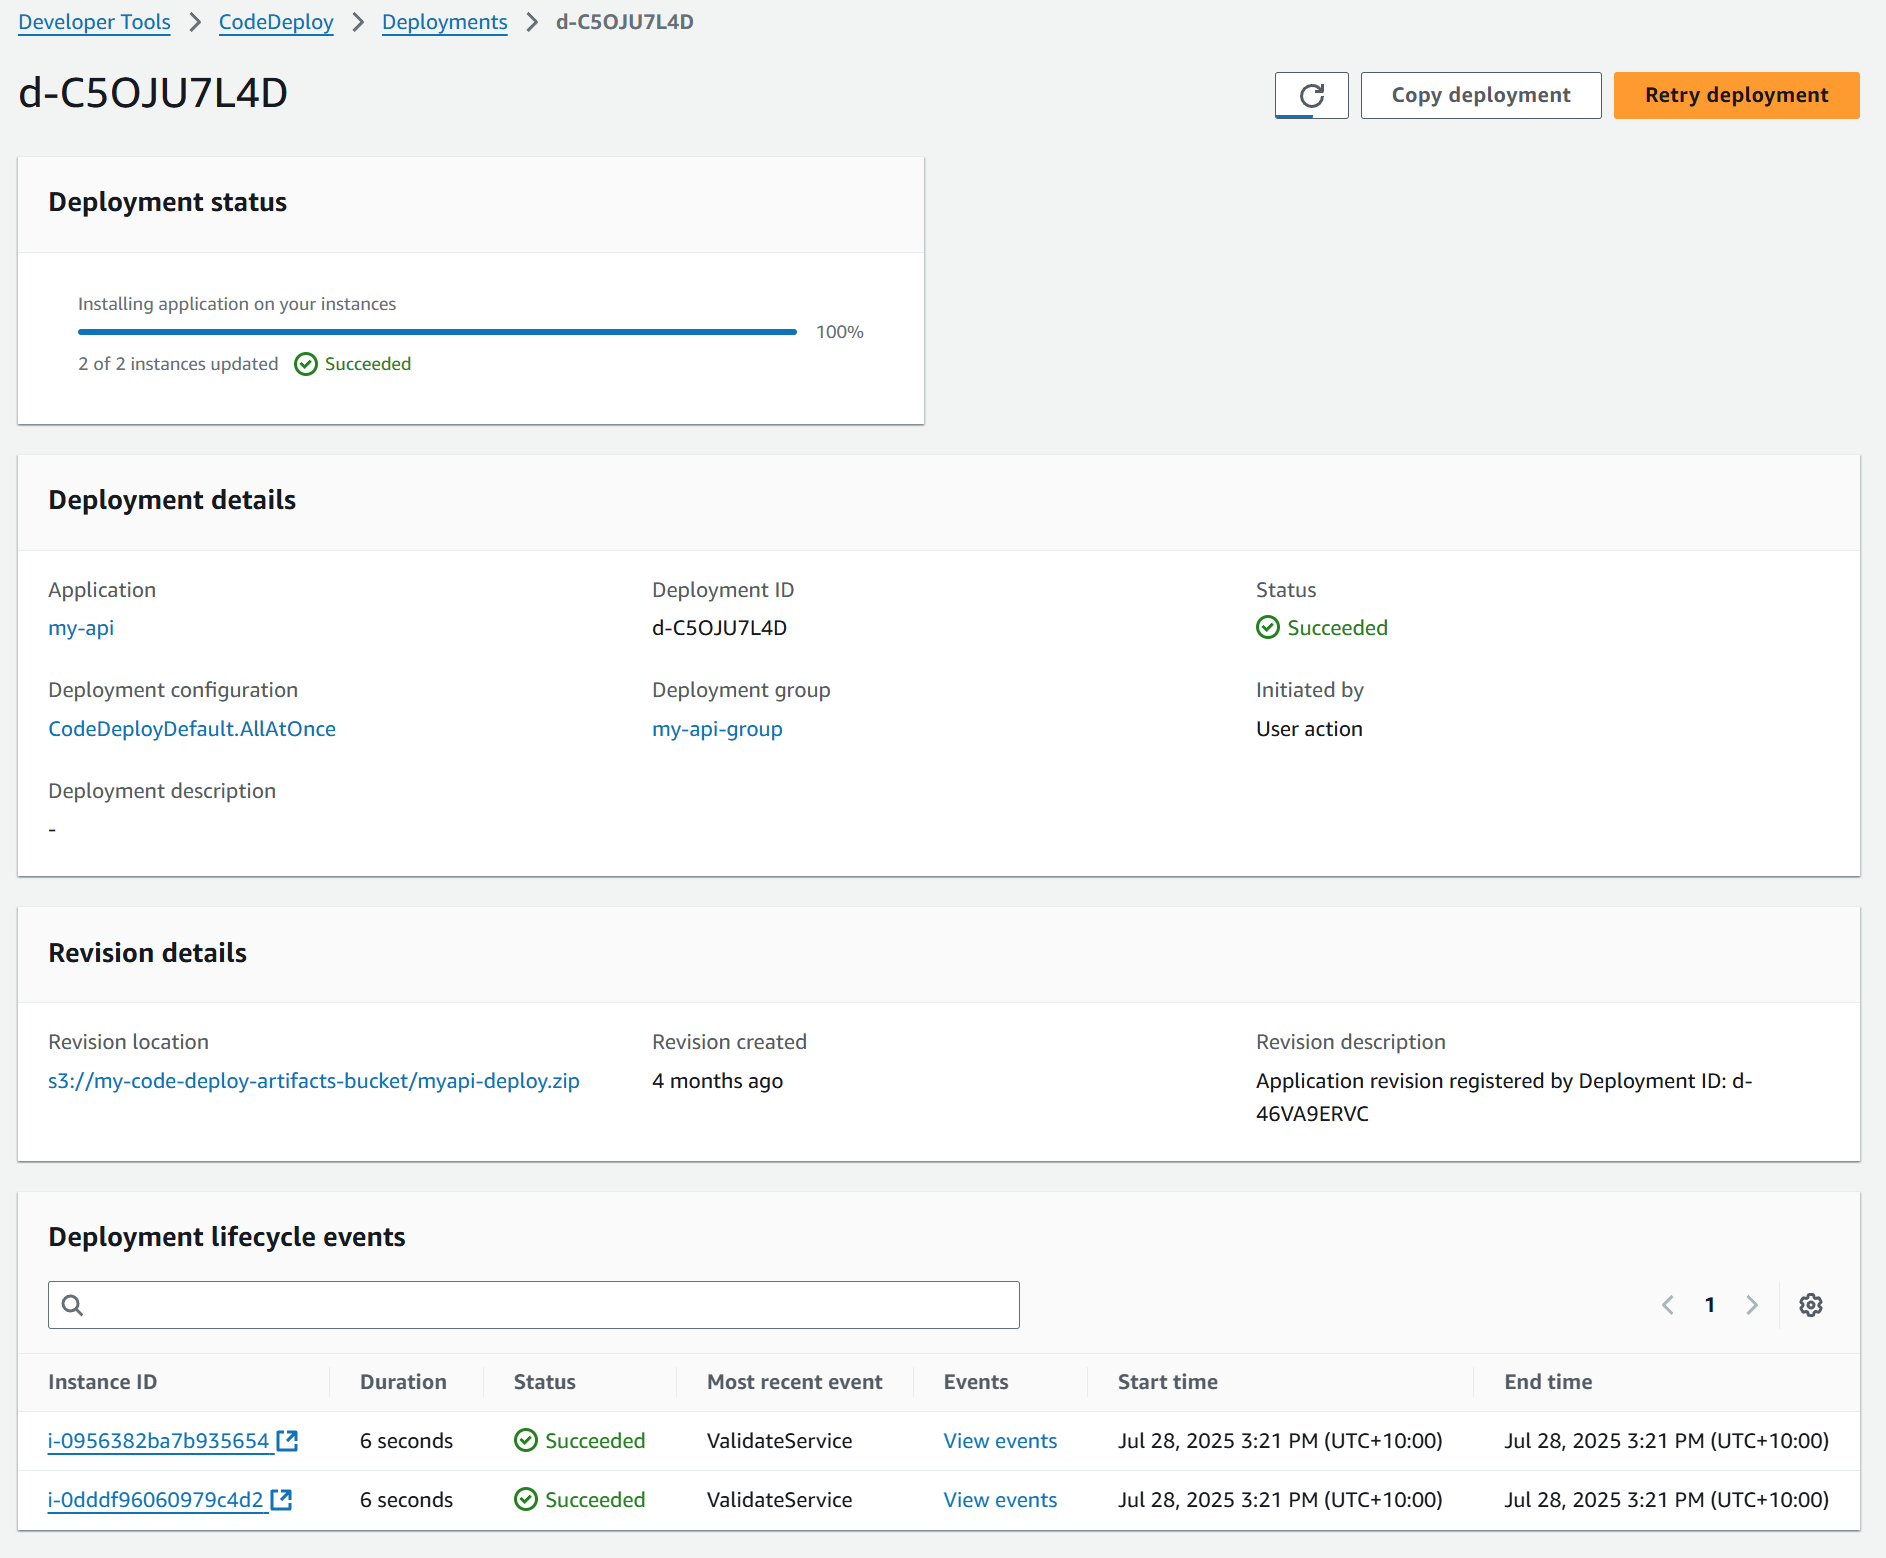
Click on the deployment to see detailed status. You can see Individual instance deployment status, Lifecycle events as they execute, Any errors or failures
Once the deployment succeeds, navigate to your load balancer URL and test the API endpoint. You should see your .NET application responding.
To verify the deployment pipeline, modify the weather summaries in Program.cs, commit and push the change to trigger deployment, then check the updated values appear in your API response.