Customize Amazon Cognito Tokens with Pre Token Generation Lambda Triggers in .NET
Learn how to use Amazon Cognito's Pre Token Generation Lambda Trigger to add custom claims directly to JWT tokens. Eliminate extra UserInfo endpoint calls and improve your ASP.NET Core application performance.
Amazon Cognito lets you customize user pool workflows with Lambda triggers.
One powerful use case is modifying the token before it's issued.
Using the Pre Token Generation trigger, you can add extra claims directly to the token—like custom user attributes or other data your app needs.
This means your ASP.NET Core app does not have to call the UserInfo endpoint every time. Those claims are already in the token, ready to use.
In this post, let's explore how to set up a Pre Token Generation Lambda Trigger and see it in action with an ASP.NET Core application.
This article is sponsored by AWS and is part of my Cognito Series.
The Problem: Extra API Calls for User Info
In a previous post, we saw the different building blocks of ASP.NET Core's policy-based authorization framework and how you can write policies that use Requirements and Requirement handlers.
We also learned how to set up OIDC scopes in Amazon Cognito to request user profile information.
Understanding OpenID Connect Scopes in Amazon Cognito

In that example, we created a custom age requirement handler that needed the user's birthdate. Since the birthdate claim wasn't available in the access token by default, our handler had to make an additional call to the UserInfo endpoint to get these details.
private async Task<DateTime?> GetUserBirthdateAsync(HttpContext httpContext){var authorizationHeader = httpContext.Request.Headers["Authorization"].ToString();if (string.IsNullOrWhiteSpace(authorizationHeader))return null;var userInfoEndpoint =$"{_configuration["JwtBearer:UserPoolDomain"]}/oauth2/userInfo";var client = _httpClientFactory.CreateClient();client.DefaultRequestHeaders.TryAddWithoutValidation("Authorization", authorizationHeader);var userInfo = await client.GetFromJsonAsync<CognitoUserInfo>(userInfoEndpoint);if (userInfo?.Birthdate == null)return null;if (DateTime.TryParse(userInfo.Birthdate, out var dob))return dob;return null;}
This approach works, but every time the requirement handler runs, we make an additional HTTP call to the UserInfo endpoint.
That adds latency and consumes network resources unnecessarily.
Let's see how we can add the birthdate claim directly to the access token so we don't need to make that extra call.
Amazon Cognito User Pool Workflow and Lambda Triggers
Amazon Cognito User Pools let you attach Lambda functions at multiple points in the sign-up and sign-in lifecycle.
Each one is a separate "hook" into that flow, so you can run custom logic before or after key events—things like user registration, authentication, token generation, and more.
What we're interested in is the Pre Token Generation Lambda Trigger.
This trigger is invoked right before the token is generated, which means we can influence what gets included in the token.
Pre Token Generation Trigger Versions
Cognito supports different versions of the Lambda trigger, and each version has its own capabilities:
- v1.0 - Allows customizing only the ID token
- v2.0 - Allows customizing both ID token and access token (requires Essentials or Plus feature plan)
- v3.0 - Required for machine-to-machine client grants flow
Since we want to modify the access token, we need to use v2.0 and be on the appropriate Cognito feature plan.
Lambda Request and Response Structure
The Lambda function receives an event object with the following structure:
{"request": {"userAttributes": {"sub": "user-id-here","email": "user@example.com","birthdate": "2009-05-01","name": "John Doe"},"groupConfiguration": { ... }},"response": {"claimsAndScopeOverrideDetails": {"idTokenGeneration": { ... },"accessTokenGeneration": {"claimsToAddOrOverride": {}}}}}
The request section contains all the user attributes and claims that are already available. The response section is what we need to modify.
To add claims to the access token, we need to populate response.claimsAndScopeOverrideDetails.accessTokenGeneration.claimsToAddOrOverride. In our case, we want to add the birthdate claim from request.userAttributes.birthdate to the access token.
Creating the Cognito Pre-Token Generator Lambda Function
Let's create a Lambda function to hook into the token generation workflow and add the birthdate claim to the access token.
If you're completely new to AWS Lambda, I highly recommend checking out my AWS Lambda series on this blog.
Open Visual Studio (or your preferred IDE with the AWS Toolkit) and create a new AWS Lambda project. Choose the Empty Function blueprint.
Here's the Lambda function handler that modifies the token:
public JsonNode FunctionHandler(JsonNode evnt, ILambdaContext context){try{context.Logger.LogLine("Incoming event: " + evnt.ToJsonString());// Navigate to response → claimsAndScopeOverrideDetails → accessTokenGenerationvar response = evnt["response"] ??= new JsonObject();var claimsScope = response["claimsAndScopeOverrideDetails"] ??= new JsonObject();var accessTokenGen = claimsScope["accessTokenGeneration"] ??= new JsonObject();accessTokenGen["claimsToAddOrOverride"] ??= new JsonObject();// Get birthdate from request.userAttributesvar birthdate = evnt["request"]?["userAttributes"]?["birthdate"]?.ToString();if (!string.IsNullOrEmpty(birthdate)){((JsonObject)accessTokenGen["claimsToAddOrOverride"])["birthdate"] = birthdate;context.Logger.LogLine($"Added birthdate claim: {birthdate}");}}catch (Exception ex){context.Logger.LogError(ex, "Error processing event");}return evnt;}
Let's break down what this code does:
- Logs the incoming event - Useful for debugging and understanding the request structure (only for testing purposes - make sure to not log PII information)
- Navigates the response object - Creates the nested structure if it doesn't exist (
??=operator) - Extracts the birthdate - Gets the value from
request.userAttributes.birthdate - Adds to access token - Inserts the birthdate into
claimsToAddOrOverride - Returns the modified event - Cognito uses this to generate the token
You can write a custom C# class for the request/response if you need stronger typing. However, I found using JsonNode to be simpler for this use case since we don't need to map all the unnecessary properties.
If you're doing more advanced manipulation with these request/response objects, creating custom classes would be beneficial.
Deploy the function to your AWS account with the AWSLambdaBasicExecutionRole.
In a real-world application, you would set up a build-deploy pipeline to automate this. I have covered that in my AWS series.
Once deployed, navigate to the AWS Console → Lambda to see your new function.
Wiring Up the Lambda Trigger in Cognito
Now that we have the Lambda function deployed, let's connect it to our Cognito User Pool.
Navigate to Amazon Cognito in the AWS Console and select your user pool.
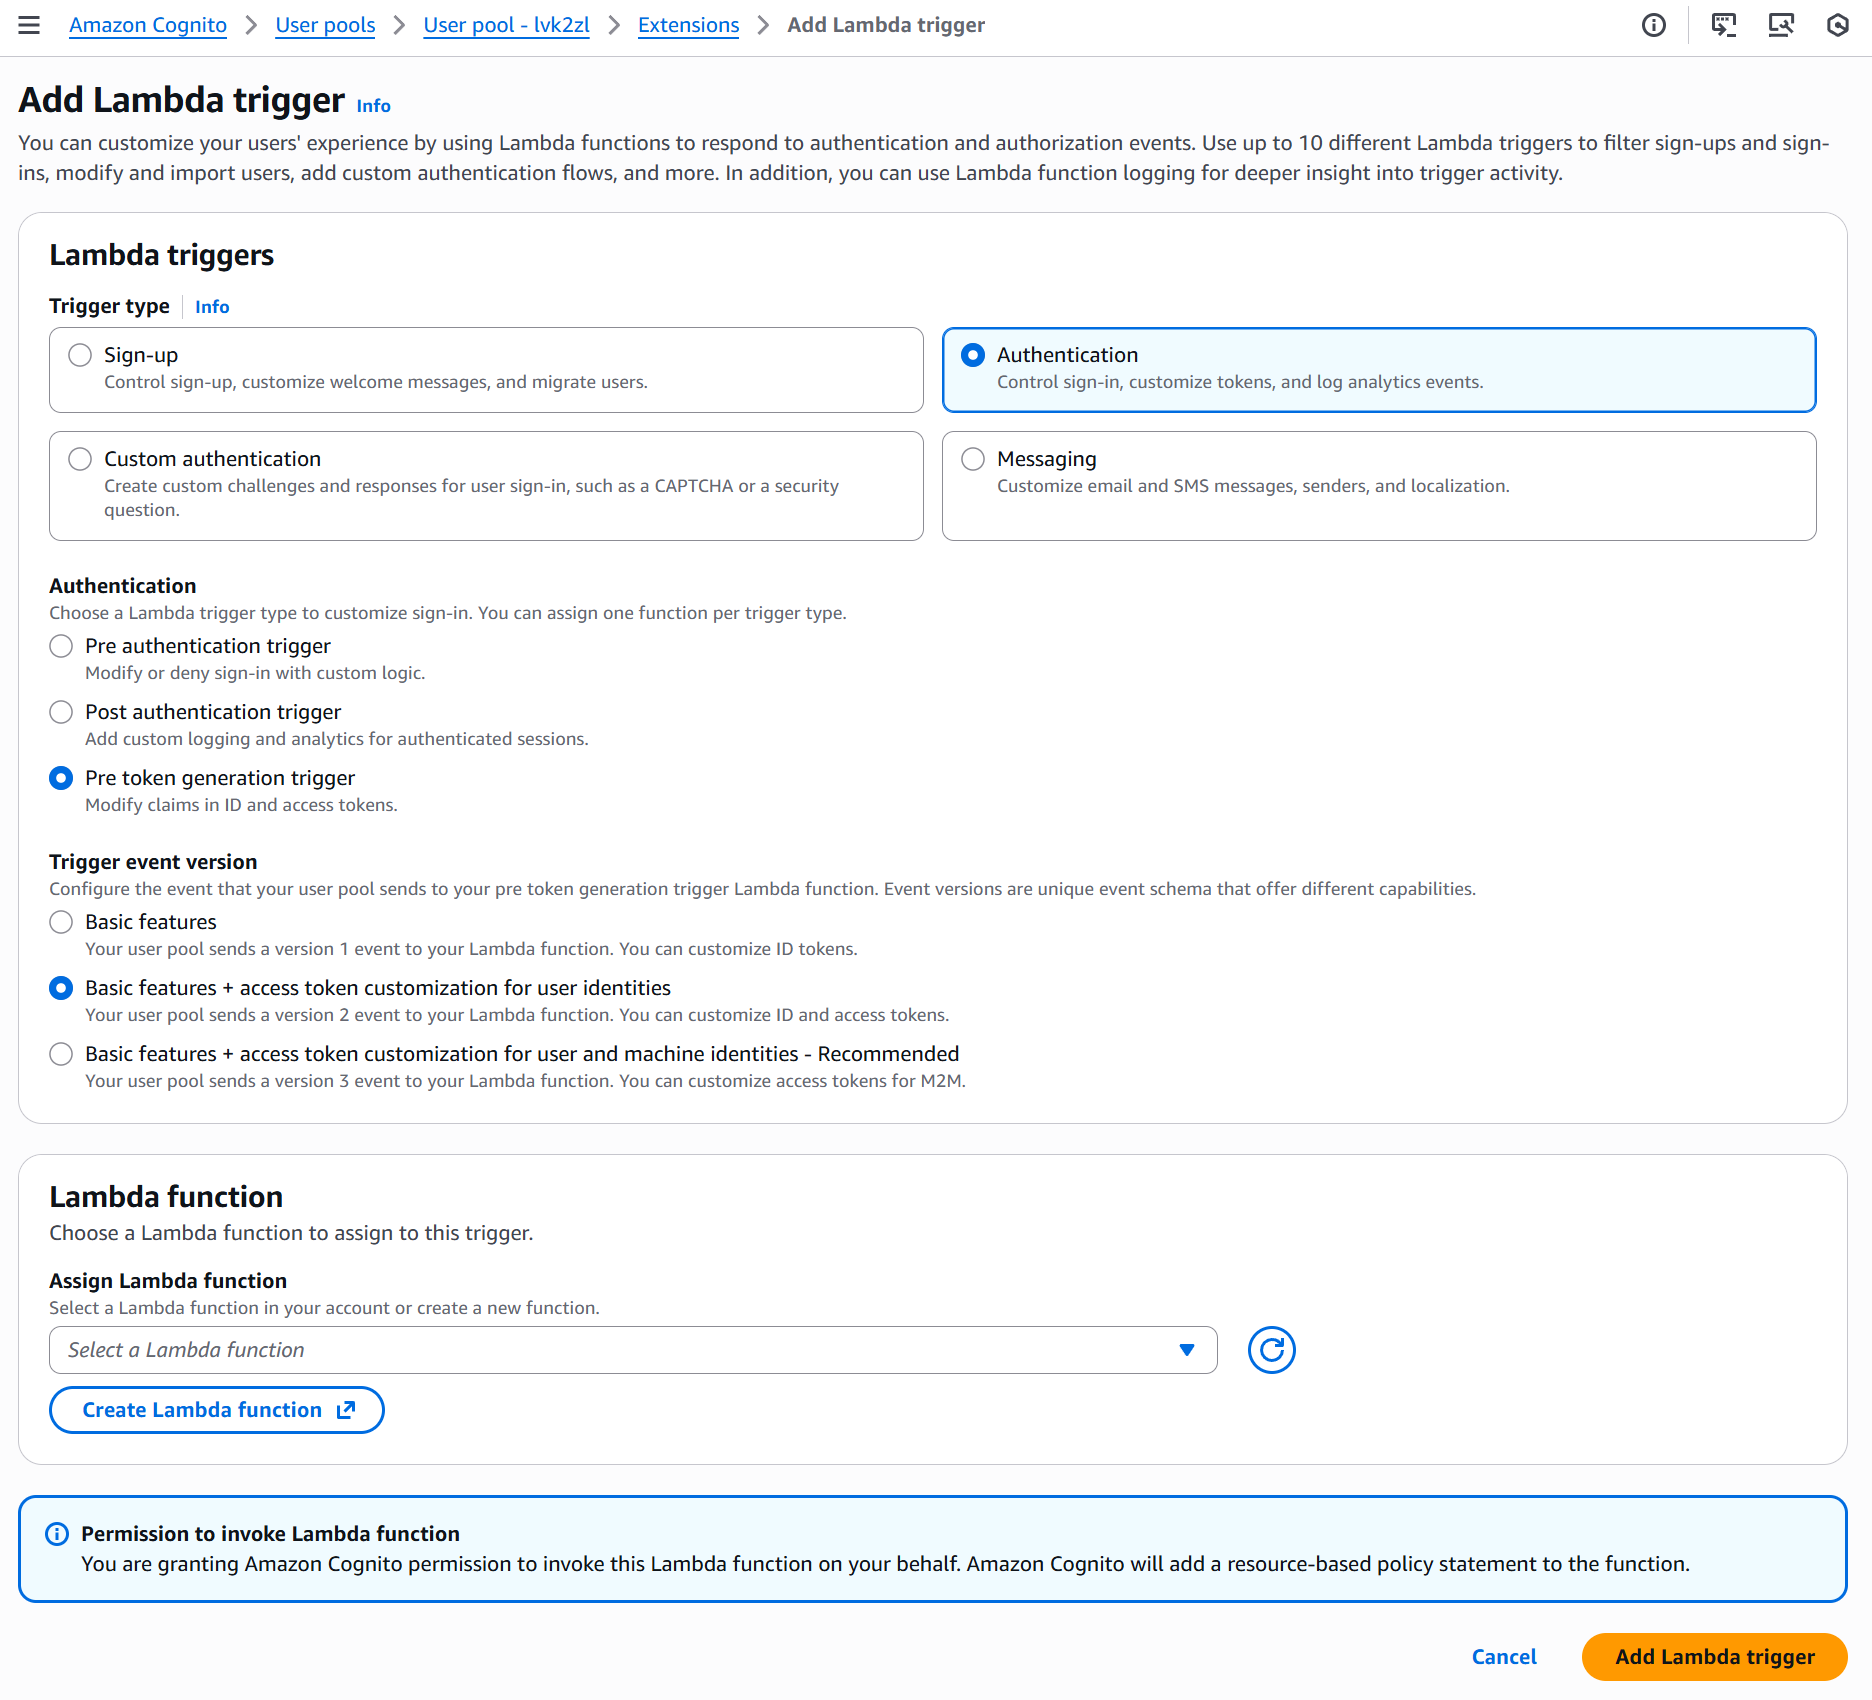
Go to the User pool properties tab and scroll down to Extensions. Click Add Lambda trigger.
Configuring the Trigger
- Trigger type: Select Authentication
- Authentication: Choose Pre token generation trigger
- Trigger version: Select Pre token generation V2.0 (required for access token customization)
- Assign Lambda function: Choose the
cognito-pre-token-genfunction we just created
Click Add Lambda trigger.
This automatically adds the required resource-based policy statement to your Lambda function, allowing Cognito to invoke it.
You can verify this by going to your Lambda function → Configuration → Permissions → Resource-based policy statements. You'll see a new policy allowing cognito-idp.amazonaws.com to invoke the function.
Testing the Lambda Trigger
Let's test that the Lambda trigger is working and adding the birthdate claim to the access token.
Navigate to your Cognito app client and open the Hosted UI login page.
Log in with your test user credentials (make sure the user has a birthdate attribute set in the user pool).
Take the access_token from the token response and paste it into jwt.io.
You should now see the birthdate claim in the access token payload:
{"sub": "user-id-here","cognito:groups": ["Admin"],"iss": "https://cognito-idp.region.amazonaws.com/poolId","version": 2,"client_id": "your-client-id","scope": "openid email profile","birthdate": "2009-05-01","exp": 1234567890,"iat": 1234567890,"jti": "token-id"}
Previously, the birthdate claim was only available in the ID token or by calling the UserInfo endpoint. Now it's directly in the access token!
Updating the ASP.NET Core Application
Now that the birthdate claim is in the access token, let's update our ASP.NET Core application to use it directly instead of calling the UserInfo endpoint.
Navigate to the AgeRequirementHandler class where we were previously making the UserInfo call.
protected override async Task HandleRequirementAsync(AuthorizationHandlerContext context,AgeRequirement requirement){try{// Get birthdate directly from the token claimsvar birthdateClaim = context.User?.FindFirst(ClaimTypes.DateOfBirth)?.Value;if (!string.IsNullOrWhiteSpace(birthdateClaim) &&DateTime.TryParse(birthdateClaim, out var birthdate)){var age = CalculateAge(birthdate, DateTime.UtcNow.Date);if (age >= requirement.MinimumAge){context.Succeed(requirement);}}}catch (Exception ex){// Log error if neededConsole.Error.WriteLine($"Error in AgeRequirementHandler: {ex}");}}
We've completely removed the GetUserBirthdateAsync method and the HTTP call to the UserInfo endpoint. Instead, we're reading the birthdate claim directly from context.User.
Since the claim is now in the access token, it's automatically available in the ClaimsPrincipal after JWT validation.
Adding Custom Attributes
You can add any attribute from the user's profile to the token, not just standard OIDC claims.
If you have custom attributes in your Cognito User Pool, you can extract them from request.userAttributes and add them to the access token the same way:
var customAttribute = evnt["request"]?["userAttributes"]?["custom:department"]?.ToString();if (!string.IsNullOrEmpty(customAttribute)){((JsonObject)accessTokenGen["claimsToAddOrOverride"])["department"] = customAttribute;}
In a future article, I'll show you how to enable custom user attributes in Amazon Cognito and use them from your .NET applications.
👉 Full source code available here