Adding Custom Attributes to Amazon Cognito User Pools for .NET Applications
Learn how to add custom attributes like subscription tiers or organization IDs to Amazon Cognito user pools. We'll explore how to create custom attributes, make them available as token claims, and control access per app client in your .NET applications.
Amazon Cognito gives us a set of standard attributes like name, email, and phone number out of the box.
But what if your application needs something more—like a subscription tier, organization ID, or any business-specific field?
That's where custom attributes come in.
In this post, let's explore how to:
- Add custom attributes to your Cognito user pool
- Make them available as token claims
- Control attribute access per app client
- Use custom attributes in ASP.NET Core authorization
Thanks to AWS for sponsoring this article in my Cognito Series.
Custom Attributes in Amazon Cognito
With custom attributes in Amazon Cognito, you can add up to 50 custom attributes to your user pool.
However, there are important constraints to be aware of:
- Cannot be removed - Once added, custom attributes cannot be deleted
- Cannot be renamed - The attribute name is permanent
- Mutability options - Can be set as mutable or immutable
- Immutable - Value cannot change after user creation
- Mutable - Value can be updated throughout the user's lifetime
For most business scenarios, you'll want mutable attributes so users can move between subscription tiers, change organizations, or update other business-specific data.
Adding Custom Attributes in AWS Console
Let's add a custom attribute to track subscription tiers for users of a weather API service.
Navigate to the AWS Console and open your Cognito user pool.
Creating a Custom Attribute
Navigate to Cognito User Pool, Click on the Sign-up tab. Scroll to the Custom attributes section and Click Add custom attribute.
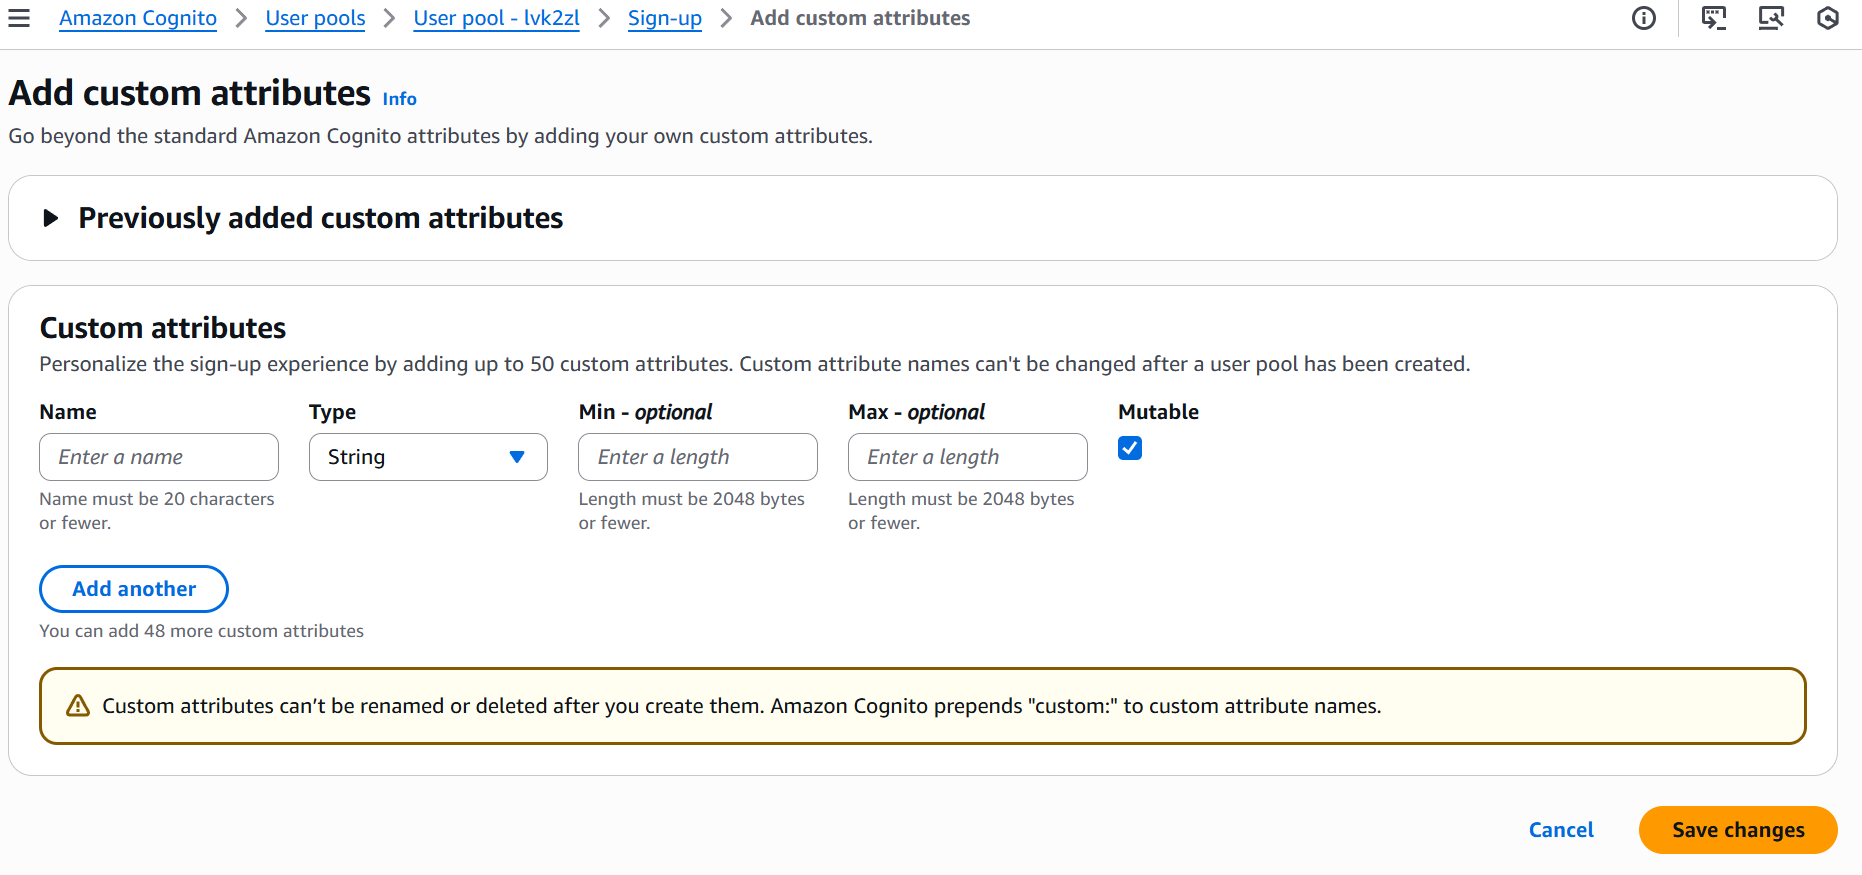
Configure the custom attribute:
- Attribute name:
subscription(will becomecustom:subscription) - Type: String
- Min/Max length: Leave as optional (defaults to max 48 characters)
- Mutable: Yes (users can change subscription tiers)
The UI supports string and number types. However, according to the AWS documentation, you can also use boolean and datetime types if you create them via the API.
Cognito writes all claim values as strings, regardless of the type you specify.
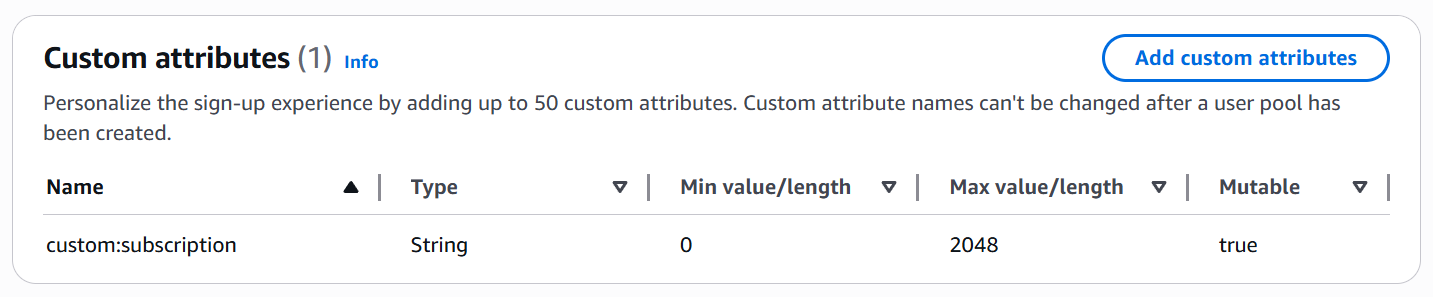
Click Save changes to create the attribute.
This creates a new attribute named custom:subscription in your user pool. The custom: prefix is automatically added to distinguish custom attributes from standard ones.
Adding Cognito Custom Attributes to Users
With the custom attribute created, let's assign a value to an existing user.
Navigate to Users in your user pool and select a user.
Click Edit, Click Add attribute. Select custom:subscription from the dropdown, Enter a value (e.g., premium, free, basic) and Click Save changes
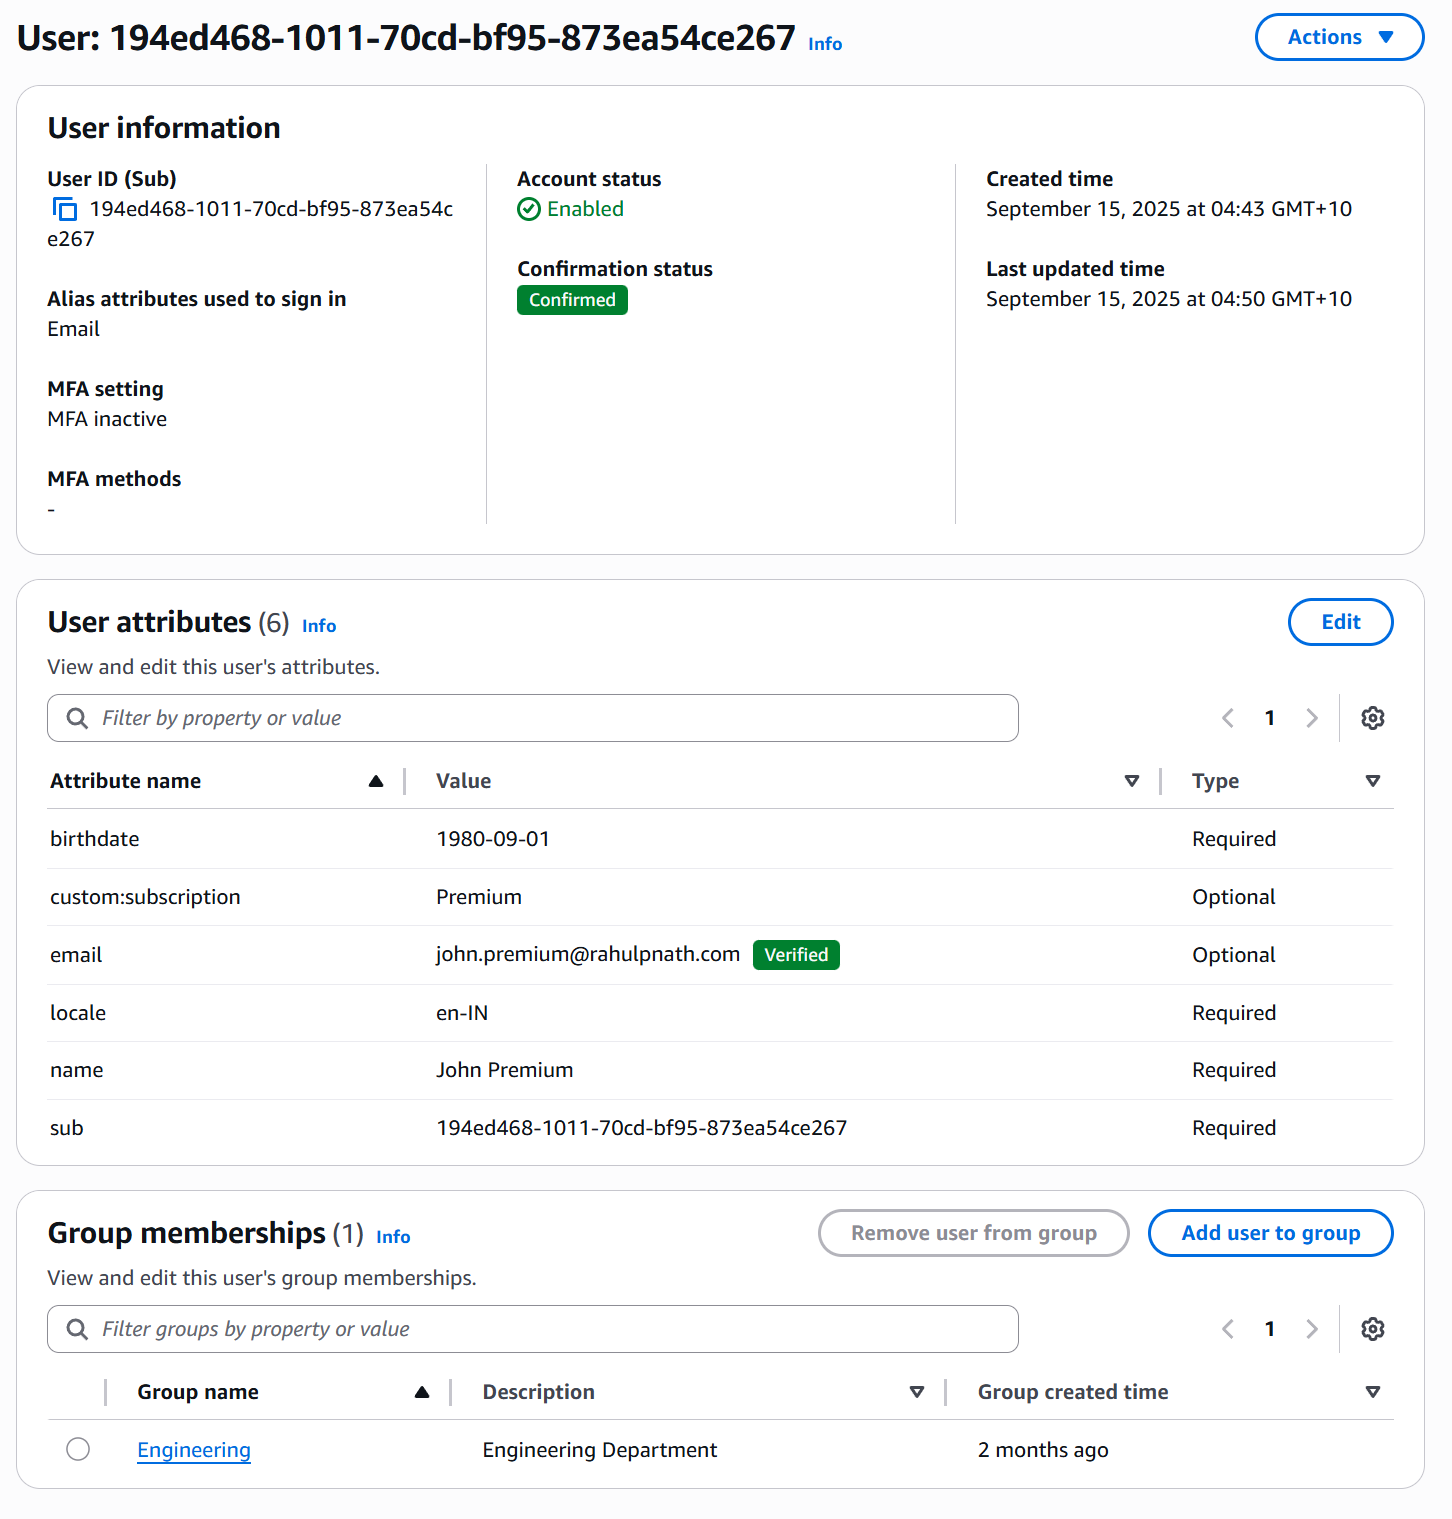
The custom attribute is now associated with that user.
Custom Attributes in ID Tokens (with Profile Scope)
By default, custom attributes are automatically included in the ID token when you use the profile scope during authentication.
Understanding OpenID Connect Scopes in Amazon Cognito

Navigate to your app client in the Cognito console and click View Hosted UI Make sure the authorization URL includes the profile scope:
https://your-domain.auth.region.amazoncognito.com/oauth2/authorize?response_type=code&client_id=YOUR_CLIENT_ID&redirect_uri=YOUR_REDIRECT_URI&scope=openid+email+profile
Log in with the user that has the custom subscription attribute set.
After successful authentication, exchange the authorization code for tokens. Copy the id_token from the response and paste it into jwt.io.
You'll see the custom attribute in the token payload:
{"sub": "user-id-here","email": "user@example.com","email_verified": true,"name": "John Doe","custom:subscription": "premium","cognito:username": "user@example.com","iss": "https://cognito-idp.region.amazonaws.com/poolId","exp": 1234567890}
The custom:subscription claim is automatically included because we used the profile scope.
Adding Amazon Cognito Custom Attributes in Access Tokens
An important limitation: custom attributes appear in the ID token, not the access token.
If you inspect the access_token from the same authentication flow (even with the profile scope), you won't find the custom:subscription claim.
For applications that need custom attributes in the access token (for API authorization, for example), we need to use a Lambda trigger to inject them.
To make custom attributes available in the access token, we'll use the Pre Token Generation Lambda Trigger that we covered in a previous post.
Customize Amazon Cognito Tokens with Pre Token Generation Lambda Triggers

Let's modify the Lambda function we created previously to also inject the custom:subscription attribute.
Updating the Cognito Pre Token Generation Lambda Function
Open your Lambda function in Visual Studio (or your preferred IDE).
Here's the updated FunctionHandler method that adds both the birthdate and subscription claims:
public JsonNode FunctionHandler(JsonNode evnt, ILambdaContext context){try{context.Logger.LogLine("Incoming event: " + evnt.ToJsonString());var response = evnt["response"] ??= new JsonObject();...// Add subscription claimvar subscription = evnt["request"]?["userAttributes"]?["custom:subscription"]?.ToString();if (!string.IsNullOrEmpty(subscription)){((JsonObject)accessTokenGen["claimsToAddOrOverride"])["subscription"] = subscription;context.Logger.LogLine($"Added subscription claim: {subscription}");}}...}
The key changes:
- Extract the custom attribute - Read
custom:subscriptionfromrequest.userAttributes - Add to access token - Insert it into
claimsToAddOrOverrideassubscription(without thecustom:prefix)
Deploy the updated Lambda function. Login and retrieve a new token, which will now have the subscription claim in it.
Controlling Attribute Access Per App Client
Amazon Cognito lets you control which app clients can read or write specific attributes.
This is useful when you have multiple applications accessing the same user pool but with different permission levels.
Navigate to your app client in the Cognito console and go to Attribute read and write permissions.

You can control which atrributes the app clients can Read (access in tokens) or Write (update values) here.
Using Cognito Custom Attributes in ASP NET Authorization Policy
Now that the custom attribute is in the access token, let's use it for authorization in ASP.NET Core.
Since the subscription claim is now in the access token, it's automatically available in the ClaimsPrincipal after JWT validation.
Create a requirement and handler that reads the subscription claim:
public class SubscriptionRequirement : IAuthorizationRequirement{public string RequiredTier { get; }public SubscriptionRequirement(string requiredTier) => RequiredTier = requiredTier;}public class SubscriptionRequirementHandler: AuthorizationHandler<SubscriptionRequirement>{protected override Task HandleRequirementAsync(AuthorizationHandlerContext context,SubscriptionRequirement requirement){var subscriptionClaim = context.User?.FindFirst("subscription")?.Value;if (subscriptionClaim == requirement.RequiredTier)context.Succeed(requirement);return Task.CompletedTask;}}// Program.csbuilder.Services.AddAuthorization(options =>{options.AddPolicy("PremiumOnly", policy =>{policy.RequireAuthenticatedUser();policy.Requirements.Add(new SubscriptionRequirement("premium"));});});builder.Services.AddSingleton<IAuthorizationHandler, SubscriptionRequirementHandler>();// Endpointapp.MapGet("/premium-weather", [Authorize(Policy = "PremiumOnly")] () =>{return Results.Ok(new { forecast = "Detailed 10-day forecast" });});
Users with subscription: "premium" get 200 OK, others get 403 Forbidden.
👉 Full source code available here